Data Execution Prevention (DEP) is a memory protection feature in Windows. It keeps a check and protects a few regions of memory and helps prevent them from executing the malicious code. In turn, it can help prevent damage to your computer from viruses and other security threats. It prevents code from being run from the default heap, stacks, and memory pools. If an application tries to execute or run the code from a protected page, that application receives an exception error with a status code. DEP being helpful, sometimes is also problematic when it does not work as expected. DEP is well-established in 64-bit programs. Most programs that cause problems with DEP will be 32-bit programs. In this article let us see how to enable or disable the DEP feature in Windows.
Disable DEP (Data Execution Prevention) For Programs That You Have Selected
Step 1: Open Windows Explorer (File Explorer) using Windows + E keys together
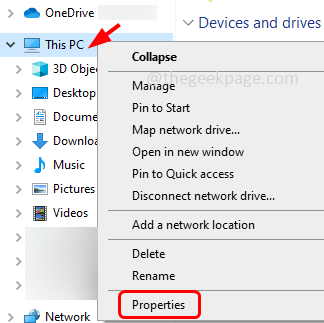
Step 2: On the left side, right-click on This PC
Step 3: From the appeared list click on Properties
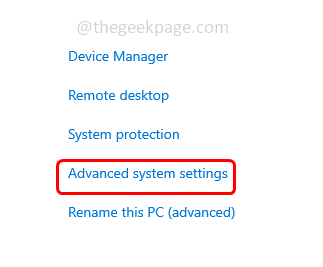
Step 4: In the opened settings window, on the right side click on Advanced system settings
Step 5: There opens the system properties window. Go to the Advanced tab
Step 6: Under the performance section, click on the settings button
Step 7: In the performance options window, go to the data execution prevention tab
Step 8: To turn on DEP for windows services and programs, click on the radio button beside it
Step 9: To turn on DEP for all programs except a few selected, click on the radio button beside Turn on DEP for all programs except those that I select
Step 10: The Add button will be enabled, click on it
Step 11: In the look in drop down, select Local Disk (C:) that is C drive
Step 12: Double click on Program files (whichever path you have an program to add)
Step 13: You can scroll and select the needed programs of your choice. Click on the programs executable files and click on open. For example here I have selected 7-zip application as an exception. When the settings is applied, 7-zip will run outside of DEP protection while all others will run within DEP protection.
Step 14: The selected programs will be listed in the performance options window
Step 15: If you want another program to be added in the exception list, then again click on Add and follow the same steps [step 11-14]
Step 16: Click on apply and then ok
Step 17: Restart your computer and the DEP is turned on / enabled for the programs.
Note: The below mentioned methods should only be used during troubleshooting or debugging
Disable Or Turn Off DEP (Data Execution Prevention) Completely
Step 1: Open the command prompt as an administrator. To do that, type cmd in the windows search bar then hold Ctrl + Shift keys together and hit enter
Step 2: A user account control window will open click on yes
Step 3: In the command prompt type the following command and hit enter
bcdedit.exe /set {current} nx AlwaysOff
Step 4: Restart your computer and the DEP will be disabled for all programs.
Enable Or Turn On DEP (Data Execution Prevention)
Step 1: Open the command prompt as an administrator. To do that, type cmd in the windows search bar then hold Ctrl + Shift keys together and hit enter
Step 2: A user account control window will open click on yes
Step 3: In the command prompt type the following command and hit enter
bcdedit.exe /set {current} nx AlwaysOn
Step 4: Restart your computer and the DEP will be enabled for all the programs.
Note: Once the DEP is set to always on or always off then it cannot be changed using the Data Execution Prevention tab in system settings. So let us see how to bring the radio buttons back in the DEP tab and can be used again
Set DEP To Its Default Behaviour (Manageable Using System Settings)
Step 1: Open the command prompt as an administrator. To do that, type cmd in the windows search bar then hold Ctrl + Shift keys together and hit enter
Step 2: A user account control window will open click on yes
Step 3: In the command prompt type the following command and hit enter
bcdedit.exe /set {current} nx OptIn
Step 4: Restart your computer and the radio buttons in the DEP tab will be accessible again.
For Info:
bcdedit.exe is the primary tool for editing the boot configuration data.
/set command sets a boot entry option value in the Windows boot configuration data.
{current} The identifier for the current boot entry is {current} that tells bcdedit to work with the boot configuration being used right at the moment.
nx is the short form of no-execute and is the setting name for DEP in the boot configuration.
OptIn Enables DEP only for operating system components.
AlwaysOff Disables DEP.
AlwaysOn Enables DEP for the operating system and all processes.
That’s it! I hope the above information is useful and easily understandable. Thank you!!


