Razer Synapse tool lets you take control of the lighting effects of your Razer mouse, keyboard, and various other Razer components you have. But, what if this Razer Synapse fails to start up or crashes on startup? Well, one of the solutions you can try is to uninstall all the Razer drivers and reinstall them. So, if Razer Synapse 3 isn’t working on your system, go follow these easy steps.
Workarounds –
1. If you have just a Razer keyboard, try plugging it into another USB port, preferably into any of the ports on the back. Then, relaunch Synapse and check.
2. Disable any antivirus you are using.
Fix 1 – Uninstall and reinstall Razer devices
Uninstall and reinstall the Razer devices from your system. This will make Razer Synapse detect them again.
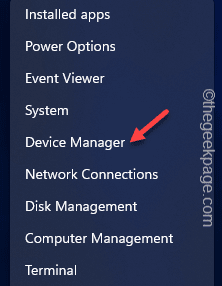
1. At first, you have to press the Win key+X keys together.
2. This will open up the power user menu. There, tap “Device Manager” to open it.
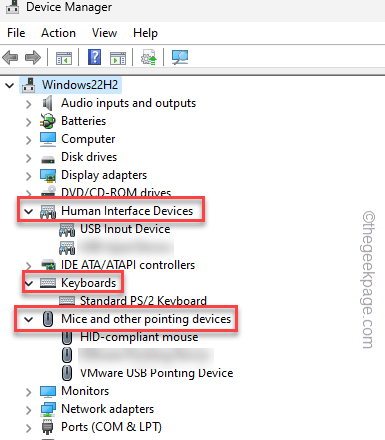
3. Now, if you have a Razer keyboard plugged in, expand the “Keyboard” area.
4. Otherwise, if you have a Razer DeathAdder or Basilisk mouse, expand the “Mouse and other pointing devices” section.
5. Additionally, you have to click once on “Human Interface Devices“.
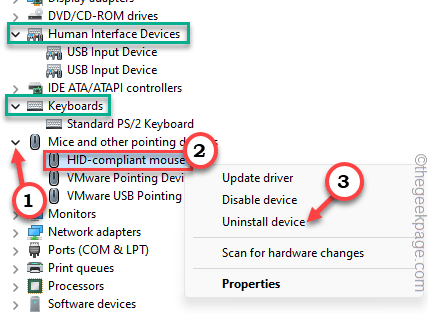
6. Now, look for your Razer devices here in all these three sections.
7. Once you have identified them, right-tap each of them once and tap “Uninstall device“.
8. Following this step, a warning message will appear. So, check the “Delete the driver software for this device.” checkbox. If this statement doesn’t appear, jus ignore this step.
9. After this, tap “Uninstall” to uninstall it from your computer.
10. Now, repeat the same feat for all the Razer devices you can find in the Device Manager.
This way, uninstall all the Razer device drivers you have.
11. Now, unplug all the Razer devices attached to your system.
12. Wait for two or three minutes. Then, close the Device Manager panel and reboot your computer.
13. Wait till Windows restarts. Then, plug in all the Razer devices you have one by one.
Windows will recognize those and reinstall the subordinate device drivers for Razer devices.
After all these steps, download and install the latest edition of Razer Synapse 3 on your computer.
Fix 2 – Start Razer Synapse with admin rights
You have to start Razer Synapse with administrative rights to avoid any authorization restrictions.
1. Just search for “Razer” using the search box.
2. Next, when you see the “Razer Synapse” in the elevated search results box, right-click that and tap “Run as administrator“.
After giving your consent, Razer Synapse will open up. Let it run and scan for all of the Razer devices you have.
Fix 3 – Start or restart Razer services
There are certain services like Razer Synapse service which are needed for the Razer Synapse application to work properly.
1. So, press the Win key and the R keys together.
2. Then, write this in the Run box and hit Enter to open Services.
services.msc
3. When you have reached the Services panel, scroll down to locate these two services.
Razer Central Service
Razer Synapse Service
4. Now, right-click the “Razer Central Service” and tap “Start” or if it is already started, click “Restart” to restart the service.
5. Following the same way, right-tap the “Razer Synapse Service” and tap “Start” or if it is already started
Otherwise, click “Restart” to restart the service.
When you have started or restarted these services, close the Services window.
Next, run Razer Synapse once again and check whether it is working or not.
Fix 4 – Download and install the latest MS Framework
Your machine should have the latest build of the .NET Framework installed to run Razer Synapse properly.
1. You have to go to the .NET Framework website.
2. There, you can find two types of downloadable. In the Runtime section, tap “Download .NET Framework 4.7.2 Runtime” to download it.
3. After downloading the installer, double tap to run it on your system.
Just follow the steps of the installer and complete the installation process.
Now, if you see this message on your screen –
.NET Framework 4.7.2 or a later update is already installed in this computer.
Then, your computer already has the best .NET Framework installed and the problem isn’t present there.
Fix 5 – Turn off the MS Defender Firewall
Try to turn off the Microsoft Defender Firewall, if it is prohibiting Razer Synapse’s inbound or outbound access.
1. You can open the Firewall settings very easily.
2. So, press the Win key and R keys together and write this.
firewall.cpl
Click “OK“.
3. This will take you Firewall page in Control Panel.
4. There, on the left-hand pane, tap the “Turn Windows Defender Firewall on or off” feature to open that.
5. Now, here you can find the Private network settings and Public network settings.
6. Next, choose “Turn off Windows Defender Firewall (not recommended)” for both network types. If you know which network type you are using, you can change it specifically as well.
7. Finally, tap “OK“.
Once you have turned off the firewall settings, close it. Then, relaunch Razer Synapse and check if it is working.
Fix 6 – Uninstall Razer Surround
Some users have pointed to the Razer Surround software as the main culprit for crashing the Razer Synapse app.
1. At first, use the Win key+R to open Run.
2. Then, type this code in there and click “OK“.
appwiz.cpl
3. Just look through the list of apps to find the “Razer Surround” app.
4. Next, right-tap it and tap “Uninstall” to uninstall the application from your system.
Follow the on-screen steps to uninstall Razer Surround. Now, restart your machine. Check if this solves the problem.
Fix 7 – Repair Razer Synapse
You can repair Razer Synapse software to fix it.
1. Write down “appwiz.cpl” in the search bar.
2. Then, tap “appwiz.cpl” to open it in Control Panel.
3. Now, locate the “Razer Synapse” app in midst of all apps.
4. After that, right-click it and tap “Change“.
This will open the RAZER GAMING SOFTWARE page.
5. Now, click “MODIFY” to modify it. If there are any new updates are available, it will download and update it.
6. In there, tap “REPAIR” to start repairing the app.
This step will fix the app. Once it is fixed, launch Razer Synapse. Check if it can detect your Razer devices.
Fix 8 – Restarts Chroma apps
The Chroma component may sometimes cause this problem with the Razer Synapse app. So, if you are using any Chroma app, turn it off.
1. Open the Razer Synapse center.
2. Here, you will notice all the Chroma apps turned on.
3. Now, you have to turn off these Chroma apps one by one.
4. Now, turn those apps on again.
Fix 9 – Uninstall and reinstall Razer Synapse
If all the other fixes have failed, uninstall Razer Synapse and reinstall it.
1. At first, tap the “Windows icon” and write “appwiz.cpl“.
2. Then, click “appwiz.cpl” to open it.
3. After this, right-tap “Razer Synapse” and tap “Uninstall” to uninstall it.
4. Wait for the next screen to load up. Then, tap “Uninstall” to uninstall it from your computer.
5. Now, head on to the Razer Synapse website.
6. There, click “Download now” to download the Razer Synapse installer.
7. Then, run the “SynapseInstaller” on your system.
8. Next, make sure the “Razor Synapse” is checked.
9. Then, tap “Install” to install it.
Wait till it is installed. Then, open Razer Synapse.
This time it will open without crashing.


