VLC Player is one of the most popular audio and video players in recent times. It supports almost all file formats and the best part is, it’s free. However, it comes with its own set of problems like it may crash all of a sudden, lag in speed, or even skip content. This can be annoying especially while you are playing your favorite content.
In this post, we will show you how to fix this issue and continue listening to or watching your favorite content, uninterrupted.
Method 1: Disable Hardware acceleration
Step 1: Follow Step 1 from Method 1.
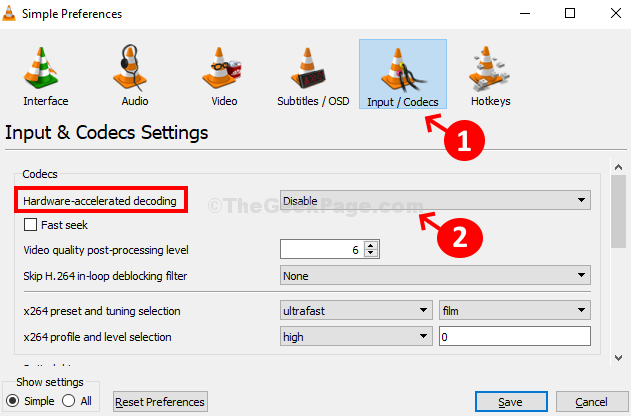
Step 2: Simple Preferences window > click on Input/Codecs icon on the top of the window > Codecs section > Hardware-accelerated decoding > select Disable from drop-down > Save.

If this method does not work, try the 3rd method.
Method 2: Using File Cache
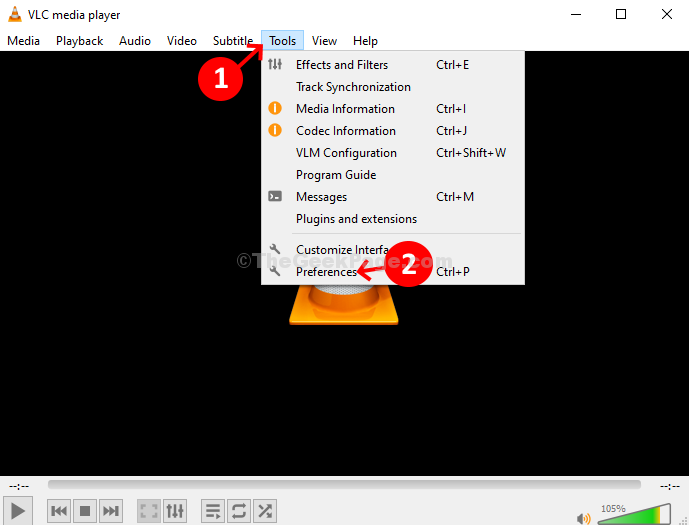
Step 1: Open VLC Media Player > Tools > Preferences.

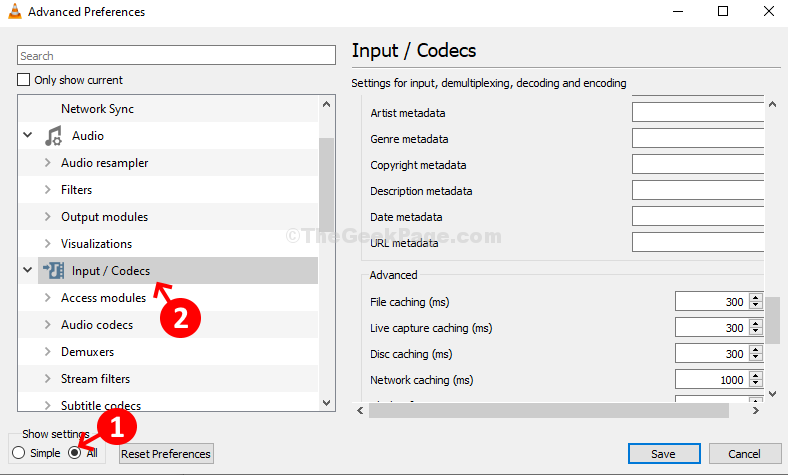
Step 2: Advanced Preferences window > bottom left of the window > click the radio button next to All > on the left side, above Show settings > scroll down > click on Input/Codecs.

Step 3: On the right side of the window > scroll down > Advanced > File caching (ms) > change value from 300 to 600 > click on Save.

This should fix the VLC Media Player skip and lag issue. If the problem persists, try the 2nd method.
Method 3: How to Fix VLC Player Skipping And Lagging Problem In Windows 10 Using Video Output Module
Step 1: Follow the same step as Step 1 from Method 1.
Step 2: Advanced Preferences window > bottom of the screen > click on the radio button next to All > on the left side, above Show settings > scroll down > Video > Output modules.

Step 3: On the right side of the window > Video output module > select Automatic from the drop-down.

This should help fix the VLC Media Player crashes and lags. If not, try Method 4.
Method 4: How to Fix VLC Player Skipping And Lagging Problem In Windows 10 Using Video Codecs
Step 1: Follow the same Step 1 from Method 1.
Step 2: Advanced Preferences window > bottom of the screen > click on the radio button next to All > on the left side, above Show settings > scroll down > Input/Codecs.

Step 3: Under Input/Codecs > expand Video Codecs > select FFmpeg.

Step 4: On the right side of the window > scroll down > find Thread > change the value from 0 to 2 > Save.

Now, your VLC Media Player should play audio and video files seamlessly. If it doesn’t work again, then you would need to uninstall and re-install VLC Media Player again.