Some Windows 10 users have reported an issue with their Realtek network controller on their computers. According to these users, they are unable to connect to the internet and an error message is showing up, saying “Realtek network controller was not found“. There may be a ton of reasons this error is happening on your device, but in most cases, it is a simple power management issue. Follow these fixes to solve the problem easily and swiftly.
Fix 1 – Check the network cables
You may see this error message if the network cable on your computer is misconfigured.
1. Press the ‘Power key’ of your laptop/desktop until your computer shuts down completely.
2. Detach the ethernet cable from your computer.
3. Now, remove the ac power adapter and battery from the laptop / PC.
4. After a few minutes, connect the power supply, insert the battery again.
5. Then start up your system.
Try to go online. Check if this has worked for you. Otherwise, go for the next fix.
Fix 2 – Repair Realtek driver
Some users have said fixing the Realtek driver has fixed the issue on their system.
1. At first, download the latest version of the Realtek driver.
2. Unzip the downloaded file. Go to the location where you have extracted the file.
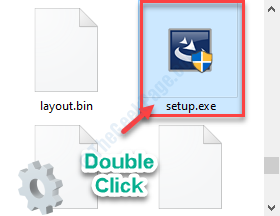
3. In the driver folder, double click on “Setup“.

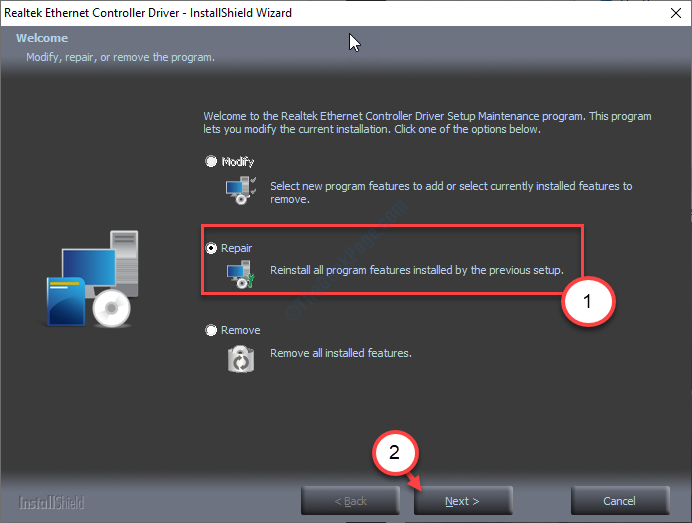
4. When the Realtek Ethernet Controller Driver appears, click on “Repair“.
5. Click on “Next“.

Wait for the setup to repair the driver and install the latest driver on your computer.
6. Click on “Finish” to close the window.

Just reboot your computer and check if this has worked.
After restarting your computer, check if this works.
Fix 3 – Modify power management
Disallow your computer to turn off the adapter to save power when the system sleeps.
1. Right-click on the Windows icon.
2. Then, click on the “Device Manager” to access it.

3. In the Device Manager, double click on the Realtek network adapter.

4. Go to the “Power Management” tab.
5. Untick the box beside “Allow the computer to turn off this device to save power“.
6. Don’t forget to click on “Ok” to save the change.

This should fix the issue and the problem should be solved.
Fix 4 – Update the network adapter driver
If you haven’t recently updated the Realtek driver for your computer, then follow these easy steps.
1. At first, press the Windows key along with the X key.
2. Then, click on the “Device Manager“.

3. When the utility window appears on your screen, expand the “Network adapters” section.
4. Right-click on the Realtek adapter and then click on the “Update driver“.

5. When you see the prompt for ‘How do you want to search for drivers?’, click on the “Search automatically for drivers“.

Now allow Windows a while to search for the ethernet driver on your computer.
Restart your computer and check if the fix has worked.
Fix 5 – Install a default Realtek driver
1. Press the Windows key+R to launch a Run window.
2. After that, type “devmgmt.msc” and click on “OK“.

3. Next, expand the “Network adapters” section once more.
4. Then, right-click on the Realtek adapter driver and click on “Update driver“.

5. After that, click on “Browse my computer for drivers“.

6. On the next screen, click on “Let me pick from a list of available drivers on my computer“.

7. Select the “Realtek PCIe GBE Family Controller (Realtek)” from the list of available drivers.
8. To install the driver, click on “Next“.

9. When the installation process has finished, click on “Close“.

After installing the software, close all the windows, and restart your computer.
Fix – 6 Troubleshoot hardware manually
Solution 1 – Detach and insert the RAM
1. Switch off your system and disconnect the power cable. If you are using a laptop, eject the battery.
2. Open the cabinet on your computer or back cover of your laptop.
3. Unplug the RAM from the motherboard carefully.
4. Leave the RAM for 5-6 hours.
5. Then re-attach the RAM to your motherboard once again.
6. Connect the power cable back to the system or plug in the battery to your laptop.
7. Start your computer normally.
Check if this helps you to connect to the internet.
Solution 2 – Use the network port in the motherboard
1. Shut down your computer.
2. Unplug the power cable from your computer.
3. In case if you are having the network cable plugged into the PCI port, eject out the network cable.
4. Plug in the network cable to the motherboard port directly.
5. Connect the power cable to your system. Startup the system and check if this works.
NOTE–
If you are using an integrated network adapter on your system, try using an external adapter (external WiFi cards, USB 3.0 to Ethernet adapter) as an alternative.
Fix 7 – Load default BIOS settings
1. At first switch off your computer.
2. After a while switch on your computer. When your computer boots up, you need to press the “Delete“* key from your keyboard to access the bios setup on your system.
* NOTE–
The actual key to open your system settings varies from manufacturer to manufacturer. Below we have mentioned the set of keys that should work-
Esc, F1, F2, F10, F11, F12 or Delete

1. Once the BIOS setting appears, go to the “Exit” settings.
2. Then check there are any options called, “Load Setup Default” and hit Enter.
3. Again, press the particular key to save the settings.
[Example – It is the “F10” key for this system.]

4. After that, select “Yes” to finally save and exit the bios settings on your computer.

Your computer will restart normally. This should set your Realtek driver to default settings.
Your problem should be solved.