Let’s say you have a requirement where you have to collect data from 50 people. You can send a Word file across to them that they can easily fill. But you need the formatting and alignment and everything else to be identical in all the 50 documents. Well, if you give the raw Word file to these 50 people, instead of 50 identical documents, you will get 50 totally different documents, needless to say. So, is there a solution? Of course, you know we always have a solution just right for you! Let’s talk about templates!
A Word template is the perfect solution for your quest. By using a Word template, you can prompt the user to enter some data when they open the template document. They can enter the data in a user prompt box and this data will automatically be inserted into your Word document. Sounds easy but thinking too difficult to implement? Well, when we are here, what are you worrying about?
In this article, we are going to explain the process of creating an interactive Word template, that prompts the users for inputs, with the help of an example. The example case requires a template that prompts the user to enter their name, age, and their native through user prompt boxes. Once the user enters the details, they are used to automatically fill the required fields in the Word document.
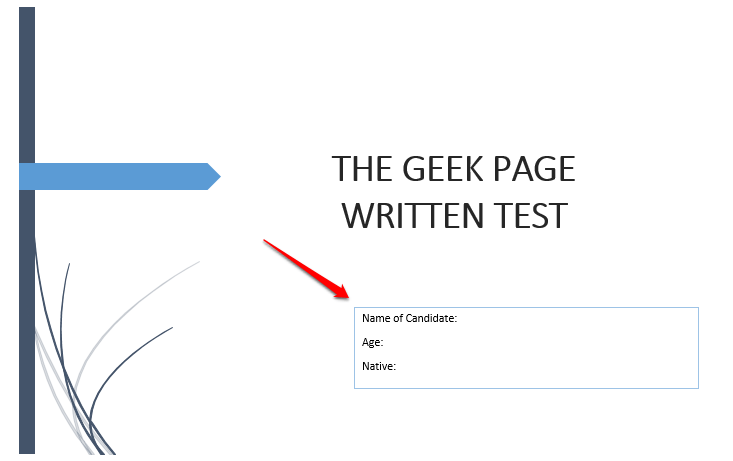
In the example used, I have my basic design all ready already, I have added just a cover page and added some data. You can create your own design and decide on the fields that you want to be filled in, using your template.
Step 1: Once you have your design ready, you can create a textbox section like the one shown in the screenshot below which requires details of the user. Remember, this is an example page, you can have as many pages as you want.
Step 2: Now, let’s type in the code that would prompt the user for input.
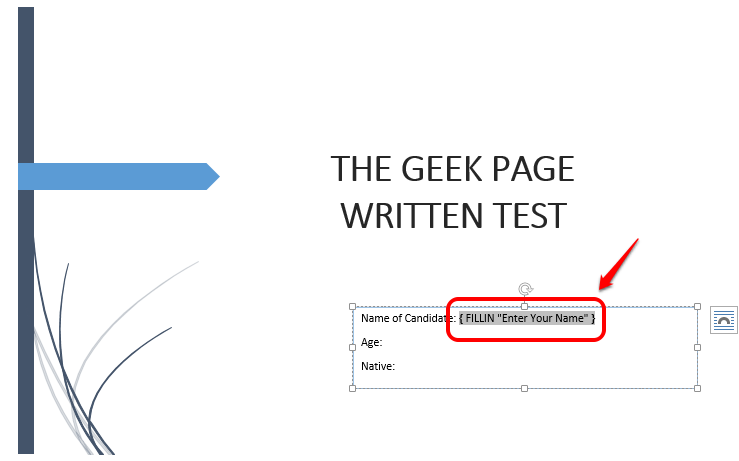
You need to press the keys CTRL + F9 first. This would insert the curly braces. Typing { } will not work. CTRL + F9 have to be pressed together.
Once the curly braces are inserted, type in the following:
FILLIN "<any user prompt message you want>"
Note: Replace <any user prompt message you want> with the user prompt message of your choice. But remember FILLIN keyword and double quotes that follow it are mandatory.
In the example below, my code would look like { FILLIN “Enter Your Name” }.
Step 3: Likewise you can add any number of lines. I have added another line to accept the user’s age. For that, I have written the code { FILLIN “Enter Age” }. Remember CTRL + F9 is mandatory to insert the curly braces, here as well.
Step 4: Just like in the above steps, I have added one more line using CTRL + F9 to accept the user’s native. For that, my code is { FILLIN “Native” }.
Step 5: Once you have the code all set, you technically have your template ready. Let’s make it official by saving your template. Click on the FILE tab at the top.
Step 6: From the left navigation pane, click on the Save As option, and from the right side of the window, click on the Browse button.
Step 7: As next, give any name to your template file. But make sure you choose Word Template (*.dotx) from the Save as type dropdown menu. This is the most important part.
Step 8: Once you have set the type of the file as dotx, let’s navigate to the location where you want to save your template file at.
Once the location is chosen, hit the Save button.
Step 9: That’s it. Your Word template is now successfully saved. You can create as many documents as you want using this template from now on.
Now let us see how you can use this template to create and save a new Word document.
Double click on the template file you just created to open it.
Step 10: Upon opening, you will be prompted to enter all the details required by the template. As per the example case in this article, you first have to enter your name. Hit the Enter key or the OK button once you are done.
Step 11: Enter the Age next. Hit the Enter key.
Step 12: Finally, enter the Native. Here also, once you are done, you can either press the Enter key or you can click on the OK button.
Step 13: There you go! You can now see that your details are automatically filled in using the Word template that you created.
Step 14: Now to save the document, hit the tab named FILE from the top panel.
Step 15: As next, click on the Save As option from the left window pane and then click on the Browse button.
Step 16: In the Save As window, you need to navigate to the location where you want to save your new document at.
Then in the File name field, enter any name of your choice. The type of the file will by default be set to docx.
Once you are all done, hit the Save button. This would save your document.
Similarly, you can create as many documents as you want using the template you created. Every time you want to create a new document using the same template, you just need to double click and open the template document and then start entering the data that you are asked to enter. Enjoy!
Please tell us in the comments section if you face any issues following any of the steps mentioned. We are always just a comment away!


