Uplay is the official Store cum launcher for all the Ubisoft games out there. What if you try to launch your favorite Assasin’s Creed title and Uplay launcher fails to launch? Well, there is nothing to worry about. Just like all the other launchers, Uplay may crash, stutter due to bugs, corrupted launcher files. Just by installing the latest one, it should be fixed.
Workarounds –
1. If Uplay launcher is crashing for the first time, close Uplay and restart the system once. After that, relaunch Uplay and test.
2. Disable or completely uninstall the third-party antivirus.
NOTE –
Ubisoft has renamed Uplay Ubisoft Connect. In this article, we will be using the name Ubisoft Connect.
Fix 1 – Clear the Ubisoft Connect Cache
If the Ubisoft Connect cache files are somehow got corrupted, clearing out the Ubisoft Connect cache should fix the issue.
1. Close Ubisoft Connect, if you have opened it.
2. Then, open the File Explorer.
3. Once it opens up, navigate this way –
C:\Program Files (x86)\Ubisoft\Ubisoft Game Launcher\
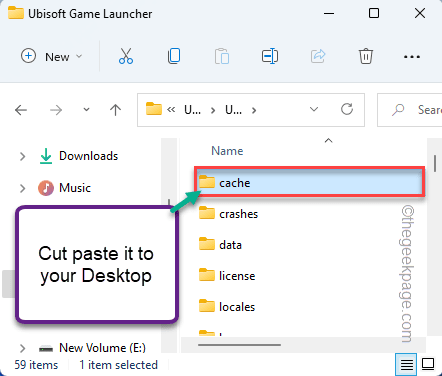
4. When you get there, select the “cache” folder.
5. Then, press Ctrl+X keys together to cut the folder.
6. Next, go to the Desktop and paste it there.
Close the File Explorer. Then, restart your computer. Once your system reboots, launch Ubisoft Connect.
You may have to log in again. Then, whether Ubisoft Connect is crashing or not.
Fix 2 – Launch a Ubisoft Connect game from a shortcut
If the launcher is crashing while launching a game within the Launcher, try launching the game directly from the shortcut.
1. Close the Ubisoft Connect app.
2. Go to your desktop to find the game icon there.
3. Then, double-tap on the game shortcut to launch the game directly from desktop.
This should be a good workaround as you don’t even have to directly access the launcher.
Fix 3 – Run the launcher in Compatibility mode
The problem can also occur due to the incompatibility of the Ubisoft Connect launcher.
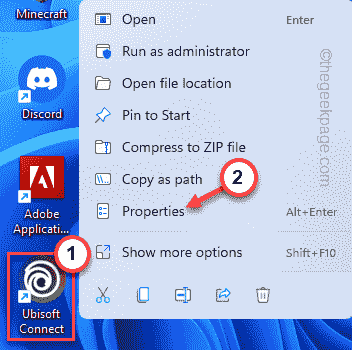
1. Right-click on the “Ubisoft Connect” launcher and tap on “Properties“.
2. On the Ubisoft Connect Properties page, tap on the “Compatibility” tab.
3. Then, check the “Run this program in compatibility mode for:” box.
4. After that, select “Windows 8” from the drop-down list.
5. Finally, tap on “Apply” and “OK” to save the changes.
Once you have done that, launch the Ubisoft Connect launcher. Test whether it is still crashing or not.
Fix 4 – Install the latest version of the graphics card
You can easily update the graphics card to the latest version.
Option 1 – Using the Device Manager
1. Press the Windows key and type “Device Manager” in the search results.
2. Then, tap on the “Device Manager” to access it.
3. In the Device Manager window, expand the “Display adapters“.
4. Now, right-click on the graphics driver and tap on “Update driver“.
5. In the next screen, click on “Search automatically for drivers” to search for the latest graphics driver.
Windows will search for the latest driver and download-install it for you. If that’s the case, complete the installation.
You may skip any further steps of this fix.
6. If you see this message on your screen –
‘The best drivers for your device are already installed‘, click on “Search for updated drivers on Windows Update“.
Settings will open up.
7. When the Windows Update section opens up, click on “Download now” to download and install the latest driver.
Just wait for the process to be complete.
Once the process is complete, restart your system.
Option 2 – Using NVIDIA GeForce Experience app
If you are using a dedicated graphics card, use the NVIDIA GeForce Experience app to download and install the latest version of the graphics card.
NOTE –
We have detailed the steps for the NVIDIA cards. If you are using AMD Radeon or Intel graphics card,
1. At first, open the GeForce Experience app.*
2. Then, tap on the “Drivers” tab.
3. Next, click on “CHECK FOR UPDATES“.
4. Now on “Download” to download the latest version of the driver.
This will download the latest version of the graphics driver.
5. Once it is downloaded, tap on “Express installation“.
Now all you have to do is to wait for the installation process to be complete.
Once it is done, close everything and restart your system to complete the process.
*NOTE –
If you haven’t yet installed the Geforce Experience app, download and install it from here.
Fix 5 – Uninstall and reinstall Ubisoft Connect
If nothing works, you can uninstall and reinstall Ubisoft Connect.
Step 1 – Uninstall Ubisoft Connect
1. Right-click on the Windows icon and tap on the “Apps and Features“.
2. When the Apps & Features opens up, type “Ubisoft” in the search box.
3. Thereafter, tap on the three-dot menu beside “Ubisoft Connect” and then, click on “Uninstall“.
4. Tap on “Uninstall” once again to further confirm.
5. In the Ubisoft Connect Uninstall screen, tap on “Next” to proceed.
6. In the next step, leave the “Uninstall Ubisoft Connect games” and “Delete local save game files” boxes alone.
7. Finally, tap on “Uninstall” to uninstall the launcher from the system.
Step 2 – Install Ubisoft Connect
Now, you have to download the latest Ubisoft Connect setup and install it.
1. Open the Ubisoft Connect page.
2. On the top-left corner, tap on the three-bar (≡) menu.
3. Then, click on “Download for PC” to download the latest version of Ubisoft Connect Installer.
4. After downloading it, double click on the “UbisoftConnectInstaller“.
5. Tap on “I Accept” to proceed further.
6. Now, tap on “Browse” to change the installation directory.
7. Tap on “Desktop” to select the location.
8. Then, click on “OK” to confirm it.
8. Then, click on “Install” to start the installation process.
9. Finally, tap on “Finish” to complete the process.
Ubisoft Connect should be launched automatically. Try to launch a game and Ubisoft Connect won’t be crashing again.


