One of the issues faced by Windows 11 users is a black desktop background being displayed at random times after an upgrade from Windows 10. According to most of the users, they saw a black wallpaper on the display while changing the theme or using a new wallpaper. There are a few others who encountered the display background going black while trying to open the Start menu.
The reason for this issue on Windows 11 is not known but there are a few fixes that have been successfully tried by other users encountering this problem. In this article, some solutions have been listed that can help you to clear this issue on your Windows 11 PC.
Before moving ahead and trying the fixes mentioned below, perform a system restart and check if this resolves the problem.
Fix 1 – Restart Windows Explorer Using Task Manager
1. Use the Ctrl + Shift + Esc key combination to open the Task Manager.
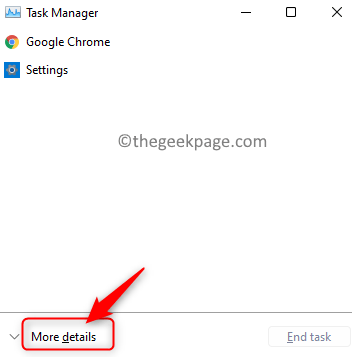
2. Click on More Details at the bottom to see the full view of the Task Manager.
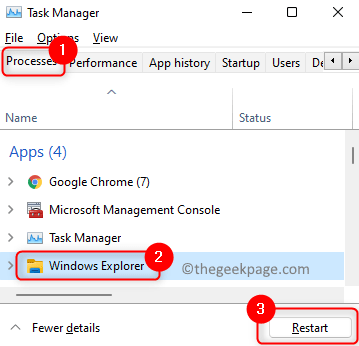
3. Select the Processes tab.
4. Here, select Windows Explorer in the list of processes currently running on your system.
Note: If you cannot see Windows Explorer in the list, open File Explorer (Windows + E) and then continue.
5. Click on the Restart button at the bottom right. This refreshes the desktop wallpaper.
6. You will now see the original background image you had used as wallpaper instead of the black wallpaper.
Fix 2 – Change the Desktop Background Manually
If restarting the Windows Explorer did not help you to resolve the black wallpaper display, then try to change the wallpaper manually using the steps mentioned below.
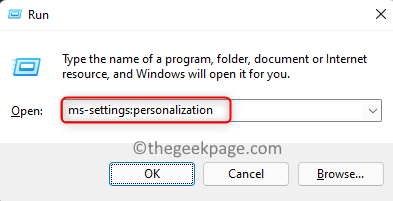
1. Open Run using the Windows and R key combination.
2. Type ms-settings:personalization to open the Personalization Settings page.
3. Now, click on Background to alter the desktop wallpaper.
4. You will now be in the Background section.
5. Here, select the option Picture in the drop-down menu next to Personalize your background.
6. Below, there is a Recent images section where you will see all the recently used backgrounds/pictures. Select anyone out of them to apply a new background.
7. If you want to use a different picture as your desktop wallpaper, click on the Browse photos button next to Choose a photo.
8. Select the picture that you are interested in and click on Choose picture.
9. That’s it. The new wallpaper will now be displayed.
Fix 3 – Tweak Ease of access centre
1 – Open control panel
2 -Now, Make sure View by > Category is selected

3 -Now, click on ease of access

4 – After that, click on ease of access centre

5 – Now, click on Make the computer easier to see

6 – Now, uncheck Remove background images (where available)

Fix 4 – Update the Graphics Driver
1. Press Windows + R to open the Run dialog.
2. Type devmgmt.msc and hit Enter to open Device Manager.
3. Click on the downward arrow next to Display adapters to expand it and view the different graphics card entries.
4. Right-click on the graphics card and choose Update Driver.
5. In the Update driver wizard that opens up, click on the Search automatically for drivers option.
6. Windows starts searching for driver updates for the selected graphics card.
7. If there is any update, then it will install it and show a message “The best drivers for your device are already installed”.
8. Restart your PC once the update is done and check if the issue is resolved.
Thanks for reading.
The issue with black wallpaper being displayed randomly will be solved after trying the fixes mentioned in this article. We hope this has helped you clear the problem on your Windows 11 PC. Let us know in the comments which fix worked for you.


