Windows 11, like its predecessor, have used the True Type and OpenType font. Whenever Windows finds an untrusted font (fonts not in the C:\Windows\Fonts folder), it blocks it from loading the fonts on the system. But, you can easily customize this setting, with which you can either enable/disable the fonts on your system. If you are facing this font issue in any app on your computer, this article is just for you.
Three distinct modes of untrusted font blocking feature
There are three distinct modes you can use to configure the untrusted font blocking process.
- On Mode – This means the untrusted font blocking feature is turned ON. If you set this mode, no untrusted fonts will be loaded.
- Audit Mode – This doesn’t prevent the untrusted fonts from loading up on your computer. But, it does log it in the event log. You can check which apps are facing this issue.
- Prevent specific apps from loading untrusted fonts – You can easily exclude some apps from loading the untrusted fonts.
How to enable untrusted font blocking in Windows 11, 10
You can use the Registry Editor to block the untrusted fonts from loading up in any app throughout the system.
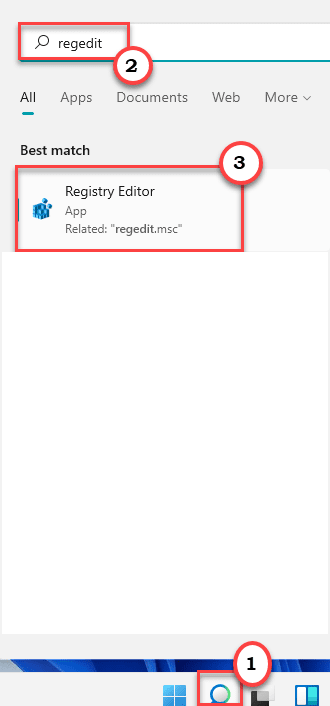
1. Tap on the Windows icon on the taskbar, and type “regedit“.
2. After that, click on the “Registry Editor” to open up the Registry Editor.

NOTE –
In the next step, you will be creating a new key in the existing registry. This is risky as the registry keeps crucial keys on the system. So, we suggest you create a backup of the registry keys if you haven’t created one yet.
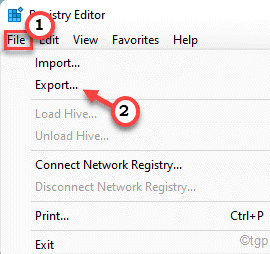
a. Once you have opened the Registry Editor, you will need to click on the “File” and then click on “Export“.
b. After that, just save the backup in a secure location.

If anything goes out of the ordinary, you can just import this backup and save the system.
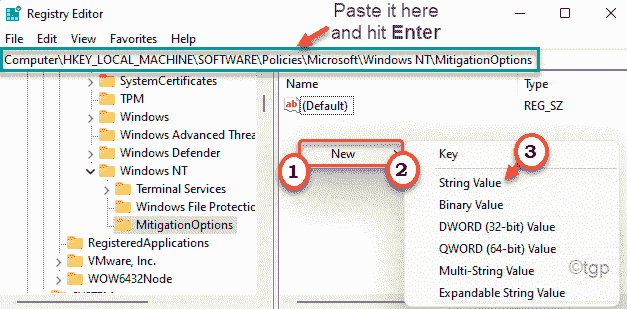
3. When the Registry Edit0r opens up, paste this location in the header and hit Enter to instantly open the key.
HKEY_LOCAL_MACHINE\SOFTWARE\Policies\Microsoft\Windows NT\MitigationOptions
4. Now, on the right-hand side, right-click on the space and tap on “New>” and then click on “String Value“.

5. Then, rename this string value as “MitigationOptions_FontBocking“.
6. After that, double-click on it to adjust the value.

7. Here you have to values which you can toggle to turn this setting on or enable the Audit Mode.
To set the ON mode – Paste this value in the box.
1000000000000
8. Then, tap on “OK” to save this setting.

9. If you want to enable the Audit Mode, the value you have to paste is this –
3000000000000
10. Then, tap on “OK” to save this setting.

Close the Registry Editor. Restart the computer to save this setting. You will have the desired settings for the font blocking/unblocking feature after you restart the system.
If you want to disable this unblocking feature on your computer, just follow these instructions –
1. Open the Registry Editor.
2. Then, go to the same location as the first time –
HKEY_LOCAL_MACHINE\SOFTWARE\Policies\Microsoft\Windows NT\MitigationOptions
3. Then, on the right-hand pane, find the “MitigationOptions_FontBocking” key.
4. Next, right-click on the key and tap on “Delete” to delete the key.

5. Finally, don’t forget to click on “Yes” when you receive a warning message.

This will disable the font blocking system and Windows will load up any fonts.
How to enable/disable untrusted fonts using Group Policy
[ONLY FOR PRO, ENTERPRISE EDITION OF WINDOWS]
If you don’t want to use the registry editor, you can easily use the Local Group Policy Editor to enable/disable the untrusted fonts.
1. At first, press the Windows key+R keys together.
2. Then, type “gpedit.msc” and hit Enter to open the Local Group Policy Editor.

3. When it opens up, go this way –
Computer Configuration > Administrative Templates > System > Mitigation Options
4. Then, on the right-hand side, you will find the “Untrusted Font Blocking” policy.
5. Then, double-click on the particular policy to modify it.

6. Then, set the policy to “Enabled“.
7. Here, you will notice three options of the “Mitigation Options” –
Block untrusted fonts and log events – As the name suggests this will block the untrusted fonts and this will block the event in the logs.
Do not block untrusted fonts – This will enable the policy, but this won’t block any untrusted fonts. It also will not log any attempts in the event log file.
Log events without blocking untrusted fonts – This will input the event in the event log file but it will not block the untrusted fonts.
Select the option you want.

8. Finally, click on “Apply” and “OK” to save this setting on your computer.

Close the Local Group Policy Editor window. Finally, restart your computer to make sure this policy is applied to the machine.
Now, your machine will be configured according to your personal preference.
Another registry hack to block untrusted fonts
There is one more registry trick that you can use to block the untrusted fonts on your computer.
1. At first, press the Windows key+R keys together.
2. Then, type “regedit” and hit Enter to open up the Registry Editor.

3. Once it opens up, paste this address in the address bar and hit Enter to instantly go to that location.
HKEY_LOCAL_MACHINE\SYSTEM\CurrentControlSet\Control\Session Manager\Kernel\
4. Now, look thoroughly through the list of values on the right-hand pane for the “MitigationOptions” key.
5. If you can’t find the key, just right-click on the space and then click on “New>” and “QWORD (64-bit) Value” to create a new word.

6. Name the new value as “MitigationOptions“.
7. Now, double-tap on the value.

8. This one also has three tweaks based on the value you set. We have listed all three values. You can set any of these values according to your preferences.
ON mode – the value is 1000000000000.
Off mode – the value is 2000000000000.
Audit mode – the value is 3000000000000.
9. Then, click on “OK” to save this change.

After that, close the Registry Editor window. Then, restart the computer to let this registry trick works out.
Know more about the fonts error from the Event Viewer
You can use the Event Viewer logs to analyze the fonts error event to know which app is causing the problem.
1. At first, press the Windows key+R keys together.
2. Then, type “eventvwr.msc” and click on “OK“.

3. After that, go to this section –
Application and Service Logs/Microsoft/Windows/Win32k/Operational
4. Here, analyze the errors to identify which one is associated with the untrusted fonts.

This way, you will know which app is lacking which font. Check if this works.
NOTE –
You may still need to use the apps that are having problems with the untrusted fonts. So, we recommend you configure the ‘mitigationoptions’ key in the registry to Audit Mode. This way, you will know which fonts are facing causing the issue from the Event Viewer. Now, there are two ways to fix the issue.
The best way to deal with this issue is to install the untrusted font in the %windir%Fonts folder. Just follow these steps –
a. On the computer you are facing this issue, just right-click on the untrusted font name and tap on “Install“.
(In some cases, you may not be able to install it without opening the fonts first. So, in that case, right-click on the font and then tap on “Open” to open it. Now, click on “Install” to install it on your system.)

b. Repeat the same step for all the computers you are facing this untrusted fonts issue.
This will install the font in the designated fonts directory on your computer. Try to use the app.
If this doesn’t work out, there is a second way –
a. Select all the fonts in the folder and press the Ctrl+C buttons together.

b. Then, go to the fonts folder –
C:\Windows\Fonts
c. Now, just paste the copied fonts.

After doing these, close the Fonts folder and restart the computer to let these fonts load up.