On the latest iterations of the Microsoft Word, several AI features are introduced. But, some of the users are complaining these Artificial Intelligence (AI) Host features are hogging up too much system resources, which is eventually slowing down the system performance. So, if your system is also showing signs of slow down due to the activity of this AI feature, you can follow these fixes to stop that AI Host Feature.
Fix 1 – Create & Run a batch file
You can create a batch file on your system and run that to kill the ai.exe and delete the associated files. You can go one step more and automate this using Task Scheduler.
STEP 1 Creating the batch file
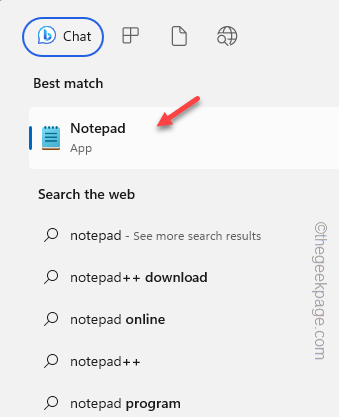
Step 1 – Search and open Notepad.
Step 2 – Paste* these lines in the blank Notepad page.
taskkill /IM ai.exe /F
CD "C:\Program Files\Microsoft Office\root\vfs\ProgramFilesCommonX64\Microsoft Shared\OFFICE16"
Del ai.exe
Del ai.dll
Del aimgr.exe
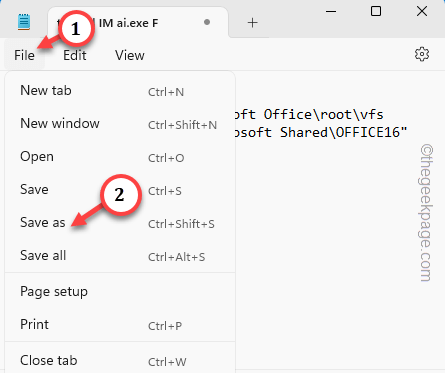
Step 3 – Tap “File” and then tap “Save as“.
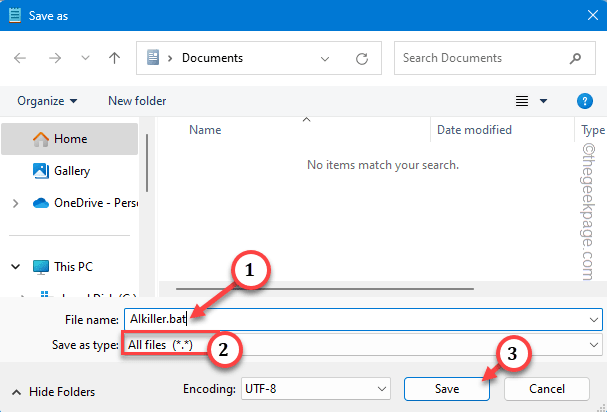
Step 4 – At first, set the ‘File type:’ to “All files“.
Step 5 – Then, rename the file as “AIkiller.bat” and tap “Save” to save the file.
Now, as you have created the batch file, you can use this to terminate the ai.exe and related processes.
Step 6 – While using the Microsoft apps, just right-tap the “AIkiller.bat” and tap “Run as administrator” to run the batch file.
This will put a stop on the ai.exe and related processes.
[
*NOTE – The batch script is for the Microsoft Office 16. But, if you are using any other Microsoft Office version, just change this line –
CD "C:\Program Files\Microsoft Office\root\vfs\ProgramFilesCommonX64\Microsoft Shared\OFFICE16"
The “Office16” folder represents the Microsoft Office 2016. So, change the number in the code according to the version of Office you are using.
]
STEP 2 – Automate the execution (Optional)
Now, you can set the script to execute automatically at the system startup (or according to your preference).
Step 1 – Just press the Start button once and type “task scheduler“.
Step 2 – Then, tap “Task Scheduler” to open that.
Step 3 – Opening the Task Scheduler window, tap “Create Task…“.
Step 4 – The first pane in Create Task is the “General” tab.
Step 5 – Give this task a name you want. We have named it “AI Killer“.
Step 6 – Check the “Run with highest privileges” box.
Step 7 – You have to create a trigger. So, go to the “Triggers” tab. Tap “New…” to create a new trigger.
Step 8 – In the New Trigger page, set the ‘Begin the task:’ to “At startup” from the drop-down list.
[You can change this to “At log on” or “At idle” mode, whichever fits you better.]
Step 9 – Tap “OK” to create the new trigger.
Step 10 – At the next step, you have to go to the “Actions” section.
Step 11 – To create a new action, tap “New action“.
Step 12 – Set the “Action” prompt to “Start a program“.
Step 13 – In the Program/Script option, tap “Browse“.
Step 14 – Now, you have to reach the location where you have saved that batch file. Go there and select the “AI killer.bat” file in there.
Step 15 – Tap “Open” to finalize the selection.
Step 16 – After this, come back to the New Action window and click “OK” to complete the process.
Step 17 – Don’t do anything else. Just tap “OK” and it is done!
The script will run on your device automatically at each system startup and kill the AI.exe process. This should help you resolve the issue.
Fix 2 – Create a new DisallowRun value
There is a trick that you can use. Just create this DisallowRun value in the system registry and fix the issue.
Step 1 – You can do this only from the Registry Editor. So, write “regedit” after hitting the Windows button once.
Step 2 – Then, open the “Registry Editor“.
NOTE – Registry fixes are always risky. So, make sure to build a registry backup on your computer. Follow these steps to create the registry backup following this guide.
Step 3 – Once you have reached the Registry Editor page, go to this address –
HKEY_CURRENT_USER\SOFTWARE\Microsoft\Windows\CurrentVersion\Policies\
Step 4 – On the left-hand pane, look whether you can find any sub-key called “Explorer” of the “Policies” header.
Step 5 – If you can’t find any such sub-key. So, right-tap the “Policies” key and choose “New>” and choose “Key” to create the new key.
Step 6 – Set the name to “Explorer“.
Step 7 – Select the new “Explorer” key.
Step 8 – Now, go to the right-hand pane and choose “New>” and tap the “DWORD (32-bit) Value” to create the value.
Step 9 – Name this new DWORD value to “DisallowRun“.
Step 10 – Then, double-tap the value to do that.
Step 11 – Set the ‘Value data’ to “1“. Finally, save this modifications by tapping the “OK” option.
Step 12 – Next, right-tap the “Explorer” key and select the “New>” and choose “Key” from the context menu.
Step 13 – Name this new sub-key as “DisallowRun“.
Step 14 – Now, right-click the “DisallowRun” and tap “New>” and choose “String Value” to create a new string.
Step 15 – Finally, double-tap this new string value to edit that.
Step 16 – Put this in the value box to complete the creation. Then, click “OK“.
ai.exe
Close the Registry Editor. All the registry edits works after a system restart.
So, do that and the AI.exe won’t cause you the problems anymore. Check if this helps.
Fix 3 – Delete the AI.exe component
Delete all the AI.exe components and make sure Office doesn’t auto update the app.
Step 1 – Delete the AI.exe and related files
At first, you have to delete the AI.exe and all the related files.
But before proceeding any further, make sure the Office is
Step 1 – Quickly, open the File Explorer from the Start Menu.
Step 2 – Now, go to this location carefully –
C:\Program Files\Microsoft Office\root\vfs\ProgramFilesCommonX64\Microsoft Shared\OFFICE16
[Additionally, you can just paste the entire address in the address bar and hit Enter to reach there at once.]
Step 3 – When you reach the OFFICE folder, you will see several AI.exe and other related components.
Step 4 – So, select all the contents there and hit the “Delete” button to delete those files.
After this, close the File Explorer.
Step 2 – Disable auto-update Office apps
Though you have wiped out the ai.exe components, it may not be enough as Office can recall these files during the next Office app updates.
Step 1 – So, you have to disable the Office app updates. To do this, open any Office application, like Microsoft Word.
Step 2 – No need to open/ create a document. Tap the “File” option and “Account” setting.
Step 3 – There, tap the “Update Options” and set that to “Disable Updates” from the drop-down to disable the Office updates for all the Office apps.
Continue to use the Office apps. You won’t feel the ai.exe consuming too much of the hardware resources.
But, you can’t use the AI features in the Word or any other Office apps.


