The remote desktop feature in Windows lets users connect to a remote computer over the network without accessing the remote setup physically. This is very easy to do on Windows and works quite well. If you want to set up a remote desktop, you can do it following the instructions we have mentioned here.
How to setup Remote desktop in Windows 11/10
Follow these steps minutely to set up a remote computer.
Step 1 – Switch ON the Remote Desktop feature
At first, you have to enable the Remote Desktop on your system.
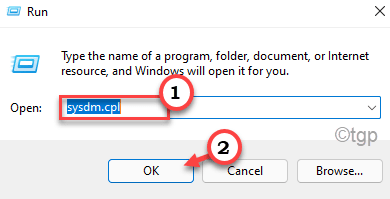
1. At first, press the Windows key+R keys together.
2. Next, type “sysdm.cpl” and hit Enter.

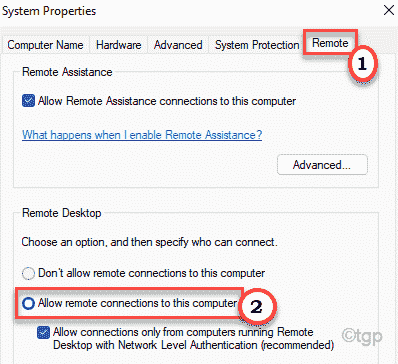
3. When the System Properties opens up, go to the “Remote” tab.
4. In the ‘Remote Desktop’ section, choose the “Allow remote connections to this computer” settings from the available options.

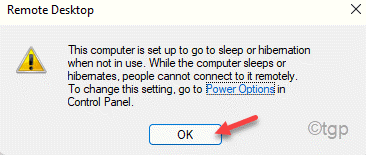
5. A warning message will appear. Just click on “OK“.

6. Don’t forget to click on “Apply” and “OK” to save the changes.

Once you have saved this change, proceed to the next step.
Step 2 – Allow the Remote Desktop port RULES by PORT 3389
The next step is to enable the remote desktop port 3389 through the Windows Firewall settings.
1. At first, press the Windows key+R keys together.
2. Then, type this command and click on “OK“.
firewall.cpl

3. Now, on the left-hand side, click on the “Advanced settings“.

4. When the Windows Defender with Advanced Security opens up, click on the “Inbound Rules“.
5. Just scroll down to find the “Remote Assistance (RA Server TCP-In)“. Right-click on the rule and then click on “Enable rule“.

6. Same way, if you scroll down, you will notice see two more rules named “Remote Desktop – User Mode (TCP-In)“.
7. Double click on it to access it.

8. Now, click on the “Allow remote computer connections to this computer“.
9. Click on “Apply” and “OK” to save the changes.

10. Then, double click on the “Remote Desktop – User Mode (UDP-In)” rule to edit it.

11. Same way, set this rule to ” “Allow remote computer connections to this computer“.
12. Next, click on “Apply” and “OK“.

13. Finally, right-click on these two rules one by one and then click on “Enable rule” to enable both the rules.
These rules use the Local port 3389.

Once you have done all these changes, you can close the firewall window.
Step 3 – Set up Port Forwarding (or, Port triggering or Port translation)
Now, you have to set up the port forwarding in the router for your remote computer.
1. At first, open a new tab in the browser window.
2. Then, go to the router website.
(If you don’t know the router web address, you can find it either on the router manufacturer website or on the router package itself or you can just google it.)
We have detailed this process using a DigiSol router. Some terminologies may differ for your router configuration, but the process is the same as we have mentioned.
3. At first, enter your access ID and password and click on “Log in” to enter the router setup.

4. Go to the “Port Forwarding” section.

5. Then, add a new rule, where, the “Protocol” is set to “TCP“.
6. Set the ‘External Port’ and the ‘Destination ports’ to “3389“.
7. Set the ‘Destination IP address’ to the internal IP address*.
8. Finally, tap on “Apply Changes” to save the settings.
[
*NOTE –
If you don’t know the IP address of your network adapter, just follow these steps to know it –
a. Open the Command Prompt terminal.
b. Type this command and hit Enter.
ipconfig

c. Check the “IPv4 Address” for the network adapter you are using.

Close the terminal.
]
If you are trying to connect multiple machines with this router, you can do so using multiple “External ports” and multiple “Destination IP address” options.
Step 4 – May the dynamic IP to a fixed hostname
[OPTIONAL]
If your ISP changes the IP address of your system from time to time, you should opt for the dynamic DNS settings instead of a fixed one. Almost all the routers have dynamic DNS settings inbuilt. But you will need a DDNS provider. These are top free DDNS providers –
Just set your DDNS provider, your username, password in the router settings are ready to go!

This way, you can easily set up a remote computer.