If you want to change the drive letter and the drive name in your Windows 11 PC, you should know a few things before your proceed.
The internal and external hard drives in the Windows 11 are automatically assigned a name using any alphabet between A to Z. However, A and B are already assigned to the floppy disk drives. But since, the modern computers do not come with a floppy disk storage slot, you can assign A or B as the name for storage devices attached to your device.
The letter C on the other hand, is the default drive letter for the primary drive of the system where your OS is installed. however, if your system has multiple drives, the letter identifies the second hard drive or the CD/DVD drive, in case, there’s no second drive.
The letter E, F, and G are assigned respectively to any other drives associated with the first drive. However, you may want to change the drive letter or the name of the drive for your convenience. The good thing is, Windows 11 has introduced some new features that can be a challenge for some. Those who are not so conversant with the new OS yet, may find it difficult to get through the changes in settings and changing or renaming the drive letter is one such setting.
However, this post will help you understand how to change the drive letter and drive name in Windows 11 easily that’s seated deep inside the new settings. There are two different ways you can change the drive letter and the drive name.
Method 1: Through the Storage Settings
Step 1: press the Win + I keys together on your keyboard to open the Settings app.
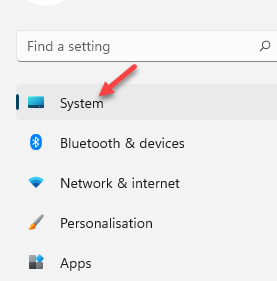
Step 2: In the Settings window, select System on the left side of the pane.

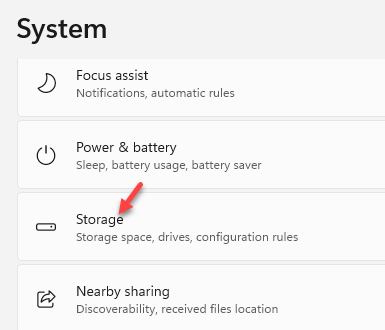
Step 3: Next, select Storage on the right side of the pane.

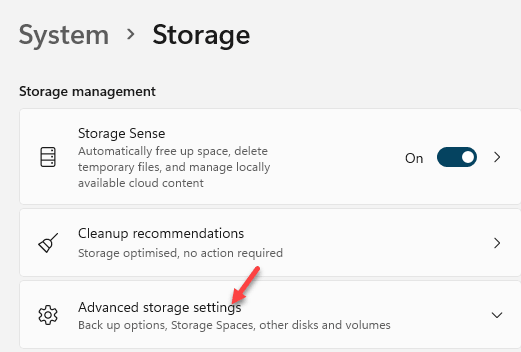
Step 4: In the Storage screen, under the Storage management section, scroll down and click to expand Advanced storage settings.

Step 5: Now, click on Disks & volumes from the list.

Step 6: In the Disks & volumes screen, select the Disk you want to rename or for which you want to change the drive letter.
Click on Properties.

Step 7: In the next screen, under the Volume Data section, click on Change label to change the drive name.

Step 8: In the Change Volume Label prompt, type the desired name and press Apply to save the changes.

Step 9: Now, change the drive letter, click on Change drive letter.

Step 10: In the Change Drive Letter prompt, under the Choose which drive letter to use for this volume field, select the desired letter and press OK to save the changes.

You have now successfully changed the drive letter and the drive name in your Windows 11 PC.
Method 2: Through Disk Management
Step 1: Press the Win + R keys together on your keyboard to open the Run command window.
Step 2: In the Run command search field, type diskmgmt.msc and hit Enter.

Step 3: This will open the Disk Management window.
Here, go to the drives below, select one (for example – E drive), right-click on it and select Change Drive Letter and Paths.

Step 4: In the Change Drive Letter and Paths dialogue box and click on Change.

Step 5: In the Change Drive Letter or Path dialogue box, select the letter from the drop-down next to Assign the following drive letter option.
Press OK to save the changes.

Again press OK to save the changes and the drive letter has been changed successfully.
Step 6: Now, back in the Disk Management window, right-click on the desired drive and click on Properties.

Step 7: In the drive properties window, under the General tab, type the desired name for the drive in the field where you see – New Volume.
For instance, we named it as USB drive.
You can name it anything as per your requirement.

Press Apply and then OK to apply the changes.
Exit the Disk Management window.
You have now successfully changes the drive name in your Windows 11 PC.