The error message “An unhandled exception occurred in…” appears on your computer if you are trying to launch an application that was designed with Visual Studio. Users have reported similar error messages from a variety of applications like Uplay, Internet Explorer, some older incompatible games designed for earlier versions of Windows. You can solve this issue just by following the fixes listed in this article.
Workarounds–
1. There is a chance that the antivirus on your computer is prohibiting your access. Disable the antivirus for a while and check again.
2. Restart your computer. After restarting your computer, give the application another try.
Fix 1 – Enable .NET Framework
Older programs/games required .NET frameworks on your computer.
1. Right-click on the Windows icon and then click on the “Run“.
2. Write this code in the Run window. Press Enter to access the Windows Features.
optionalfeatures

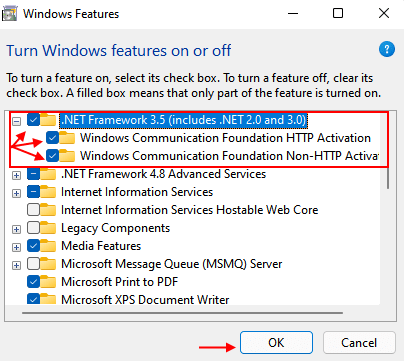
3. In the Windows Features window, check the “.NET Framework 3.5(includes .NET 2.0 and 3.0)“.
4. Then, click on “OK“.

Windows will download and install the required feature on your computer.
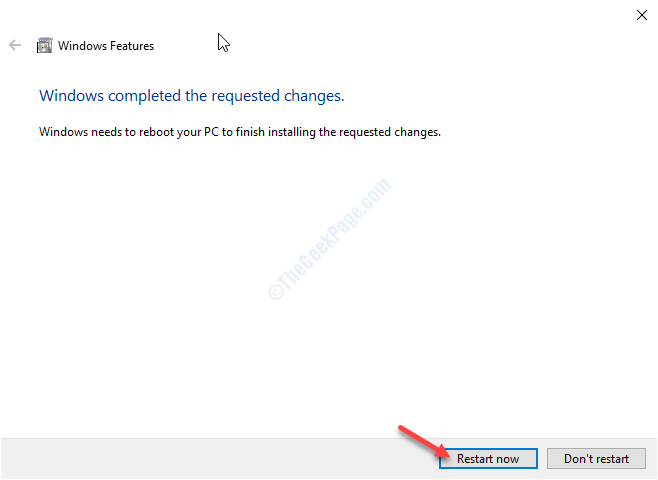
5. Once done, click on “Restart Now” to restart your computer.

After restarting your computer, you can run the program again.
Fix 2- Run SFC and DISM checks
SFC and DISM checks may identify and fix the light corruption in your system files.
1. Press the Windows key+R.
2. Then type “cmd“. Press Ctrl+Shift+Enter together.

3. Simply type this command and hit Enter to run a simple SFC scan.
sfc /scannow

4. Running a DISM scan is a very easy process. To do so, copy-paste this command and then hit Enter.
Dism /Online /Cleanup-Image /RestoreHealth

Once both these scans are finished, reboot your device and check if this works.
Fix 3 – Install Windows Update
Windows receives occasional patches.
1. Press Windows key + R together to open run command box,
2 -Now, write ms-settings:windowsupdate in it and click OK.

3. Then, click on “Check for updates“.
4. When the updates are downloaded, click on “Restart Now” to restart your computer.

If the problem was caused by any Windows issue, updating it should fix it.
Fix 2 – Delete the Launcher registry value
Some users have complained about seeing this error message while trying to access Uplay by Ubisoft. Follow these steps to solve this issue.
Warning – Registry Editor is a sensitive location on your computer. Before proceeding further modifying the registry, we request to make a backup of the registry on your computer.
After opening the Registry Editor, click on “File“. Then click on “Export” to make a new backup on your computer.

1. Type “regedit” in the search box.
2. Then, click on the “Registry Editor” to access it.

3. Then, navigate to this location –
Computer\HKEY_LOCAL_MACHINE\SOFTWARE\WOW6432Node\Ubisoft
4. After that, right-click on the “Launcher” key.
5. Then, click on “Delete” from your computer.

After deleting the key, close the Registry Editor.
Restart your computer.
Fix 4 – Install the latest version of the .NET framework
There is a chance that the existing Windows .NET framework has become corrupted.
1. Press Windows key+R to open the Run window.
2. In the Run window, type or copy-paste “optionalfeatures“. Click on “OK“.

Windows Features window will be opened.
3. Now, check the option “.NET Framework 4.8 Advanced Series” if it not already checked*.
4. Then, click on “OK“.

Windows Features will now install the latest .NET Framework on your computer.
[*NOTE- If the option is already checked, uncheck the box and click on “OK“.

Reboot your computer. This will disable the .NET Framework on your computer.
After restarting your device, follow the steps described above to re-enable the .NET Framework on your system and restart the system once again.
]
Fix 5 – Reset Internet Explorer
If you are facing this error message while opening Internet Explorer on your computer.
1. Right-click on the Windows key. Then, click on “Run“.
2. When the Run window opens up, type “inetcpl.cpl“. Click on “OK“.

3. When the Internet Properties opens up, go to the “Advanced“.
4. Click on “Reset…” to reset the application.

5. In the Reset Internet Explorer Settings window, check the option “Delete personal settings“.
6. Click on “Reset” to reset the application.

Restart your computer and check if this works.
Fix 6 – Disable script debugging operation and delete registry keys
If the previous method didn’t fix the issue for Internet Explorer, follow these easy steps.
1. Press the Windows key+R.
2. Then, again type this code and click on “OK“.
inetcpl.cpl

3. In the Internet Properties window, go to the “Advanced” tab.
4. Then, check the box “Disable script debugging (Internet Explorer)“.

5. After that, click on “Apply” and then on “OK“.

Close the Internet Properties window.
6. Press Windows key+R together.
7. Write “regedit” in the terminal. Click on “OK“.

8. When Registry Editor appears on your screen, go to this location~
For 32-bit users - HKEY_LOCAL_MACHINE\SOFTWARE\Microsoft\Windows NT\CurrentVersion\AeDebug

For 64-bit users - HKEY_LOCAL_MACHINE\SOFTWARE\Wow6432Node\Microsoft\Windows NT\CurrentVersion\AeDebug
9. Now, right-click on the “Debugger” key and click on “Delete“.

10. After that, navigate to this area based on whether you are using a 32-bit or 64-bit system~
For 32-bit users - HKEY_LOCAL_MACHINE\SOFTWARE\Microsoft\.NETFramework

For 64-bit users - HKEY_LOCAL_MACHINE\SOFTWARE\Wow6432Node\Microsoft\.NETFramework
11. Just like before, right-click on the “DbgManagedDebugger” key and then click on “Delete” to delete the key from your computer.

Close the Registry Editor on your computer.
Then restart your computer to let these changes take effect.
Fix – 7 Clean boot your system
If any third party application is prohibiting normal performance of the .NET frameworks, this problem may occur.
1. You have to right-click on the Windows icon and click on “Run“.
2. Write “msconfig” in the terminal. Then you have to press the ‘Enter‘ key once.

3. Once the System Configuration window opens up, click on the “General“.
4. Simply after that, click on the radio button beside the “Selective startup” option.
5. After that step you have to check the box beside the “Load system services.

6. Go to the “Services” section.
7. Next what you have to do is check the “Hide all Microsoft services“.
8. To disable all the third-party applications, click on “Disable all“.

9. You have to click on the “Startup” section.
10. Click on the “Open Task Manager“.

10. Here you need to click on “Disable” to disable them all.

When you have disabled all the startup of unnecessary applications, close the Task Manager window.
11. Then, click on “Apply” and “OK”.
