DXGI_ERROR_DEVICE_REMOVED error occurs when the graphics card on your system isn’t running properly or there is some connection issue on your computer. If you are facing this issue, don’t worry. There are very easy resolutions to fix the issue in no time at all.
Fix 1 – Modify the registry
Modify the registry on your computer to solve the problem.
1. First, type “regedit” in the search box beside the Windows icon.
2. Then hit Enter to access the Registry Editor on your computer.

3. When you have opened the Registry Editor on your computer, expand the left side to go to this place~
Computer\HKEY_LOCAL_MACHINE\SYSTEM\CurrentControlSet\Control\GraphicsDrivers
4. You need to right-click on the space on the right-hand side and then click on “New>” and then click on “D-Word (32-bit) Value“.

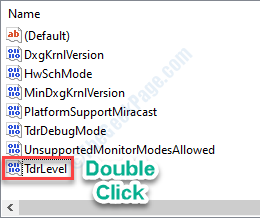
5. Name this key as “TdrLevel“.
6. Now, to change the value of this delay, double click on this key.

7. In the Edit DWORD (32-bit) Value window, put “0“.
8. Then, click on “OK“.

Close the Registry Editor window and restart your device to let this change take effect.
After restarting the problem won’t bother you again.
Fix 2 – Turn off the Shadow play
NVIDIA Shadow play is used to capture in-game footages on supported systems. This may cause this crash.
1. You have to search for the “GeForce Experience“.
2. Then, click on “GeForce Experience” in the search results.

3. In the GeForce Experince window, go to the “General” tab.
4. Then, uncheck the “IN-OVER OVERLAY” settings.

Close the GeForce Experince page and further check it out.
Fix 3 – Switch off the Anti-Aliasing feature
Some users have complained that anti-aliasing feature is causing this issue at the first place.
1. Type “NVIDIA Control Panel” in the search box.
2. Then you have to click on the “NVIDIA Control Panel“.

3. Once the Control Panel appears, click on the “Manage 3D settings” on the left-hand side.
4. Then, click on the “Global settings“.

5. Now, here you will notice several ‘Antialiasing’ features.
6. Click on the “Antialiasing-FXAA” feature and switch it to “Off“.

7. Similarly, set all the “Antialiasing” features to “Off“.

8. Then, click on “Apply” to apply these settings.
![]()
Close the application. Restart your machine and check if the problem is still there or not.
Fix 4 – Update graphics driver
Maybe your old graphics driver is causing this issue on your computer.
1. Press the Windows key+X.
2. Then, click on “Device Manager“.

3. In the Device Manager appears, expand the “Display adapters“.
4. Right-click on the graphics adapter and then click on “Update driver“.

5. Now, to let Windows search for the driver itself and install it on your computer, click on “Search automatically for drivers“.

Windows will now search for the latest driver and install it on your computer.
Fix 5 – Uninstall and reinstall graphics adapter
1. Press Windows key+X keys together from your keyboard.
2. Just click on the “Device Manager” to access the utility.

3. When you see the list of drivers, expand the “Display adapters“.
4. Right-click on the driver and click on the “Uninstall device” to uninstall it from your computer.

5. If you see a prompt for confirmation to uninstall the graphics driver, just click on “Uninstall“.

After uninstalling the driver, just reboot your computer.
Rebooting your device will re-install the driver on your computer.
This should have fixed your issue.
Alternative Tips-
1. Set your