You have just upgraded your old Minecraft launcher to the latest Minecraft Launcher from Windows Store. But what if you receive an annoying error message – ‘Unable to update Minecraft Native Launcher‘ while trying to connect to your favorite Minecraft server? Well, don’t worry. We have just sorted some very easy solutions for you. Just follow these easy fixes to solve this issue very quickly.
Fix 1 – Uninstall the old Minecraft Launcher
The reason you are seeing this error message is that the older Minecraft Launcher is conflicting with the existing one.
1. At first, press the Windows key+R keys together.
2. Then, write this single line in the terminal and click on “OK“.
appwiz.cpl
3. You will notice all of your installed apps here.
4. Now, right-tap on the older Minecraft app and click on “Uninstall“.

After that, just follow the on-screen instructions to complete the uninstallation process.
Now, launch the Minecraft Launcher that you have downloaded from Microsoft Store. This shall fix your issue.
Fix 2 – Run the launcher in compatibility mode
Running the Minecraft Launcher in compatibility mode may work.
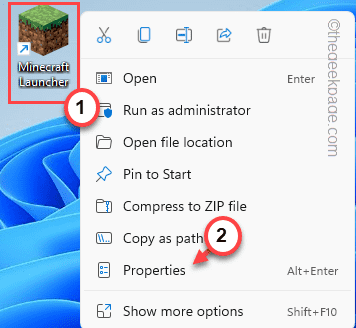
1. On your desktop, right-click on the “Minecraft Launcher” icon and tap on “Properties“.

3. In the Properties window, click on the “Compatibility” section.
4. After that, tick the “Run this program in compatibility mode for:” option.
5. Then, tap on the drop-down and choose “Windows 8“.

6. After that, check the “Run this program as an administrator” option.
7. Finally, tap on “Apply” and “OK” to apply these changes.

After that, open the Minecraft Launcher on your system and check if this works.
Fix 3 – Download the Minecraft updates
You can download the alternative version of the Minecraft application file and use it.
1. Then, go to the Minecraft alternative download section.
2. On this page, you will notice several download links for various versions of Minecraft.
3. Then, tap on “Minecraft.exe” to download the application on your computer.

6. Then, double click on the “Minecraft” to access it.
It will now download the latest Minecraft Launcher on your computer.

6. Then, Minecraft Launcher Setup shall open up. Complete the installation on your system.

After this, you can launch the game from the desktop. Check whether this fix works.
Fix 4 – Repair Minecraft
If the problem is happening due to the lack of a few system files, repairing the launcher from Settings may work.
1. At first, press the Windows key+R keys together.
2. Again you have to type “appwiz.cpl” and hit Enter to open the Program & Features window.

3. After the windows appear, look for the “Minecraft Launcher” app in the list of apps.
4. Just right-click on it and tap on “Repair” to repair the Launcher.

After doing this, close the Control Panel.
After that, try to launch the game with Minecraft Launcher. Check if this works.
Fix 5 – Uninstall both Minecraft Launcher
If uninstalling the older Minecraft Launcher is not working for you, you have to uninstall both the launchers.
Step 1 Uninstall the Minecraft launcher from Store
1. At first, right-click on the Windows icon and tap on “Apps & Features“.
2. In the Settings window, scroll down through the right-hand pane, to find the “Minecraft“.
3. Then, tap on the three-dot button and tap on “Uninstall“.
4. Further, tap on “Uninstall” to confirm your action.
Once you have uninstalled it, you can close the Settings.
Step 2 Uninstall the older launcher
1. At first, press the Windows key+R keys together.
2. Then, write this single line in the terminal and hit Enter.
appwiz.cpl
3. You will notice all of your installed apps here.
4. Now, right-tap on the older Minecraft app and click on “Uninstall“.

Once you have uninstalled the Minecraft Launcher, close the Control Panel window.
Step 3 Rename the Minecraft data files
1. At first, press the Windows key +R keys together.
2. Then, type “%appdata%” and click on “OK“.
3. Now, right-click on the “.minecraft” folder and tap on “Rename” to rename the folder.
4. After that, set the name of the folder as “.minecraft1“.
Now, when you will install the new Minecraft launcher from Store it will create a new appdata folder.
Step 4 Install Minecraft from Store
1. Now, open the Microsoft Store.
2. Thereafter, type “Minecraft” in the search box of the Store.
3. Further, tap on the “Minecraft for Windows+Launcher” to access it.
4. Then, tap on “Install” to install the Minecraft from Store.
Once it is done, launch the game using the launcher you have downloaded from Store. It will work just fine.