If any device such as Mobile, Tablet or a Laptop that has tablet mode, which supports built-in accelerator sensor in them, then it rotates the screen automatically. When any user turns the device upside down or to right / left side, then the screen also rotates automatically. Some users do not like to rotate their screen when they turn their device like while viewing any image or watching any video by turning the device. But many of the users are not able to turn this feature off. Therefore we have come up with few solutions that might disable the automatic screen rotation on your windows 11 device.
How to Turn On or Off Automatic Screen Rotation via Settings app
Step 1: Press Windows + I keys together on your keyboard to open Settings app.
Step 2: Click System on the left side of the Settings window.
Step 3: Then, Select Display option on the right side as shown in the below image.

Step 4: Click on Rotation lock toggle button to On to enable / Off to disable the automatic screen rotation feature on your system as shown below.
NOTE: Devices like laptop without the tablet mode feature, has Rotation lock feature greyed out / missing.

Step 5: Close the Settings window after changing the automatic screen rotation settings.
Now onwards, you can turn your device any way without the screen rotating automatically.
Hope this solution solved your issue.
How to Turn On or Off Automatic Screen Rotation using Quick Settings
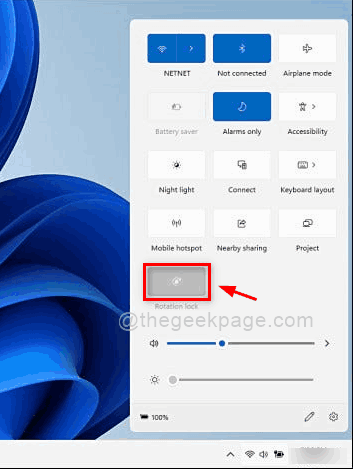
Step 1: Press Windows + A keys together to open the Quick Settings.
Step 2: Click on Rotation lock option in the Quick settings to enable / disable it.

NOTE:- If the rotation lock settings option is not present in the quick settings, then please follow below steps to add.
Step 3: Click the Edit button at the bottom of the Quick settings as shown below.

Step 4: Click on Add button and select Rotation lock option from the list as shown in the below screenshot.

Step 5: Click Done button after adding Rotation lock option to the Quick settings as shown below.

That’s it.
Hope this was helpful and resolved your issue.
If not, then go through our final solution explained below.
How to Turn On or Off Automatic Screen Rotation using Registry Editor
Step 1: Press Windows + R keys together to open Run dialog box.
Step 2: Type regedit in the run box and press the Enter key to open Registry Editor.
Step 3: Click Yes on the UAC prompt to continue.

Step 4: Copy and paste the following path given below in the empty address bar and hit Enter key.
HKEY_LOCAL_MACHINE\SOFTWARE\Microsoft\Windows\CurrentVersion\AutoRotation
Step 5: Select the AutoRotation registry key and double click on Enable DWORD value key to open it.

Step 6: Enter the 1 in the value data textbox field to enable the automatic screen rotation as shown below.
Click OK button to make changes and close the window.

Step 7: If you want to disable the automatic screen rotation feature, then Enter 0 in the value data textbox and click OK.

Step 8: Close the registry editor and restart your system once.
That’s it.
I hope this post was informative and helpful to you.
Please let us know which solution worked for you in the comments section below.
Thank you for reading!