Whenever you give print command, whether it will prompt to choose the printer from any list? If not, then it means windows decides which printer to be selected to execute the print command. Setting the default printer on your Windows 11 system is quite easy and useful because what windows does is, it selects the most recently used printer on the system. Therefore, if you want any particular printer to be selected for printing any document every time, then you have to set it as default printer on your system. There are many methods by which you can change the default printer settings. In this post, we have come up with various methods by which you can set the default printer on your windows 11 system.
Method 1: Change / Set the Default Printer Using Settings app
Step 1: Press Windows + I keys together to open Settings app.
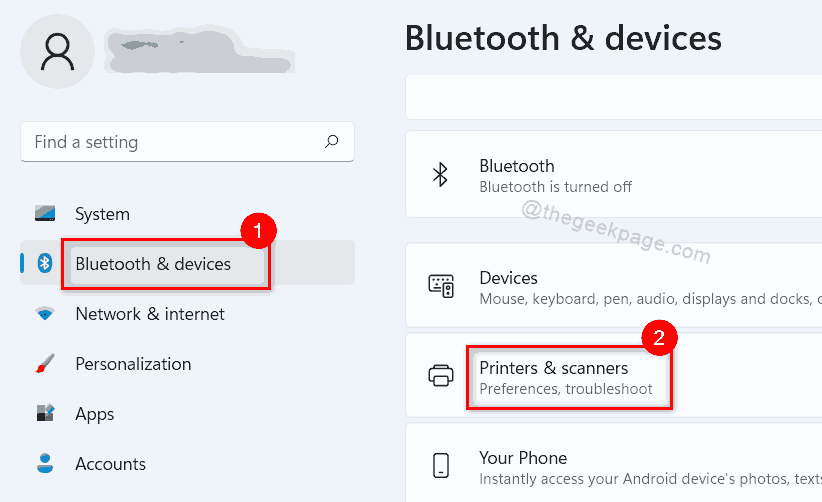
Step 2: Then, Click Bluetooth & devices on the left side of the Settings window.
Step 3: Select Printers & scanners on the right side as shown in the below image.

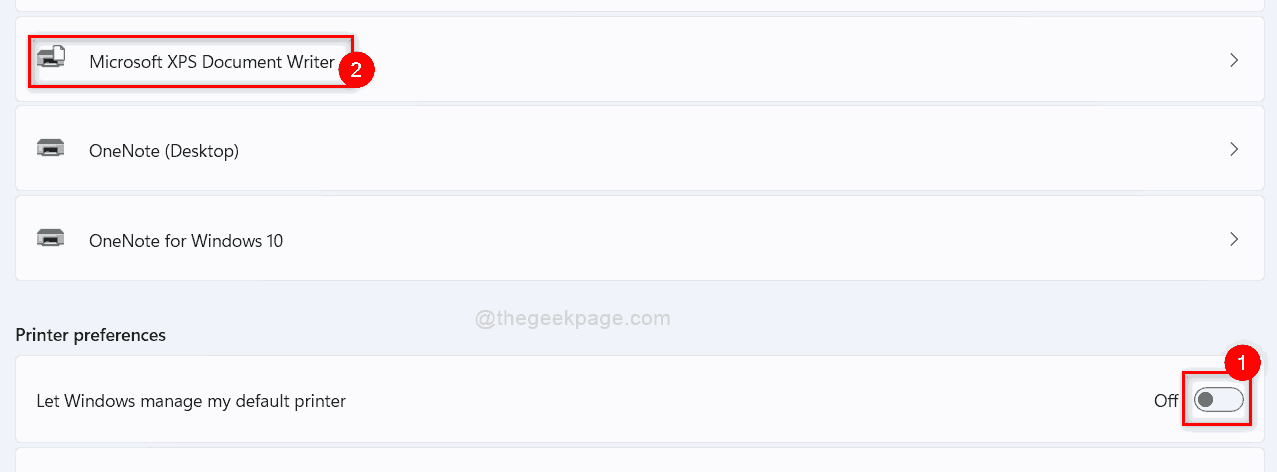
Step 4: In the Printers & scanners page, Click Let windows manage my default printer toggle button to turn it Off.
Step 5: Then, Click on any printer you want to set as default, from the list shown at the top of the page as shown in the below screenshot.

Step 6: Click Set as default button in the Printer settings page.

Step 7: After you have click the Set as default button, the Printer status should be displayed as Default.

That’s how you can set a default printer in windows system using Settings app.
Method 2: Set the Default printer Using Control Panel
Step 1: Press Windows + R keys together to open Run dialog box.
Step 2: Type control panel in the run box and hit the Enter key to open Control Panel.

Step 3: In the Control Panel window, make sure View by Category is selected.
Step 4: Then, Click View devices and printers under Hardware and Sound as shown below.

Step 5: In the Devices and Printers page, Right click on any printer that you want to set as default.
Step 6: Select Set as default printer from the context menu as shown in the below screenshot.

Step 7: Then, Click OK button on the confirmation prompt to proceed.

Step 8: Now the default printer is set on your system.
Method 3: Set Default Printer using Command Prompt
Step 1: Press Windows + R keys together on your keyboard to open Run dialog box.
Step 2: Type cmd in the run box and press CTRL + SHIFT + ENTER keys together to open command prompt as admin.
Step 3: Click Yes on the UAC prompt to continue.

Step 4: Type the below command and hit Enter key to set the default printer.
NOTE:- Replace OneNote (Desktop) with any printer name you want to set as default printer.
wmic printer where name=”OneNote (Desktop)” call setdefaultprinter
Step 5: You will get a successful message after executing the above command.

Step 6: Close the command prompt window.
This is how you can set the default printer in Windows 11 system using command prompt.
That’s it.
Hope this article was helpful and informative.
Please let us know in the comments section below which method was easy and helpful to you.
Thank you for reading!