Web Browsers may seem to be a very simple application at an outer glance. But when we have a detailed look at it we may notice that there are many complex tasks that are running that consume most of the resources. If we open the taskbar, we can see that most of the system’s resources are consumed by the browsers. So, for efficient utilization of the system’s hardware, modern devices support hardware acceleration.
Hardware Acceleration is a simple process where web browsers ( in this case Edge) use specific hardware components called accelerators to run their computationally heavy tasks more efficiently. Generally, all the tasks are handled by the CPU. When there are some bulky tasks like graphics or video loading etc, these tasks are offloaded from the CPU and sent to GPU (Graphics Processing Unit) in order to save some resources of CPU and hence enhancing the performance of the system. By default, this feature is enabled in Microsoft Edge.
However, the acceleration may :
- Lower quality of the video
- Slow rendering of Web Pages
- Compatibility issues with the graphics driver.
- An issue with Font rendering
In such cases, we might want to Turn OFF the Hardware Accelerator. In this article, let us see how to Turn On and Turn Off Hardware Acceleration in different ways.
Method 1: From Browser Settings
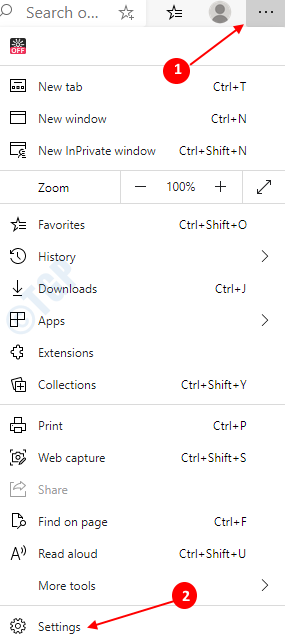
Open Microsoft Edge. Click on three dots in the top right corner of the window and Choose Settings

Turning ON Hardware Acceleration :
In the window that opens,
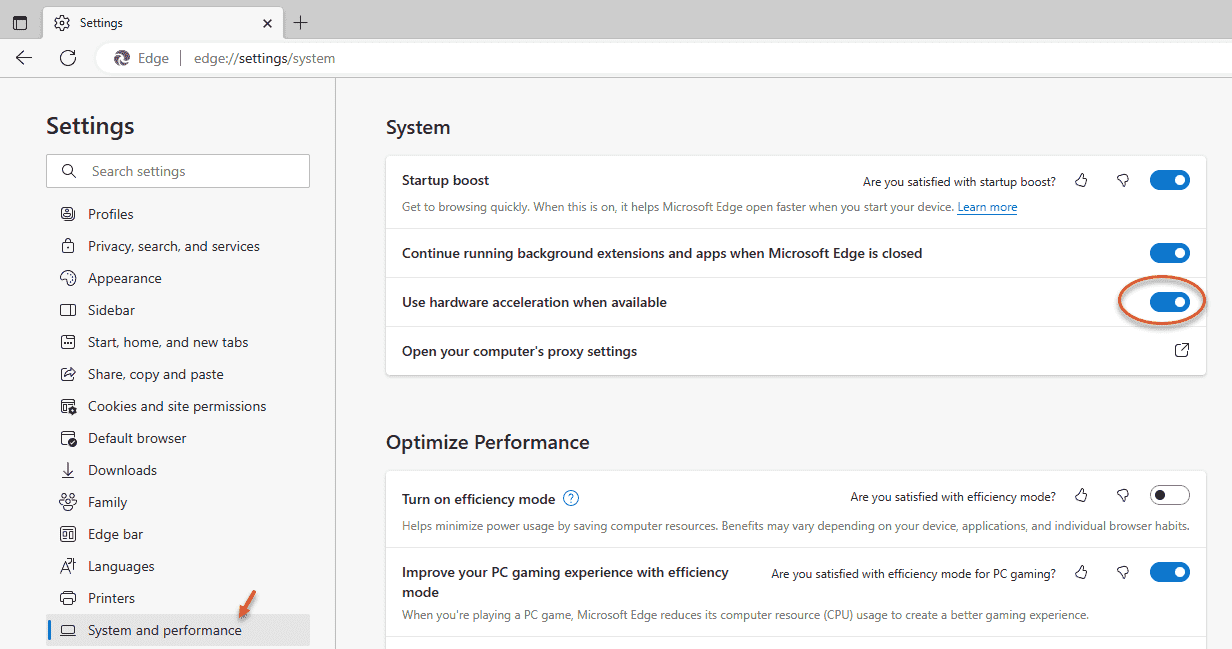
- Choose System and Performance on the left-hand side
- On the right-hand side, Toggle the button to turn ON(Button will turn blue in color) Use hardware acceleration when available
- Now, Click on newly appeared Restart Button

Turning OFF Hardware Acceleration :
In the window that opens,
- Choose System and Performance on the left-hand side
- On the right-hand side, Toggle the button to turn OFF(Button will turn white in color) Use hardware acceleration when available
- Now, Click on newly appeared Restart Button
To see the changes, click on the Restart button next to For this setting change to take effect, restart your browser or manually close and re-open Edge.
Method 2: By Tweaking the Registry Settings
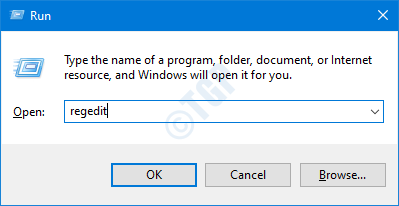
Step 1: Press Windows+r at the same time, in the Run window , type regedit and hit Enter

Step 2: In the Registry Editor that opens, type or copy-paste or navigate to HKEY_LOCAL_MACHINE\SOFTWARE\Policies\Microsoft\Edge location.
NOTE: If Edge folder does not exist in the given location, create one (Right Click on Microsoft folder –> New –> Key –> Press Enter)
Step 3: On the right-hand-side, right-click anywhere and in the context menu that shows up
- Choose New
- Select DWORD(32-bit) Value

Step 4: Name the DWORD key as HardwareAccelerationModeEnabled
Step 5: Right-click on HardwareAccelerationModeEnabled and Choose Modify

Turning ON Hardware Acceleration :
In the Edit String window, Set 1 under Value data and press OK to Turn ON Hardware Acceleration in the Microsoft Edge

Turning OFF Hardware Acceleration :
In the Edit String window, Set 0 under Value data and press OK to Turn OFF Hardware Acceleration in the Microsoft Edge

NOTE :
- The above registry setting can be used in Microsoft Edge version 77 and beyond in Windows 10
- When the changes are made from the registry, the changes are applied to all the users.
- Once the changes are Turned ON/OFF using the above method, it cannot be disabled using the Browser Settings. Refer to the snapshot below.

- If you do not want to control this feature using the registry method in the future, you may delete the Edge folder we had created in Step 2. (Right Click on Edge Folder –> Delete –> Press Enter).After doing so, you will be able to change the settings from Browser henceforth.
That’s all. Thank you for reading. Hope this has been useful.