If you are looking for a solution to the error There are no more files error , that pops up with a description “There are no more files” , then you are at the right place.
Before digging deeper, let me give you a brief description on what Windows System Errors are. Whenever users are working with the system, unknown and unexpected errors show up with a code associated with them. These error codes help the users analyze and investigate what exactly is happening with the system. A complete understanding of the program and it’s runtime context is required for the users to understand these codes and find feasible solutions to deal with it. Non-system software and third party designs can also be a reason behind it.
ERROR_NO_MORE_FILES, commonly known as Code 18 is one such Windows System Error code which you might encounter while trying to save or copy files. There are a number of possible scenarios that might have triggered this error.
I suggest you to try out the following repair methods to get away with it.
Method 1 – Uninstall ASUS data security management
If you had recently installed any software, and it is first time you see this error code in your system, then there are high chances of this software being the reason. To uninstall it,
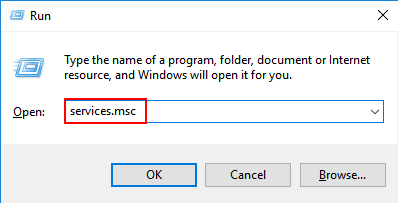
Step 1: Press Windows key + R key together to open run.
Step 2: Write services.msc in it and click OK.

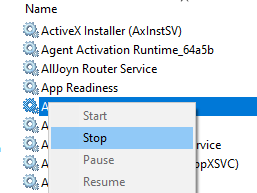
Step 3: In service manager window, locate ADSM service. Right click on it and stop it.

Step 4 : Open Control Panel from Start menu in the Windows Search Bar.

Step 5 : Click on the Uninstall a program option under Programs in the page that opens up.

Step 6 : Uninstall ASUS data security management .
Step 7 : Restart your system and check if the error still persists.
Method 2 – Check For Any File Corruptions
This requires the Command Prompt to be opened in elevated mode.
Step 1 : Open Start > type cmd > Right Click On Command Prompt > Select Run as Administrator.

Step 2 : Now, type in the command sfc /scannow as shown below.

Step 3 : This runs a complete check on files and once the scan is complete, you are required to restart your system. All the corrupted files will be replaced on doing so.
The above command can also help in Repairing any registry issues and it runs a SFC scan through them to find any discrepancies.
Method 3 – Run a disk check for Errors
Running a check disk points out all the system errors and also any inconsistencies associated with your operating system. To do so,
Step 1 : Open up the command prompt in the elevated mode. To do so, Open Start > type cmd > Right Click On Command Prompt > Select Run as Administrator.

Step 2 : Type in the command chkdsk C: /f to run a check disk on the C drive. You can replace the C in the command with any letter of your hard drive partition. Hit enter and the process starts.

Incase, the process is unable to start due to some ongoing operations, you have an option to make it start automatically on your system restart.
Step 3 : A report on the issues found, fixed or checked in will be generated upon successful completion.
Step 4 : Reboot your system normally to resolve the issue.
Method 4 – Restart Your System in Safe Mode
Saving or copying your files while your system is in Safe Mode is another possible solution.
Step 1 : To do this, hold down the shift key and click on the on-screen Power button available in your Start Menu simultaneously. Without releasing the Shift Key, select the Restart option.

Step 2 : You would land on a window as shown below. Click on the feature Troubleshoot under Choose an Option.

Step 3 : Select the option Advanced Options under Troubleshoot.

Step 4 : Under the Advanced options, you are required to choose Startup Settings.

Step 5 : Under the Startup Settings, you will be prompted to Restart the system. Click on Restart which will reboot your system in Safe mode.

This may take a little while. Save or copy your files now and restart your system again. You should face no issues.
Method 5 – Reinstall Or Update Your Drivers
Any changes that you might have done to your system recently could have probably messed up your driver. In such a case, it is highly recommended to either reinstall it or update it.
Step 1 : If you had received the error from Device manager, then try to pin point the driver causing the issue, from the description of the error.
Step 2 : Open up the Device Manager tab by doing a search on the Windows Search Bar.

Step 3 : Select the appropriate driver from the list of drivers available. Right click on it.
Step 4 : Here, you get two options. One is to uninstall the driver and other is to update it.
Option 1 : To uninstall the driver, choose the option, Uninstall device.

Option 2 : To update the driver, choose the option Update Driver.

Step 5 : If you had chosen the Uninstall device option in Step 4, it prompts you for confirmation. Click Uninstall again. It might take a little while for the complete uninstallation Process.

Step 6 : Reboot your system to view the updates.
Method 6 – Run a Full Scan Of Your System
In case, you have any third party antivirus software installed in your system, please use that to run a complete check on your system. Otherwise, you can make use of the default one provided by Microsoft.
Step 1 : Open up the Windows Security application.
To do so, Go to Start > type Windows Security > hit ENTER. This lands into the Window’s built-in antivirus page, Windows Defender.

Step 2 : Click on Virus And Threat Protection option on the Left Tab.

Step 3 : In the Virus and Threat Protection Page that pops up, you will find a feature named Scan options below Quick Scan. Click on it.

Step 4 : You are now required to select the Full Scan option, followed by Scan now that does a complete scan for any threats on your system. This may take a while.

Any malware that is detected on your system will be shown up at the end.
Method 7 – Clean Boot Your System
In case of conflicting programs or application in your system, a clean boot may help identify the drivers causing the issue. To accomplish this, follow the below steps.
Step 1 : Open up the System Configuration by sequencing through the actions – Start > type msconfig > Select System configuration. Alternatively, you can directly search for it in the search bar.

Step 2 : Click on the Services Tab in the window that opens up, and check in the Hide All Microsoft Services checkbox and click Disable All.

Step 3 : Open up the Task Manager from the Start Menu. You can do this by searching for Task Manager from the Windows 10 Search bar.

Step 4 : Click on the Startup Tab as shown in the image below. Select all the items under it, and click on the Disable Option.

Step 5 : You are now required to switch to the System Configuration dialog box as mentioned in the first step. Open up the Startup tab and click on the OK button.

Step 6 : Restart your system to fix any issues that might have persisted.
If you still get the error after trying all the above methods, then a better option will be to do a complete system recovery. This brings back the system to a working condition without a need to reinstall the Operating System. It recovers the system completely from any malfunctions, file corruptions and install failures. Good luck.
Please feel free to comment in case of any queries.