How to turn on Anti-Adware feature in Windows 10 defender: – Adware is short for advertising-supported software. When a user tries to install something useful in his/her computer system, he/she is often tricked into installing the adware alongwith. But don’t worry, Windows 10 users have good news. Windows Defender defends your system from such attacks. It is very easy to turn on the anti-adware feature in your windows 10 defender. For this, we have to make some changes in the registry editors. Care is to be taken while updating the registry editors. Read on, to learn how to succesfully and safely turn on the anti-adware feature in windows 10 Defender with the help of regedit program.
STEP 1
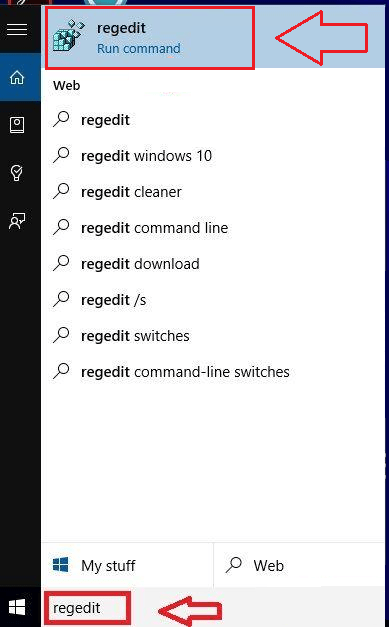
- Inorder to turn on the anti-adware feature in Windows 10 Defender, we need to make some changes to the registry entries. For that, we need to run the regedit program first. Span out your Start menu and type in regedit. From the search results, find the regedit program and click on it.
STEP 2
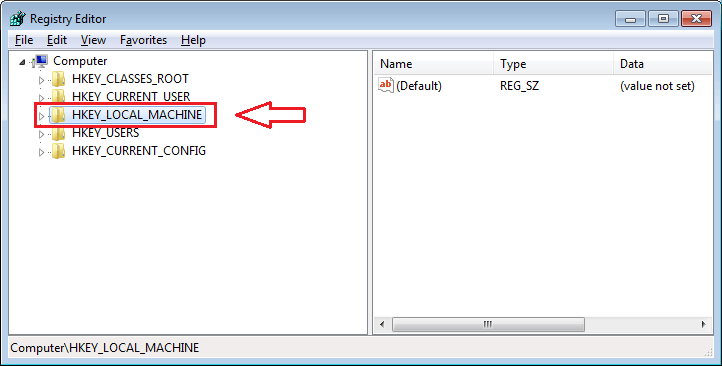
- From the left pane of the window named Registry Editor, find the option HKEY_LOCAL_MACHINE and click on it.
STEP 3
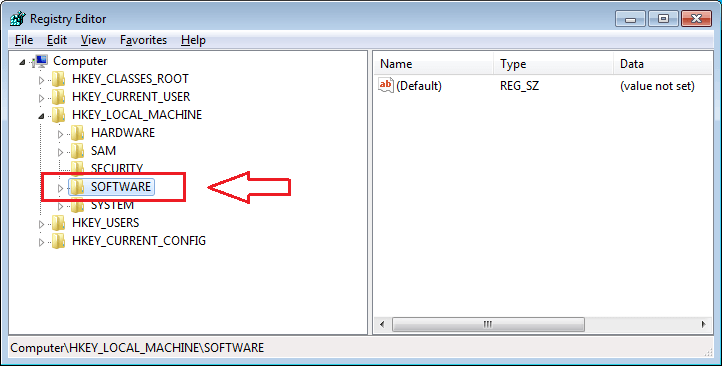
- There will be an option named Software in the options listed under HKEY_LOCAL_MACHINE. Click on it to get to the next step.
STEP 4
- Under Software, click on Policies option.
STEP 5
- Now, three options will span out. Adobe, Google and Microsoft. It’s on Microsoft, that you need to click next.
STEP 6
- Under Microsoft, find Windows Defender to click on.
STEP 7
- Next step is clicking on the option MpEngine. If you can find it under Windows Defender, then simply click on it. Else, don’t worry. You just need to create a new key, that’s all. Right click on Windows Defender option, then on New and then on Key.
STEP 8
- Now you will see that a new key is generated. Rename the new key as Mpengine and click on it.
STEP 9
- Next step is to find a DWORD named MpEnablePlus from the right window pane. A DWORD is a 32 bit unsigned integer. If you find it, click on it. If you don’t, right click on the right window pane, then click on New and then on DWORD (32-bit) Value.
STEP 10
- As next, Rename the newly created DWORD value as MpEnablePlus.
STEP 11
- Now you need to double click on the newly created MpEnablePlus DWORD value. This will result in the opening of a new window named Edit DWORD (32-bit) Value. You will find a text field named Value data. Change it’s value from 0 to 1. Click on Ok. You are all set. Restart the system for the changes to take over.
STEP 12
- Now that the anti-adware feature is turned on, whenever Windows detects an unwanted software, it shows a notifictaion close to the status bar.
STEP 13
- To see the effects, open Windows Defender. Open the History tab. Now if you check the radio button for All detected items, you will be able to view the quarantined items. They can be eaily removed by the Remove all button at the bottom.
That’s it. Turning on the anti-adware feature in Windows 10 defender is as easy as that. You can easily opt not to buy expensive software inorder to enable this functionality, when Windows itself can do the job for you. Hope the article was found useful.


