When working on a Windows 11 & Windows 10 system, you need a lot of apps to work with. While opening the app through the Start menu or the Windows search , you usually see or identify the app through it’s explicit icon. However, some users are reporting of coming across a strange issue, where the thumbnail icons of the Microsoft apps are not showing in the Windows 10 Start and Search menu when looking up for specific app.
On the other hand, some other users report that the thumbnail icons are missing only while using the Windows search and is displayed normally in the Start menu instead. While this issue is specifically showing up on the Windows 10 platform, there are users who report that for them, the issue is exclusive for Microsoft Office apps.
Some of the reasons why the thumbnail icons of apps won’t show up in the Windows Start menu and the Windows search are, when the Google Drive sync is causing an issue, Windows is not set to save the thumbnail previews in the Taskbar or when the icon cache file is not working properly.
Fortunately, we have found a few solutions that may help you fix the missing thumbnail icons of Windows 10 apps in Windows search and Start menu.
*Note – Before you proceed with the below solutions, make sure that app shortcuts are all in their right path as below:
C:\ProgramData\Microsoft\Windows\Start Menu\programs
Once you are confirmed, you can also try to run an anti-virus or malware to rule out the possibility of a virus attack. However, if the shortcuts are in the correct path and the system is clean, you may try the below methods.
Method 1: Pause Syncing for the Google Drive App
Try this method, if you already have the Google Drive app installed and that could be one of the major reasons why you may encounter this error. Sometimes, the constant syncing of the Drive in the background can interfere with the graphics display on your Windows 10 PC. Follow the below steps t possibly fix the issue:
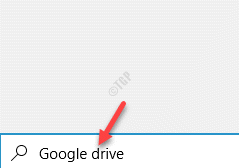
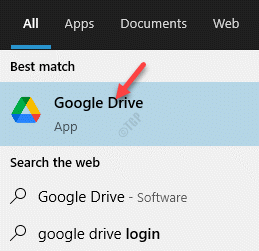
Step 1: Go to Start and type Google Drive in the Windows Search bar.

Step 2: Click on the result and it will start running the Google Drive in the background.

Step 3: Now, go to the right side of the Taskbar and click on Notification Area (System Tray) icon (up arrow).
In the System Tray, right-click on the Google Drive icon.

Step 4: Next. in the small interface that opens, click on the gear icon (Settings) on the upper right.
Click on Pause syncing to pause the Google Drive from syncing in the background.

Step 5: Search Display settings in Windows taskbar search. Click on Display settings from the search result.

For Windows 10
Change the Scale and layout settings to recommended settings

For Windows 11

*Note – If it still doesn’t work, follow the Steps 6 through 8 and set the Change the size of text, apps and other items field back to 100% (Recommended) under the Scale and layout section on the right.
Now, check back in the Start menu and Windows search, and the thumbnail icons for the apps should be visible in your Windows 10 PC.
Method 2: Make Custom Changes in Performance Options
This method helps you to force your system to begin the taskbar thumbnail previews by making certain change to he performance options. Based on some user experience, this tweak forces your Windows 10 PC to show the correct or the missing icon back as you search for the app in the Windows search bar or in the Start menu. Here’s how to make the change:
*Note – The following change that we are going to make is turned off default and hence, the change needs to be made through the System Properties window. Here’s how:
Step 1 – Press Windows key + R together to open run.
Write sysdm.cpl in it and click OK.

Step 2: Right-click on the result (sysdm.cpl) and select Run as administrator to open the System Properties window with admin rights.

Step 3: In the System Properties dialogue box, go to the Advanced tab and under the Performance section, click on Settings.

Step 4: It opens the Performance Options window.
Here, under the Visual Effects tab, select the Custom option and in the list, check the box next to Save taskbar thumbnail previews.
Press Apply and then OK to save the changes and exit.

Press Apply and then OK again in the System Properties window to confirm the changes made and close the window.
Now, type the name of apps in the Windows search box and you should now see the thumbnail icons of the apps.
Method 3: Delete the IconCache File
The Windows app icons are usually saved inside a file named Icon Cache. This helps the icons to be recovered immediately when required. However, sometimes this cache file for icons may get corrupt leading to missing thumbnail icons for apps in your Windows 10 Start and Search menu.
This method helps you to remove the IconCache file, and when you start using the Start menu and the Windows search again, the file gets rebuilt again. Follow the below steps to delete the IconCache file to rebuild it:
Step 1: Search file explorer options in Windows search box. Click on File explorer options from the search result which appears.

Step 2: Click on View Tab. Just select show hidden files option. Click on Apply and OK.

Step 3: Now, right-click on the Start menu and select Run to launch the Run command window.

Step 4: In the Run command window, type Appdata in the search field and hit Enter to open the folder in the File Explorer window.

Step 5: Double-click on the Local folder to open it.

Step 6: Now, find the IconCache.db file, select it and hit Delete.

Now, restart your PC and check your Windows 10 Start menu and the search bar. The thumbnail cons of the apps should be visible now.
Method 5: Rebuilding the Icon Cache using Command Prompt
If you are unable to find the IconCache file or somehow unable to rebuild cache using the previous method, you can use this method to rebuild cache using the Command Prompt. Let’s see how:
*Note – This method is specific to Windows 10 only.
Step 1: Press the Win + R keys together in your keyboard to open the Run command window.
Step 2: In the search field, type cmd and press the Ctrl +Shift + Enter shortcut key on your keyboard to launch the elevated Command Prompt.

Step 3: In the Command Prompt (admin) window, run the below command one by one and hit Enter after each command:
ie4uinit.exe -show
taskkill /IM explorer.exe /F
DEL /A /Q "%localappdata%\IconCache.db"
DEL /A /F /Q "%localappdata%\Microsoft\Windows\Explorer\iconcache*"
shutdown /r /f /t 00
*Note – Once you execute the last command, it will restart your PC immediately, hence, make sure that you save any data that’s not stored, before you proceed to execute the commands.
Once the PC restarts, check if the thumbnail icons of apps not showing issue in your Windows 10 search and start menu is fixed.
Method 6:Remove Google Drive File Stream
Coming back to Google Drive app, it’s often the major reason behind the break-down of the app icons or other graphic related issues on your Windows 10 PC. This occurs when the sync is broken in the Google Drive File Streaming that’s known to sync files to and fro computer and the cloud. In this case, we must break the Google File Streaming syncing process by exiting the app and uninstall it, till we can recover the function.
*Note – Before you proceed to quit the Google Drive File Streaming and remove it, make sure you create a backup of the File Stream folder data.
So, here’s how you can quit the program and remove it:
Step 1: Go to Taskbar and on the right side, click on the small up arrow to open the system tray.
Here, click on the Google Drive icon.

Step 2: In the Google Drive interface that opens, click on Settings (gear icon) on the upper right.
From the list, select Exit.
This will close the Google Drive app from running in the background.

Step 3 Press Windows key and R key together from keyboard to open RUN command box
Step 4 – Type appwiz.cpl in it and click OK

Step 5:from the list of programs locate Google Drive File Streaming , right click and uninstall.
Step 7: Select Google Drive File Streaming and select Uninstall.
Now, wait for the app to be uninstalled.
Once uninstalled, reboot your PC and you should now be able to view the thumbnail icons of the Windows 10 apps in the Windows search and the Start menu.
Method 7: Run SFC Scannow
Sometimes, the thumbnail app icons may not show up in your Windows 10 search and Start menu if the system files are broken or corrupt. In such a case, you can run a system file checker scan which detects any corrupt files and repairs them on the spot. Let’s see how to run the scan:
Step 1: Press the Win + X hotkey and select Run.

Step 2: It opens the Run command window.
Here, type cmd in the search box and press the Ctrl + Shift + Enter keys together on your keyboard to open the Command Prompt with admin rights.

Step 3: In the Command Prompt (admin) window, type the below command and hit Enter:
sfc /scannow

This process takes a few minutes, so wait till it gets over. It will look for any damaged or corrupt files and if found, will repair them instantly.
Once done, exit Command Prompt window and restart your PC.
Go to the Start menu or type app names in the Windows search box to see if the app icons are visible now.
Method 8: Create a New User Account
If all of the above methods fail to work, the last option would be to create a new user account. Let’s see how;
Step 1: Right-click on Start and select Settings.

Step 2: This will open the Settings window.
In the Settings window, click on Accounts.

Step 3: In the next window, click on Family & other users option on the left.

Step 4: Now, go to the right side of the window and under the Other users section, click on Add someone else to this PC.

Step 5: Next, in the How will this person sign-in? window, click on the I don’t have this person’s sign-in information link.

Step 6: In the Create account window, click on Add a user without a Microsoft account link.

Step 7: Now, in the Create a user for this PC page, enter your desired Username, Password and then re-enter the password.
Click Next and follow any on-screen instructions to complete the process.

Now, login to this new user account and check in the Start menu and Windows search bar if the thumbnail icons of apps are showing now.