This is a tutorial on how to enable the ClipSVC on your Windows 11 & Windows 10 computer. CLIPSVC or Client License Provide service provides a support structure for all the Windows Store app. So, if you have disabled the CLIPSVC on your computer, all the Store apps you have bought/owned won’t work properly. This problem won’t solve unless you enable the CLIPSVC again on your system.
Workarounds –
1. Restart your computer once.
Fix 1 – Run the registry script
You have to create and run a registry script on your computer.
[
Warning –
You are going to run a registry script on your computer that alters certain keys on your computer. This may cause some issues. So, we suggest you create a backup of the registry keys if you haven’t created one yet.
1. At first, tap the Windows key and the R key at the same time.
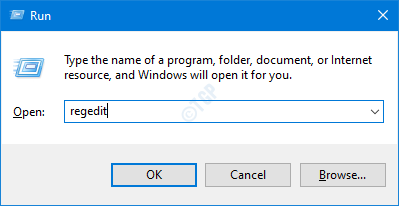
2. Once the Run terminal appears, type “regedit” and hit Enter.

3. Once you have opened the Registry Editor, you will need to click on the “File” and then click on “Export“.
4. Save the backup in a secure place.

After taking the backup, close the Registry Editor window.
]
1. Open the Notepad on your computer.
2. Then, copy-paste these lines in the Notepad.
Windows Registry Editor Version 5.00
[HKEY_LOCAL_MACHINE\SYSTEM\CurrentControlSet\Services\ClipSVC\Parameters]
"DisableSubscription"=dword:00000000
"InactivityShutdownDelay"=dword:0000012c
"RefreshRequired"=dword:00000001
"ServiceDll"=hex(2):25,00,53,00,79,00,73,00,74,00,65,00,6d,00,52,00,6f,00,6f,\
00,74,00,25,00,5c,00,53,00,79,00,73,00,74,00,65,00,6d,00,33,00,32,00,5c,00,\
43,00,6c,00,69,00,70,00,53,00,56,00,43,00,2e,00,64,00,6c,00,6c,00,00,00
"ServiceDllUnloadOnStop"=dword:00000001
"ProcessBiosKey"=dword:00000001
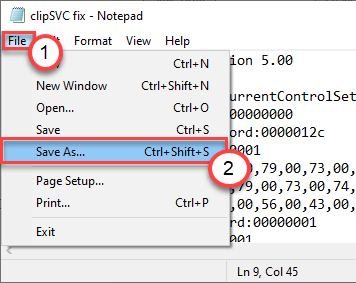
3. Then, click on “File” on the menu bar.
4. Next, click on “Save as” to save the file.

5. Go to a location of your choice on your computer. Click on ‘Save as type:’ and set it to “All Files“.
6. Next, name the file as “clipSVC solution.reg“.
7. Finally, click on “Save” to save the registry script.

8. Go to the location where you have saved the registry script.
9. Here, right-click on the “clipSVC solution.reg” file.
10. Then, click on “Merge” to run the script file and merge the changes with the registry keys.

11. You will see a prompt has appeared on your computer asking for confirmation.
12. Just, click on “Yes” to confirm the merger.

13. Now, type “cmd” in the search box.
14. Then, right-click on the “Command Prompt“. Further, click on “Run as administrator” to open up the terminal as an administrator.

15. Once the Command Prompt appears, type this command to start the clipsvc service.
net start clipsvc

Close the Command Prompt terminal.
Try to access any Store app on your computer. Check further it is opening or not.
Fix 2 – Enable CLIPSVC service
Try to start the clipSVC service from the Services.
1. At first, right-click on the Windows icon and then click on “Run“.
2. Write “services.msc” in the Run window. Click on “OK“.

3. When the Services window appears, scroll down to find the “Client License Service (ClipSVC)” service.
4. After that, double-click on the service to run it.

5. To start the service, click on “Start“.

6. Don’t forget to “Apply” and “OK” to save the changes.

Close the Services window. Try to open any app that you have downloaded from Store (like – Groove Music, Movies & TV, etc.).
Check if this works.
Fix 3 – Try starting the CLIPSvc from CMD
If you can’t startup the CLIPSvc from the Services screen as the ‘Start’ button is greyed out, try starting it from the terminal.
1. Press the Windows icon and click on “Run“.
2. Write “cmd” in the terminal. Press the ‘Ctrl+Shift+Enter’ together to access the Command Prompt screen.

3. To start the clipsvc service, execute this command.
net start clipsvc

Close the Command Prompt terminal.
This should enable the ClipSVC on your computer.