Is the external hard disk not detected by Windows? Don’t worry. Usually, Windows 10 automatically detects any drive plugged into it, thanks to the plug-and-play feature. But sometimes this problem appears where Windows 10 doesn’t recognize the external media device. You can easily solve this problem simply by following these easy solutions.
Workarounds –
1. Plug in the external media device to another port on your device. Try attaching it to the ports on the back of the cabinet. Check further.
2. Complete installing the pending updates on Windows.
Fix 1 – Manually assign a drive letter
If the external devices don’t have a drive letter automatically assigned to them, try to do it manually.
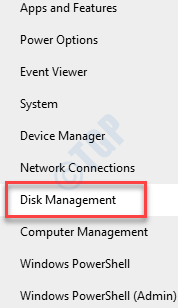
1. Simply, press the Windows key +X keys together.
2. After that, just click on the “Disk Management” to access it.

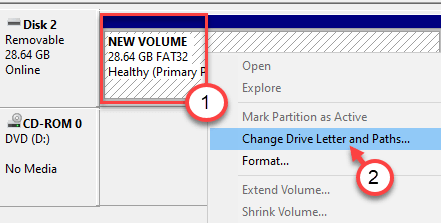
3. Once the Disk Management opens up, you will notice the external drive here.
4. Then, right-click on the external hard disk drive and click on the “Change Drive Letter and Paths…“.

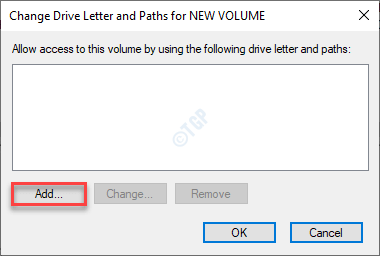
5. To add a new driver letter, click on “Add…“.

6. Now, select the “Assign the following drive letter” option.
7. After that, assign a new drive letter for the system from the drop-down.
8. Finally, click on “OK” to complete the change.

Now, close the Disk Management window.
Open the File Explorer and check if the drive is appearing now.
NOTE –
This process is a workaround. The external drive may be appearing now on the file explorer, but you have to redo the workaround once again if you unplug and plug in the external media. To enact a permanent solution, go for the next solutions.
Fix 2 – Enable automatic mounting of volumes
To let your computer automatically detect the mounting of volumes, follow these steps.
Step – 1 Run VIrtual DIsk
1. At first, right-click on the Windows icon and then click on “Run“.
2. Write “services.msc” in the Run window. Click on “OK“.

3. When the Services window appears, scroll down to find the “Virtual Disk” service.
4. Then, double click on the “Virtual Disk” service to access it.

5. After that, click on the ‘Startup type’ and select “Manual” from the drop-down.
6. If the service hasn’t started yet, click on “Start” to start it now.

7. Don’t forget to save this setting, click on “Apply” and “OK“.

Close the Services window.
Step 2 – Enable automatic mounting of volumes
Now, you can enable the automatic mounting of the volumes.
1. Right-click on the Windows icon and click on the “Run“.
2. Now, type “cmd” in the Run terminal. Then, press the Ctrl+Shift+Enter to access it.

3. Once the Command Prompt appears, type this command and hit Enter.
automount

This will disable the automatic mounting feature.
4. Again, type this command and hit Enter.
automount enable

Close the Command Prompt terminal and restart your computer.
This will enable the auto-connect and disconnect feature again.
Try disconnecting and reconnecting the external hard drive.
Fix 3 – Check if any attribute is causing this issue
Check if any attribute is affecting the visibility of the drive in the system.
1. Type “cmd” in the Search box beside the Windows icon.
2. Then, right-click on “Command Prompt” which appears on the elevated search result, and then click on “Run as administrator“.

3. Now, you have to enter the diskpart management system.
Simply copy-paste these two commands one-by-one and hit Enter to execute both of the commands sequentially on your computer.
DISKPART
lIST DISK

4. Here, you will notice the list of disks. Just, check the “Disk No” that contains the partition.
Check out the size of the disks and then decide which is disk contains the partition. Usually, the drive that is of the highest size is the disk that contains the partition.
( Example-In this case, it is the “Disk 0” as the size of the disk is 931 GB).

5. To do so copy-paste and modify these commands in the Command Prompt window one-by-one and hit Enter after each of them to see the disk’s partitions.
SELECT DISK ( disk no.)
LIST PARTITION

6. Paste these commands one at a time, modify the command according to it, and hit Enter.
SELECT PARTITION (partition no.)
Replace partition no. with the partition no that contains the external hard disk drive. You can easily apprehend the particular partition according to the size.
Example – We are altering the attributes of partition 6. So, the command will be –
SELECT PARTITION 6

7. To get a list of attributes this volume possesses, execute this command.
attributes volume

Here, you will see the status of four attributes. Check if any attributes are set to “Yes“.
(In this case, as you can see the ‘Hidden‘ attribute is set to “Yes“. )
If it is proceed further.
8. Paste this command and modify it according to the requirement.
attributes volume clear attributename
[
Replace the “attributename” in the command with the name of the attribute that is set to “Yes“.
Example – In our case, ‘Hidden’ is set to yes. So, the command will be –
attributes volume clear hidden

]
Repeat this same action for any other attributes that is set to “Yes”.
Like – If you see that the “No Default Drive letter” is set to “Yes”, you have to execute this command –
attributes volume clear NoDefaultDriveLetter
9. Once you have cleared these attributes, the external media device will open up automatically.
Check further it this has worked out in the File Explorer.
Fix 4 – Uninstall and re-install HDD
Try uninstalling the faulty hard disk drive from your computer.
1. Press the Windows key and the “Run“.
2. Then, type “devmgmt.msc” in the Run terminal.

3. Now, expand the “Disk drives” section.
4. Then, right-click on the external hard disk drive and click on “Uninstall device“.

5. Then, click on “Uninstall” to uninstall the drive from your computer.

Just restart your computer. This will re-install the driver for the external hard disk drive.
Your problem should be solved.