In order to download and play console games, users make use of the Xbox application on their Windows PC. But, lately, many users have noticed an error “This location isn’t set up for installing games” when they try to install new games using the Xbox app. Once this error message is seen, the game installation process is stopped.
It has been seen that some of the users facing this error did not have Gaming services installed on their PCs which generally happens after you have upgraded the Windows OS. The presence of Gaming services helps the Windows Store in installing large game files through Microsoft Store. Also, this error has been seen in cases where the default storage location for the download of game files has not been set up.
Are you confronting this error message with the Xbox app on your Windows PC? Then, read this article to find some solutions that you can try to resolve the Xbox app error. Before moving ahead with the fixes, check the points given below in workarounds to see if they fix the error.
Workarounds
1. Check for any Windows updates and install them.
2. Make sure that the game you are trying to install is compatible with the version of Windows.
3. Restart the Xbox app.
4. Reboot your PC and check if the error exists.
Fix 1 – Check for Gaming Dependencies and Download them
Gaming dependencies are those apps that need to be present on your computer in order to install or play games. Once you find the gaming dependencies that are missing, you can install them if the installations are not complete.
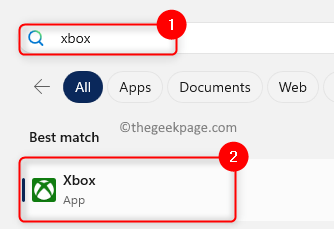
Step 1. Hit the Windows key and type xbox in the search box.
Step 2. In the Best match search results, click on Xbox app.
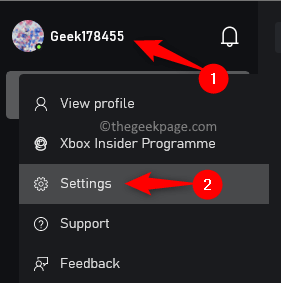
Step 3. Click on your profile name in the upper left corner of the app window.
Step 4. In the menu that opens, click on Settings.
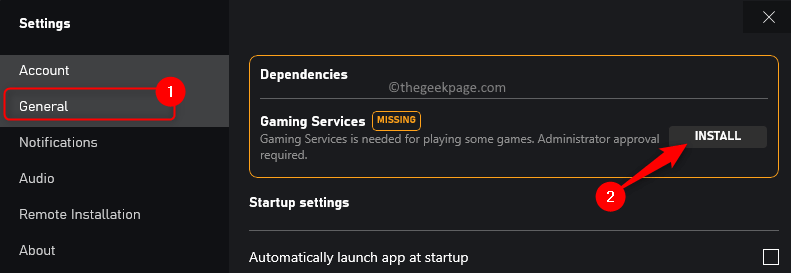
Step 5. Select the General tab in the Settings window.
Step 6. If there are any gaming dependencies that need to be installed, there will be a notification on the right side at the top.
Step 7. If you see any missing dependencies here, click on the Install button.
Step 8. Wait for the installation process to finish. Then, try installing the game and check if the error is fixed or not.
Fix 2 – Choose a Default Storage Location
Step 1. Open the Settings app using Windows + I key combination.
Step 2. With the System tab highlighted in the left panel, scroll and locate Storage on the right.
Step 3. Click on Storage.
Step 4. Go to the Storage management section and click on Advanced storage settings.
Step 5. In the list displayed, select Where new content is stored.
Step 6. On this page, use the dropdown under New apps will save to and select the drive of your choice.
Step 7. Then, click on Apply.
Step 8. Try to download and install the game and see if the issue is resolved.
Fix 3 – Update Gaming Services
Step 1. Open the Run dialog using Windows + R.
Step 2. Type powershell and press Ctrl + Shift + Enter keys together to run PowerShell as an administrator.
Click on Yes when prompted by UAC.
Step 3. Type the command given below and hit Enter.
Get-AppxPackage *gamingservices* -allusers | remove-appxpackage -allusers
Step 4. Exit PowerShell and restart your computer.
Check if the error still persists.
If the Gaming services don’t update after executing the above command then perform the steps below.
Step 1. Open Run (Windows + R).
Step 2. Type regedit and hit Enter to open the Registry Editor.
Step 3. Navigate to the location below.
HKEY_LOCAL_MACHINE\SYSTEM\CurrentControlSet\Services
Step 4. Under Services, look for keys named GamingServiceNet and GamingServices.
Step 5. Right-click on these keys one at a time and choose Delete.
Click on Yes to confirm the key deletion.
Step 6. Restart your system after you have deleted both of the above-mentioned keys.
Step 7. Hit the Windows key and type store.
Step 8. Click on Microsoft Store in the Best match results.
Step 9. Go to the Library tab in the bottom left corner.
Step 10. In the Updates & downloads section, check if there are any updates for Xbox or Gaming Services.
Step 11. If any updates are available, then click on the Update button to download and install the latest update.
Step 12. Check if the problem is resolved after the update.
Fix 4 – Use Microsoft Store to Install the Game
Step 1. Make sure that you are using the same account in both Microsoft Store and Xbox app.
Step 2. Open both the Xbox app and Microsoft Store.
Step 3. Search for the game in the Microsoft Store using the search box.
Step 4. Click on Install to download and install the game on your PC.
Step 5. You will see that the game is being installed both in Store and on the Xbox app.
Fix 5 – Update Permissions for the Windows folder
The lack of permission to WindowsApps folder after upgrading the OS to Windows 11 can be the reason for encountering this error. WindowsApps folder contains all the applications on your PC that were obtained from Microsoft Store.
Windows 11 users have admin permissions for WindowsApps in the C drive by default. However, when you change the location for saving new apps on your PC, the WindowsApps folder is created in the new drive location but it doesn’t have admin permissions. This may give rise to errors while installing games using Xbox.
Step 1. Hit the Windows key and type command prompt.
Step 2. With Command Prompt highlighted, click on Run as administrator on the right side.
Step 3. Type the command below and hit Enter.
takeown /f "<path>" /r
Note: Here, <path> is the name along with the path of the folder of which you want to take ownership. This path will be the path of the WindowsApps folder on the drive that is selected for saving apps.
Step 4. Open File Explorer (Windows + E).
Step 5. Navigate to the path C:\Program Files
Step 6. Select the WindowsApps folder and click on the Delete icon at the top.
Step 7. Make sure to delete this folder in the Recycle Bin of your system.
Step 8. Reboot your system and check if the error with installing the game on Xbox is resolved.
Fix 6 – Repair and Reset the Xbox App
Step 1. Press Windows + R to open Run.
Step 2. Type ms-settings: appfeatures and hit Enter to open the Installed Apps page.
Step 3. Look for Xbox app using the search bar in the list of installed apps
Step 4. Click on the three-dot menu associated with Xbox and choose Advanced options.
Step 5. On the Advanced options page, scroll down to the Reset section.
Step 6. Click on the Repair button.
Step 7. After the repair, check if the error is resolved.
Step 8. If the issue still persists, then go back to the Advanced options page and click on Reset.
Click on Reset again in the confirmation prompt.
Step 9. Once the app is reset, open Xbox and try installing the game to check if the error is fixed.
Fix 7 – Reinstall the Xbox App
Step 1. Perform Steps 1 – 3 as stated in Fix 5 above.
Step 2. Tap on the three ellipses associated with Xbox and select Uninstall.
Step 3. When prompted to confirm, click on Uninstall again.
Step 4. Wait for the app to uninstall.
Step 5. Open Microsoft Store and search for the Xbox app.
Step 6. Click on Get/Install to install the Xbox app on your PC.
Step 7. After Xbox is installed, try downloading the game and see if the error is still showing or not.
That’s it!
We hope that you found this article helpful in resolving the error “This location isn’t set up for installing games” in Xbox while trying to download and install any game on your Windows PC. Comment and let us know the method that helped you overcome the issue stated above.


