The Windows 10 OS comes with a default font of Segoe UI as it sadly does way with the possibility of changing the font through Control Panel or Personalization settings like in the previous versions.
It’s natural for you to want to change the OS fonts to the one of your choice so that you can be applied to File Explorer, message box, title bars, menus, and more. Unfortunately, Windows 10 ceased to offer that feature leaving you wondering how to change the font.
However, the good news is, you can still change the default system font in your Windows 10 PC by making some changes to the Registry.
Let’s see how.
Solution: Using Registry Code on Notepad
Before you make any modifications to the Registry make sure you create a backup for the registry data. This will help you to restore any loss of data while making the changes.
Step 1: Press the Win + R keys on your keypad (together) to open the Run command. Now, type Notepad in the search box and hit Enter to to open Notepad.

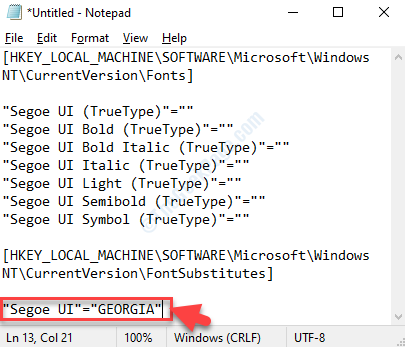
Step 2: Copy the below registry code and paste it in the Notepad that opens:
Windows Registry Editor Version 5.00

[HKEY_LOCAL_MACHINE\SOFTWARE\Microsoft\Windows NT\CurrentVersion\Fonts]

"Segoe UI (TrueType)"=""
"Segoe UI Bold (TrueType)"=""
"Segoe UI Bold Italic (TrueType)"=""
"Segoe UI Italic (TrueType)"=""
"Segoe UI Light (TrueType)"=""
"Segoe UI Semibold (TrueType)"=""
"Segoe UI Symbol (TrueType)"=""

[HKEY_LOCAL_MACHINE\SOFTWARE\Microsoft\Windows NT\CurrentVersion\FontSubstitutes]

"Segoe UI"="DESIRED FONT"
Make sure to replace the DESIRED FONT (highlighted) with the font you want to change it to. For instance, we want to change the font to Georgia (within quotes), so the code in the end, will look like this:
"Segoe UI"="GEORGIA"

*Note: To check how the final system font will look, follow the process as shown towards the end of the article.
Step 3: Now, click on the File option at the top, and and select Save As from the menu.

Step 4: Next, select Desktop as location, and go to File name and name it anything as per your choice followed by .reg in the end, but within double quotes.
For instance, we named it as, “change default system font.reg”.
Leave the Save as type field as it is, that is, as Text Documents (*.txt) and hit the Save button below.

Step 5: Now, go to the saved .reg file on desktop, double-click to run it, and click Yes on the UAC prompt to proceed. Press Yes again on the next prompt to confirm making the changes.
That’s it. So, this is how you can change the default system font in your Windows 10 PC via registry.
How To Check Which Font You Want To Use As System Font
Step 1: Now, in the Notepad, go to the Format option at the top. Click on it and select Font from the menu.

Step 4: Next, in the Font dialogue box, select your desired font under the Font section and check how it looks in the sample below.
Here we checked for the Georgia font. You can check your desired font.

This will help you know how the system font will look once changed to your desired font.