Changing a File Type (extension) is a straightforward job. But, sometimes even easier things can become tricky and changing the file extension is one of them. You should be extremely careful while changing the file type as a simple mistake can brick the file and make it inoperable. So, we have discussed multiple ways of altering a file type on Windows 11, 10.
How to change the File Type on Windows 11, 10
There are two ways you can do this. You can either use the direct GUI method( in the File Explorer) or you can alter the file type from the terminal.
Way 1 – Using the File Explorer
Way 2 – Using the CMD terminal
Way 1 – Change the file type directly
You can alter the file type directly from the context menu in the File Explorer. These are the steps you should follow to change the file type of the file.
STAGE 1 – Enable the extension view
Windows doesn’t show the extension of a file in default view. So, you have to enable that from Folder Options menu.
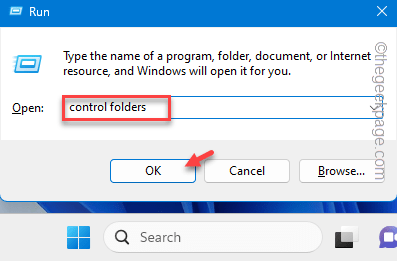
Step 1 – Open the Run dialog box using ⊞ Win+R keys together.
Step 2 – Put this in the box and hit Enter.
control folders
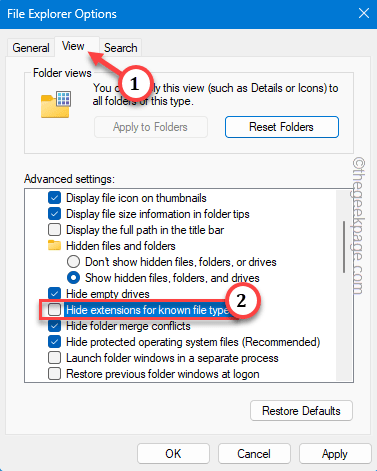
Step 3 – When you have opened up the Folder Options screen, go to the “View” pane.
Step 4 – Finally, uncheck the “Hide extensions for known file types” box.
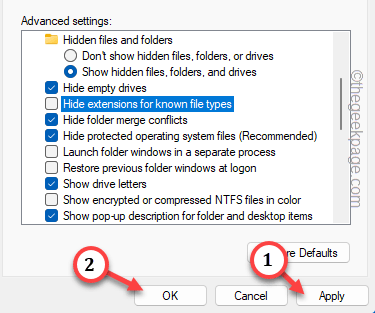
Step 5 – To save these changes, use “Apply” and “OK” functions consecutively to save the changes.
STAGE 2 – Change the file type
Now, you can very easily change the file type.
Step 1 – For the first step, you need to open the File Explorer.
Step 2 – Get to the location of the file.
Step 3 – Now, right-tap that file and tap “Rename” function.
Step 4 – Just remove the file extension and append the extension in it’s place.
Step 5 – Hit Enter to attempt the change.
Step 6 – This message will show up –
If you change a file name extension, the file might become unstable.
Are you sure you want to change it?
Step 7 – Ignore this and tap “Yes” to finally change the name.
That’s it! This is process that you can take to change the extensions of almost all the files.
Way 2 – Using the terminal
If you know your ways with the CMD terminal, renaming is done best from the terminal. These are the steps just to do that –
Step 1 – Start by tapping the Windows button once to access the search box.
Step 2 – Next, type “command” in the search bar.
Step 3 – After this, just right-tap the “Command Prompt” and choose “Run as administrator“.
Step 4 – You have to use the “cd” command to reach the location of the file.
[It will be easier if you copy the path of the file from the File Explorer directly or reach the folder one-by-one.]
cd location of the file
[Example – For example, the file that we are renaming is located here –
C:\Users\sambi\Downloads
So, the code is –
cd C:\Users\sambi\Downloads
]
Step 5 – Finally, you can use the rename code to rename the file.
ren current name new name
[ Replace the “current name” with the current name of the file and replace the “new name” with the name of the file with the new extension.
Example – The current name of the file is “BetterTogetherSetup.txt“. We are going to rename it “BetterTogetherSetup.exe“.
So, the command is –
ren BetterTogetherSetup.txt BetterTogetherSetup.exe
]
This way, you can easily change the file type on your Windows devices.


