Task Manager enlists all the startup items on your system that, as the name suggests, automatically start up when the computer boots up. Using the Task Manager, one can easily manage the startup items. But what if the “There are no startup items to display” this message shows up on your Task Manager screen? Usually, this occurs when the startup items are absent from the system files. But, don’t worry. There are some easy fixes that you can apply to find a quick resolution for this issue.
Workarounds –
1. The first thing you should try is to restart your computer. After you have restarted, check whether you can view the startup items or not.
2. Open the Recycle Bin and check whether you have removed the “Startup” folder by mistake. If that’s the case, just restore it and reboot your computer.
Fix 1 – Try rebooting the Explorer process
If this is a one-time glitch you can easily fix the issue just by restarting the File Explorer process.
1. Check if any instance of File Explorer is already opened. Otherwise, you have to press the Win key and the E keys together.
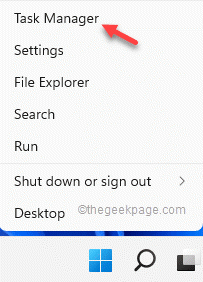
2. Then, press the Windows key+X keys together.
3. Thereafter, tap on the “Task Manager” to access it.
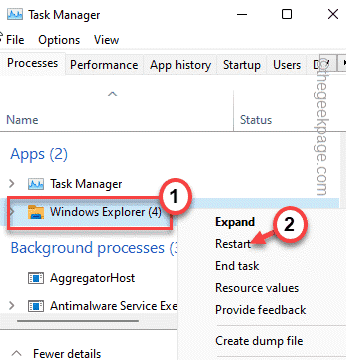
4. When the Task Manager opens up, right-click on the “Windows Explorer” process and tap on “Restart“.
Your computer screen will turn black for a brief moment and become unresponsive. Open the Task Manager again and test if this is working or not.
Fix 2 – Make a new Startup folder
If the older Startup folder is corrupt, you can create a new Startup folder.
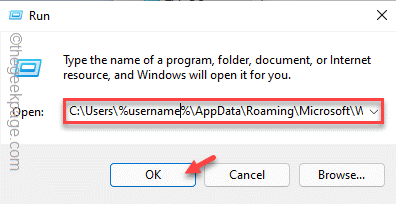
1. You may open the File Explorer by pressing the Win key +R keys together.
2. Then, paste this address into the terminal and hit Enter*.
C:\Users\%username%\AppData\Roaming\Microsoft\Windows\Start Menu\Programs\
3. When you reach there, try to look for the Startup folder.
4. If you can’t find it, right-click on the space and tap “New>” and tap “Folder“.
5. You can name it “Startup“.
Once you have done this, close everything and restart your system.
*NOTE –
If you want to fix the issue for all the users, you have to create the Startup folder in another location of your system.
You have to go to the Startup folder in the Windows folder. Open the Run terminal and paste this –
shell:common startup
Check if this is working or not.
Fix 3 – Add application shortcuts to Startup Folder
If only creating the Startup folder doesn’t work, you can move the application shortcuts to the Startup folder may work out.
1. At first, press the Windows key and type the name of the app that you want to start up with your system.
2. So, you can just right-tap the app and tap “Open file location“.
This will lead you directly to the shortcuts on the Programs page.
3. You can now find the root executable file. To do that, right-click on the shortcut file on the Programs page, tap on the shortcut file and click “Open file location“.
[If you don’t notice the ‘Open file location’ option from the right-click context menu, that app is not compatible with Windows Startup programs. ]
4. Look for the shortcut file in the core files of that app.
[
If you can’t find the shortcut file, you can create a shortcut file for that app on your own.
a. Just, right-tap the app file and tap “Show more options“.
b. Then, tap “Create shortcut” to create a shortcut.
]
5. Just, select the file and click on the “Copy” icon to copy it.
6. Once you have copied it, open the Run by pressing the Windows key+R keys together.
7. Type “shell:startup” in the Run terminal and click “OK” to open it.
8. Once you have opened it up, paste the app shortcut file in here.
This way, repeat this process of locating the shortcut file and copy-pasting the shortcut file in the Startup folder.
Once you are done, you can restart your machine. Once the system restarts, you can check whether the startup items are appearing or not.
Fix 4 – Run an SFC scan
SFC scan can find and fix the issue if this doesn’t work.
1. You can right-tap the Windows key and tap the “Run” option.
2. Then, type “cmd” and press Ctrl+Shift+Enter keys together to access the terminal with administrative rights.

3. You can run the DISM tool check with just a single code. Just, right down this line in the terminal and hit Enter.
DISM.exe /Online /Cleanup-image /Restorehealth
Let Windows complete the DISM scan.
3. After running the DISM scan, paste this command and hit Enter to run an SFC scan.
sfc /scannow
After the scanning process reaches 100%, close the Command Prompt and reboot your system.
Check if this works out.


