Whenever Microsoft Outlook finds a disparity between the copy of a locally stored file/event and the one saved in the cloud, it shows this long statement “One or more items in the folder you synchronized do not match. To resolve the conflicts, open the items and then try this operation again.” on your screen. Solving this issue is easier than other Outlook bugs. So, without wasting any more time, go through these solutions to fix the problem.
Fix 1 – Log in to the Outlook on web
You must check whether the event is updated/canceled by logging OWA in the Outlook web.
Step 1 – Go to your preferred browser and get to the Outlook.
Step 2 – Log into your account using the MS Office credentials.
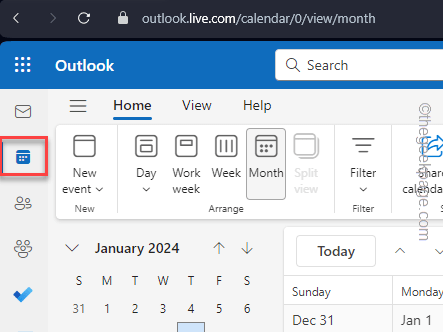
Step 3 – Once you are in there, go to the “Calendar” tab.
The online version will show you the actual status of the events. If there are any updates to the meeting/event, it will be showcased there.
You can adjust the event from there if you want.
Fix 2 – Clear the Offline items
The conflict is between the offline items and the files saved on the server. So, if you clear the offline items from the Calendar settings in Outlook, it should fix that.
Step 1 – While you are in the Outlook page, go to the “Calendar” tab.
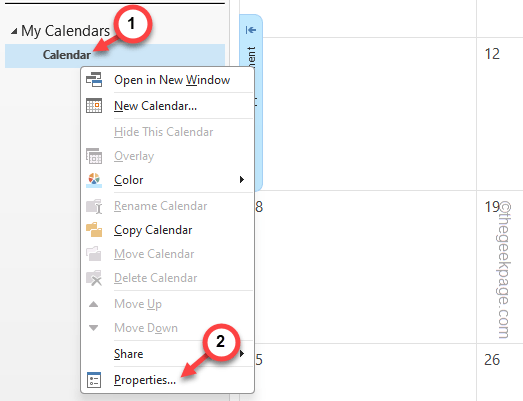
Step 2 – There, right-click the “Calendar” folder in there.
Step 3 – Choose to open up the “Properties” from the context menu.
Step 4 – Go to the “General” section.
Step 5 – Use the “Clear offline items” option to remove all the offline items from your computer.
Step 6 – Tap “OK“.
Once you have removed the offline items from the local storage, there won’t be any more contradictions between the local files and the online server.
Check if this works.
Fix 3 – Repair the Outlook Data File
Repairing the corrupted Outlook Data File should fix this problem.
NOTE – You must close the Microsoft Outlook before you proceed.
Step 1 – You can use the Outlook Repair tool to analyze and repair the corruption in the Outlook data file.
Step 2 – Open the File Explorer and get to this address –
C:\Program Files (x86)\Microsoft Office\root\Office19
[The actual address can be different, as it completely depends upon the version of Office files installed on your device.]
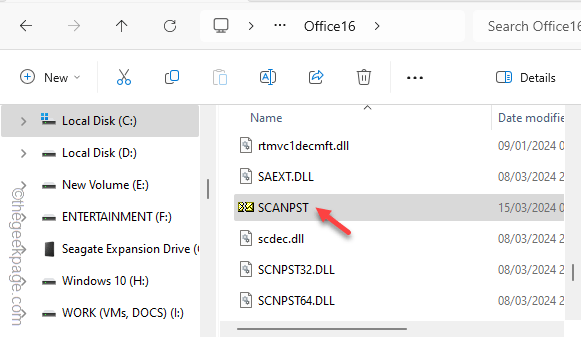
Step 3 – Find the “SCANPST” file in there.
Step 4 – Double-tap to start the Outlook Inbox Repair Tool.
Step 5 – Now, you have to load the Outlook date file in there.
Step 6 – So, tap “Browse“.
Step 7 – The number of Outlook data files on your local drive does depend upon the number of Outlook accounts, profiles.
Step 8 – Select the Outlook data file and click “Open“.
Step 9 – Next, tap “Start” to start the process.
Step 10 – On the following tab, use the “Repair” option.
This will fix any issues with the Outlook Data file.
Once this is done, feel free to use the Outlook app. There won’t be any discrepancies between the online version of the Outlook contents and the locally stored files.
Fix 4 – Use the MSRA tool
The Microsoft Support and Recovery Assistant can help you in this case.
Close any instances of Outlook app before attempting the solution.
Step 1 – Open the Microsoft Support and Recovery Assistant tool.
Step 2 – Tap the “Advanced diagnostics-Outlook” to download the tool.
Save it in an easily accessible location.
Step 3 – Later, double-tap the “SetupProd_ExpExp” unit that you have just downloaded.
Step 4 – This setup will install the Microsoft Support and Recovery Assistant tool. So, tap “Install“.
Step 5 – Tap “I agree” to agree with the terms and run the Support assistant on your device.
This tool will run and troubleshoot the issue on your system.
Check if this works.
Fix 5 – Use a new Outlook profile
Maybe the problem is with the Outlook profile. So, you should create a new Outlook profile and use that.
NOTE – Close the Microsoft Outlook window before you follow the following steps.
Step 1 – Load the Run window using the Win+R buttons together.
Step 2 – Next, paste this and hit Enter.
outlook.exe /manageprofiles
Step 3 – Tap the “Show Profiles” in the Profiles tab to open the Profiles page.
Step 4 – Use the “Add” option.
Step 5 – You have to give a specific name to this profile.
Step 6 – Input the name of the profile and click “OK“.
Step 7 – The Profile wizard will open up. Go through the steps to register the email address that you are already using in the Outlook.
Step 8 – Follow through the entire process and wrap it up.
Outlook does send a test e-mail to test the connection.
Step 9 – When the entire profile setup process is complete, you just have to ensure that the Outlook opens this new profile.
Step 10 – Choose the “Always use this profile” mode. Now, choose the profile that you have just created in Outlook.
Step 11 – Save the changes using “Apply” and “OK” buttons.
Relaunch the MS Outlook and check.
Fix 6 – Remove the Outlook account
Remove the Outlook client and add that again in MS Outlook.
Step 1 – You have to open a Run dialog box. So, hold the Win+R keys together.
Step 2 – Just input the same line in the Run terminal and hit Enter.
outlook.exe /manageprofiles
Step 3 – But this time, open the “Email Accounts” option to load the email accounts on your device.
Step 4 – Select the email account in there.
Step 5 – Tap the “Remove” option to remove the email account.
Once you have removed the email account, it will be deleted from your Outlook.
But, you can add the Outlook account in the Microsoft Outlook client.
Step 1 – Close and relaunch the current instance of Outlook.
Step 2 – Get this way –
File > Info
Step 3 – Tap “Add account” option there.
The rest of the process is quite easy. Just follow the steps on the Email Setup wizard and complete setting up your account there.
You won’t get the ‘One or more items in the folder you synchronized do not match.‘ message anymore.


