When your system is starting up, it may seem stuck on a black screen showing you an error message “The system found unauthorized changes on the firmware, operating system, or UEFI drivers“. As the error message suggests, the system is in conflict due to some changes in the UEFI firmware, or in layman’s terms, the secure boot option is misconfigured. Correcting it should solve the issue for your computer.
Fix 1 – Disable the Secure Boot mode
You have to disable the Secure Boot mode on your system.
1. Start up the system.
2. When your system is starting back up, keep pressing the boot key* to access the BIOS setup.
*This boot key usually depends upon the manufacturer and it varies one from another. So, carefully notice which key is allotted to your system. It can be any one of these keys –
F2, Del, F12, F1, F9, F2, Esc

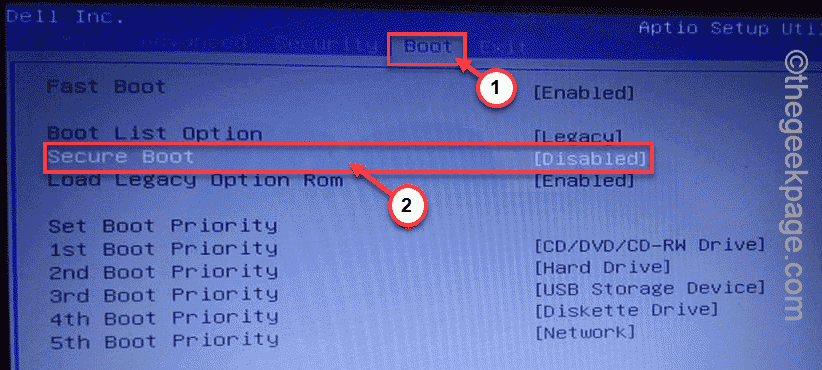
3. Once the BIOS page opens up, go to the “Boot” section.
You will see several boot options.
4. You can use the arrow key to select the “Secure Boot” item and then press Enter.
5. Simply, make sure to select the “Disabled” option and hit Enter.
7. After that, just press the particular key that is associated with the “Save & Exit” option (F10 key).
Saving this change will automatically close the Boot settings and restart your system.
This will solve your problem.
[
NOTE – In some computers, you may find an additional option to change the Secure Boot function. In that case, follow these steps –
1. Once you have access to the Secure Boot option, you will find two settings. These two options are –
Windows UEFI Mode
Other OS
2. You have to select the “Other OS” option and hit Enter to select it.
Just save the settings and restart your system.
]
Fix 2 – Use a system restore point
If you have a system restore point, you can go back to it and fix this problem.
1. Shut down your device and then start it up.
2. When you see the manufacturer’s logo, force shutdown it.
3. Repeat this process 2 more times. For the third time, let your system reboot. This way, you will find the Automatic Repair page.
4. On the Recovery page, click on the “Advanced options“.
5. On the next screen, head this way –
Troubleshoot > Advanced options
6. Here, you will find the “System Restore” settings. So, tap it.
7. This will open the System Restore window layover. Now, tap on the “Recommended restore:” option.
8. If you prefer another restore point, you can also opt for “Choose a different restore point“.
9. Once you have selected the option, tap “Next“.
10. The next screen will show you the list of available restore points.
11. But, if you want to see more restore points, check the “Show more restore points” box.
12. Now, you have to choose the restore point that you want (Choose the restore point when the error wasn’t there.
13. Then, tap “Next” to go to the next step.
11. Finally, tap the “Finish” button to start the system restore process.
This System Restore process may take some time.


