If you want to ask for any feedback or suggestions from your contacts or even conduct any kind of survey then creating a poll in outlook is a fun and effective way to do it. You can easily create a poll that will have the question you want to ask and different options to choose as an answer. Send it to your friends/colleagues and ask them to vote. Here you can also see the response under each choice in percentage and decide about the best result. Isn’t it exciting? So in this article let us see how to create a poll and add it as an email message in Microsoft Outlook.
Create A Poll In Outlook
Step 1: Open the Microsoft Outlook.
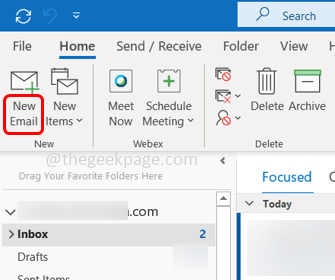
Step 2: Open a new email message by clicking on the New Email option at the top left corner.
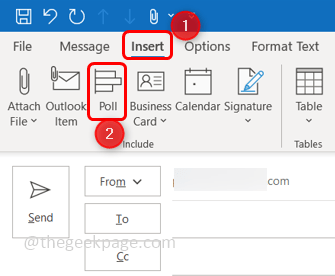
Step 3: A new email will open, then click on the Insert tab at the top. Click on the Poll option.
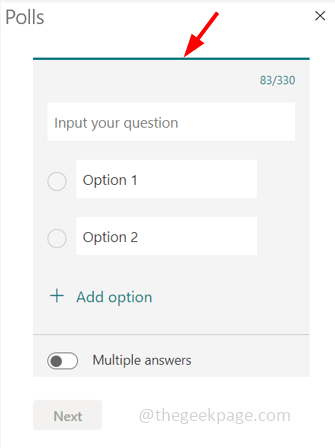
Step 4: There appears a polls window on the right side.
Step 5: Type the question in the input your question bar for which you need the voting.
Step 6: Enter the choices for the question in the option bar.
Step 7: By default, there will be two options bar, you can add more by clicking on the Add option.
Step 8: You can also delete the options by clicking on the delete button beside the options bar.
Step 9: If you want more than one answer to be selected, enable the Multiple answers toggle button and you can observe the checkboxes beside the options bar so that you can choose more than one choice.
Step 10: To vote for a single choice, then disable the multiple answers toggle button by clicking on it again. Once it is disabled you can see the radio button beside the options bar.
Step 11: Once the pattern for voting/poll is set, click on Next then click on Add to email. If you want to still modify the voting pattern then click on Edit.
Note: Latest version of Outlook might have an option called Insert poll into email instead of Next.
Step 12: Now the poll is inserted into the email message, which is visible on the right side. You can now send the email to your contacts by clicking on the Send button.
Note: If you want to remove the poll from the email message for any reason then you can click on the Remove Poll option. This is available in the latest version of Outlook.
Step 13: To view and vote for the polling, click on the vote link from the email message.
Step 14: The link opens in the web browser and you can see the question and its options to vote.
Step 15: Select the option to vote by clicking on the radio button/checkboxes. Enter your email address to track your response. Click on the Vote option.
Step 16: The result page will open where you can see the voting results in percentage. You can also click on view results to see the result.
That’s it! Hope this article is helpful and makes it easy for setting up email polling. Thank you!!


