If you see an error ” The requested URL could not be retrieved” when you are browsing the internet, this article will help you fix this error. Mostly this error is seen because of the issues in connectivity. The first and foremost thing is to check if the following changes work :
- Check the URL again. Sometimes, we might have misspelled the address.
- Try refreshing the page (Ctrl+ f5)
- Try opening the same webpage using different browsers.
If the issue still persists, try the following fixes :
Fix 1: Disable Antivirus Temporarily
Antivirus is used to protect the system from external viruses. At times, in order to protect the system, it blocks certain sites and interferes with the connection. To avoid this, we have to bypass the Antivirus by disabling it temporarily.
In the bottom right corner of the taskbar, locate the antivirus program that is installed. Right-click on it and choose Disable / Stop / Shut down something similar. Please note that these instructions are different for different antivirus brands.
Check if this fix works. If not, enable the antivirus back and check the below fixes.
Fix 2: Disable Windows Defender Firewall Temporarily
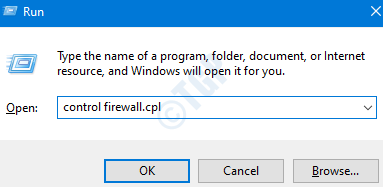
Step 1: Hold the keys Windows+r at the same time, a run window opens, type control firewall.cpl, and press Enter

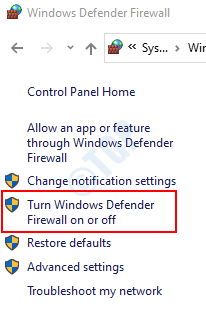
Step 2: In the appearing window, choose the Turn Windows Defender Firewall on or off option located on the left-hand side.

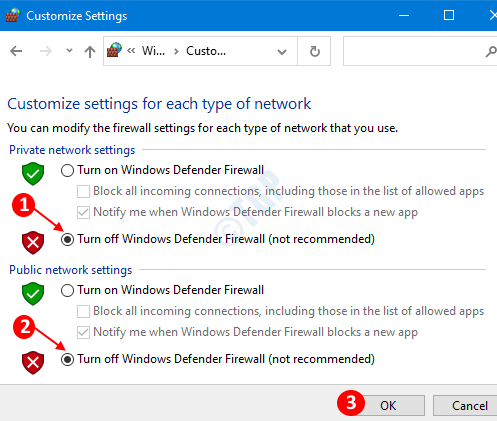
Step 3: In the Customize Settings window,
- Tick the Turn off Window Defender Firewall(not recommended)
- Tick the Turn off Windows Defender Firewall(not recommended)
- Click on OK

You can now see that the Windows Firewall has disabled. Check if the issue has resolved and the URL opens. If yes, then enable the firewall again and see what exact setting caused the issue.
If not, then check the other fixes below.
Fix 3: Disable Proxy Temporarily
Step 1: Open the Browser and click on the Menu icon located at the top right corner of the window and choose Options

Step 2: In the appearing window, Under the General section on the left-hand side, click on the Settings button under the Network Settings section

Step 3: In the Connection Settings windows that open,
- Choose either No Proxy OR Use system proxy settings
- Press OK

Note that the above-mentioned settings are for the Mozilla Firefox browser. If you are using any other browser, the settings will not be the same. However, they will be somewhat similar.
Now that the Proxy is disabled from the browser, we need to disable the proxy from the system as well.
Step 4: Open the Run window(Windows+r) and type ms-settings:network-proxy and press OK

Step 5: In the Settings –> Network and Internet –> Proxy window that opens,
- Turn Off (the button will now be displayed in white color) for Automatically detect settings
- Turn Off the button(the button will now be displayed in white color) for Use setup script

With these changes, Proxy will be completely disabled from the system. Now, you can check if the issue has resolved. If not enable the proxy back and check the fixes below.
Fix 4: Switch Off and Switch On the Modem or Router
At times, it is seen that the error “The requested URL could not be retrieved” is shown because of the instability in the Network. In such cases, restarting the modem or the router has helped.
To restart the device, press the power button on the device. Wait for some time for the device to restart and for the green LEDs to show up. Check if the issue has resolved and the URL opens.
Fix 6: From Command Prompt
In certain cases, renewing the IP address of the system has solved the issue. To do so,
Step 1: Open the Run window(Windows+r) and type cmd and press Ctrl+Shift+Enter to open the command prompt with Administrator Privileges.

Step 2: In the command prompt window, type the following command
ipconfig /release

ipconfig /renew
With these, a new IP address will be assigned to the system. Restart the system and check if the issue resolves. If the issue has not resolved yet, try the below fix.
Fix 7: Clean Boot of the System
Step 1: Open the Run window(Windows+r) and type msconfig and press OK

Step 2: In the System Configuration window that opens, under the Services tab,
- Tick the Hide All Microsoft services
- Click on Disable all

Step 3: In the same window, Open the Startup tab, click on Open Task Manager

Step 4: In the Task Manager Window that opens, Disable all the programs that are enabled at the start-up.

Step 5: In the System Configuration Window
- Click Apply
- Then Press OK

Step 6: Restart the PC.
Check if the issue has resolved with this fix. If you are able to retrieve the URL now, it means that one of the services or programs have been causing the issue. In order to find the application/service that has caused the problem, disable one service and program at a time and check if that has caused the problem. Once you find the application, you can remove it from the system.
Fix 8: Installing Latest Updates
Step 1: Open the Run window(Windows+r) and type ms-settings:windowsupdate-action and press OK

Step 2: In the Settings –> Update & Security –>Windows Update window that opens , click on Check for Updates.Once the installs are installed, restart the PC.

Now that the system is up to date, check if the issue still exists.
Thank you for Reading. We hope this has been informative. Please let us know in comments which of the above fix helped you solve the issue.