The VMWare Authorization service is an essentil service for normal functionality of all the virtual machines under the belt of VMware application. Users who are facing this problem, won’t be able to intialize, connect or control the remote devices. But, just like other problems regarding the VMwares, you may fix this VMware Authorization service following these easy sets of solutions.
Fix 1 – Initiate the VMware Authorization service
VMware Authorization service needs to start up automatically. So, use the Services page to manage that.
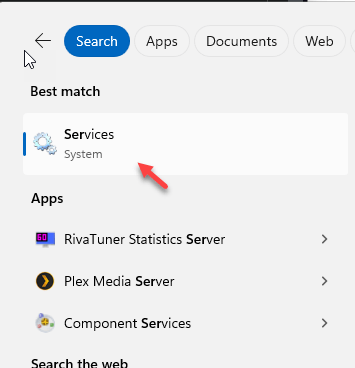
Step 1 – Hit the Windows button and begin to type “services“.
Step 2 – Next, open “Services” to open it up.
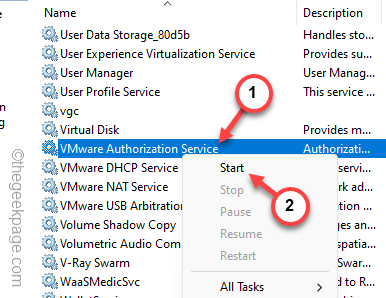
Step 3 – Find the “VMware Authorization” service there in this list.
Step 4 – Once you have found that, right-tap that service and click “Start” to initiate the service.
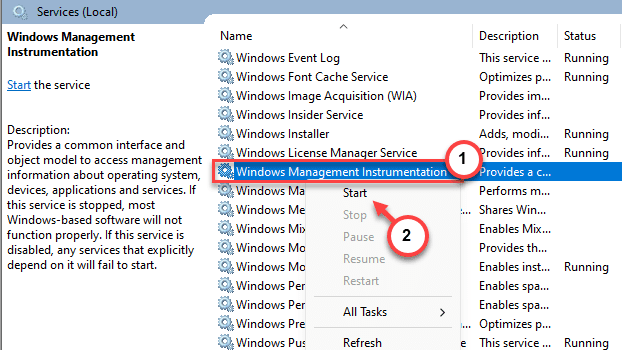
Step 5 – Now, look for the “Windows Management Instrumentation” service.
Step 6 – Next, just right-click this service as well and click “Start” to start this service as well.
The VMware Authorization service depends upon this service as well.
After starting up both the services, relaunch the VMware and check.
If the problem still persists, try the next solution.
Fix 2 – Give the VM Authorization service administrative rights
VMware Authorization service requires administrative permissions to be functioning normally on your system. So, the user running the VMs must be under the umbrella of the ‘Administrators’ group.
Step 1 – You can do this from the User Accounts wizard. So, quickly press the Win+R keys.
Step 2 – After this, type this and hit Enter.
netplwiz
Step 3 – Enter the “Users” section.
Step 4 – Find the account that is using the VMWare on the system. Double-tap the account to access that.
Step 5 – Get to the “Group Memberships” tab.
Step 6 – After this, select the “Administrator” type.
Step 7 – Save this alteration using the “Apply” and “OK” buttons.
After including the account to the list of administrators, close the terminal.
You may need to restart your system.
After this, try launching VMware once more.
Fix 3 – Change the system startup settings
Make sure that the VMware services starts automatically during the system startup.
Step 1 – You can do this System Configuration page. To do that, right-click the Windows button and click “Run“.
Step 2 – Next, write this and click the “OK” button.
msconfig
Step 3 – Visit the “Services” tab.
Step 4 – Go down straight to the list of services and find the “VMware Authorization service“.
Step 5 – Make sure to check all the VMware-related services in there.
Step 6 – Finally, click the “Apply” and “OK” buttons to apply and save the changes in System Configuration.
Step 7 – Windows will show you a prompt to restart the system. So, tap “Restart now” to restart the computer.
After the system restarts, you can launch the VMware and check again. It will function normally.
Fix 4 – Repair the VMware
Repairing the VMware should get it working on your system once again.
Step 1 – Search “VMware” from the search box.
Step 2 – Later, right-click the “VMware Workstation” and click “Uninstall” to uninstall that from your system.
Step 3 – As this takes you to the Installed Apps section, scroll down to find the “VMware Workstation” on your system.
Step 4 – Next, click the dot button and click “Modify“.
Step 5 – Keep going through the VMware Setup page.
Step 6 – When the main step appears, choose the “Repair” option and hit the “Next” button to start the repairing operation.
When the repairing process is done, you won’t be seeing the “The VMware Authorization Service is not running” message while using VMware.
I hope these fixes have solved the issue!


