Windows tells you the preshared key is wrong. You’ve checked it four times. You’ve pasted it in. It is not wrong.
And the same key works fine on your phone. Or on the laptop sitting next to this one. Something else is going on.
Why This Happens
That error message lies. It’s the wrong message for what actually broke.
L2TP/IPsec builds its tunnel in two stages. First IPsec sets up an encrypted channel using your preshared key — a shared password both ends already know. Then L2TP runs your traffic through it.
But your router does something called NAT. It rewrites the address on every packet leaving your house, so that a dozen devices can share one public IP address. Handy. And IPsec hates it, because IPsec was designed to notice when a packet gets modified in transit. That’s its entire job.
So the router rewrites the packet. IPsec sees a packet that doesn’t match what was signed. The handshake fails. And Windows, having no better idea what went wrong, reports the most common cause it knows: bad preshared key.
Your key is fine. Windows just needs to be told that NAT is in the picture. That’s Fix 1, and it solves this for most people.
Fix 1 – Turn On NAT Traversal Support
Windows disables this by default. Microsoft’s own support docs describe exactly this registry value for connecting to a VPN server that sits behind a NAT router. Which is nearly all of them.
1 – At first, press Windows + R, type regedit, and press Enter. Click Yes on the prompt.
2 – Then, copy-paste this entire address into the address bar at the top, and press Enter:
HKEY_LOCAL_MACHINE\SYSTEM\CurrentControlSet\Services\PolicyAgent
3 – Next, right-click an empty area in the right pane and choose New > DWORD (32-bit) Value.
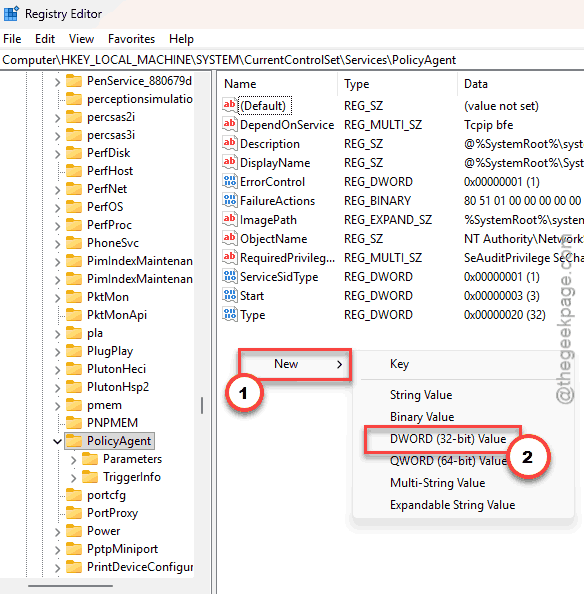
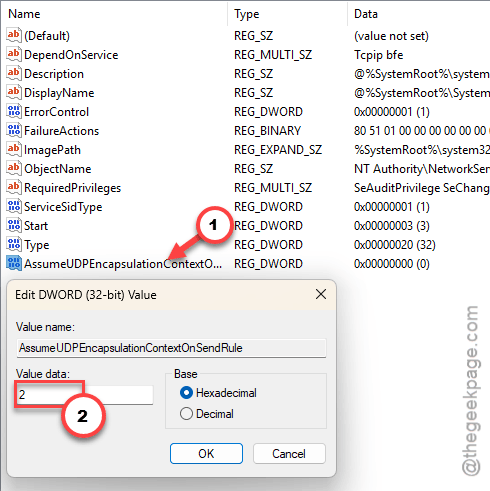
4 – Name it exactly AssumeUDPEncapsulationContextOnSendRule. Spelling and capitals matter — copy it from this page.
5 – Double-click it and type 2 in the Value data box.
6 – Click OK.
7 – Restart your PC. The value does nothing until you do.
Why 2? Because 2 means “both the server and I might be behind a NAT router.” It covers every situation, so there’s no reason to use 1.
Fix 2 – Clear the Key and Type It Again
Windows caches the key, and the cached copy goes stale. Pasting it fresh doesn’t help, because Windows keeps using the old one until you clear the box. Type it by hand this time — a trailing space you can’t see will fail exactly like a wrong key.
1 – Start by pressing the Windows + R keys together.
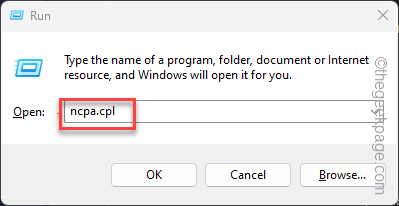
2 – Then, type ncpa.cpl, and press Enter.
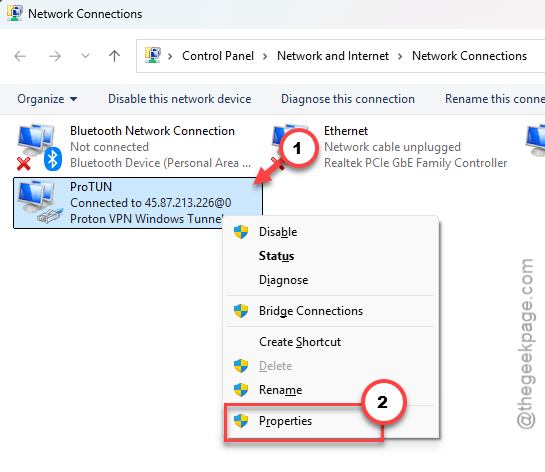
3 – Then, right-click your VPN connection and choose Properties.
4 – Click the Security tab.
5 – Check that Type of VPN reads Layer 2 Tunneling Protocol with IPsec (L2TP/IPsec). If it says Automatic, change it.
6 – Click Advanced settings.
7 – Select Use preshared key for authentication.
8 – Select everything in the key box and delete it. Make sure the box is completely empty.
9 – Type the key in by hand.
10 – Click OK, then OK again.
Check if this works.
Fix 3 – Lock Down the Authentication Settings
Left on Automatic, Windows tries a list of old authentication methods. Your server rejects them one by one and the negotiation can collapse before it reaches the one that works.
1 – In the same VPN Properties window, stay on the Security tab.
2 – Set Data encryption to Require encryption (disconnect if server declines).
3 – Under Authentication, select Allow these protocols.
4 – Tick Microsoft CHAP Version 2 (MS-CHAP v2).
5 – Untick PAP and untick CHAP. Both send your password in ways nobody should accept in 2026.
6 – Click OK.
7 – Try connecting.
Fix 4 – Restart the IPsec Services
Two Windows services do the actual key negotiation.
1 – Press Windows + R, type services.msc, and press Enter.
2 – Then, find IKE and AuthIP IPsec Keying Modules and IPsec Policy Agent — both are in the I section.
3 – For each one: right-click, choose Restart.
4 – If you can’t restart these services, choose Start instead.
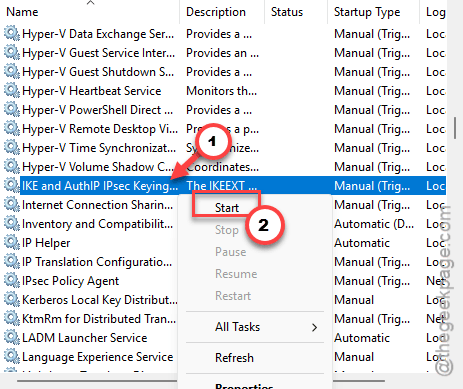
5 – Then right-click each one again, choose Properties.
6 – Now, set Startup type to Automatic, and click OK.
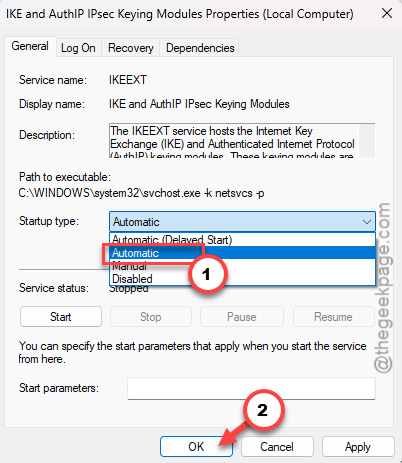
That stops them dying again after the next reboot.
Fix 5 – Check What Your Router Is Blocking
If you only get this on one network — your office Wi-Fi, a hotel, a mobile hotspot — the PC isn’t the problem.
L2TP/IPsec needs three things to get through: UDP port 500, UDP port 4500, and a protocol called ESP. Plenty of routers pass the first two and quietly drop ESP. Look for a setting named IPsec Passthrough or VPN Passthrough in your router’s admin page and make sure it’s enabled.
How to Prevent This
– Add that AssumeUDPEncapsulationContextOnSendRule value to any Windows PC that connects to an L2TP VPN. Do it once, on day one.
– A Windows reset or a clean install wipes it.
– Ask your VPN admin about IKEv2 instead. It handles NAT properly, without registry surgery. L2TP is old and it shows.
People Also Ask
What is a preshared key for VPN?
A password that both the VPN server and your PC already know before they ever talk. It proves each side is legitimate so they can set up the encrypted tunnel.
What are the security risks of using a preshared key on a VPN server?
Everyone shares one key, so a single leak exposes the whole thing. It doesn’t identify who is connecting, and it’s rarely rotated — plenty of servers use the same key for years. A short key can also be brute-forced offline. Certificates or IKEv2 are the better choice.