Many Windows users have reported seeing an issue when they connect their external hard disks, pen drives, or any USB storage media to the system. When they plug the external storage device into the system and try to access this device, they see an error message as shown below,
<DriveLetter>:\ is not accessible.
The parameter is incorrect.
Potential Causes for this issue are :
- Virus infection
- Corruption of the File system
- Problematic USB Drives
If you’re seeing this error on your system, then don’t worry. In this article, we have compiled possible fixes to overcome the Parameter is incorrect error.
Fix 1: Make sure decimal symbol is used in the Date Time Settings
In certain cases, it is noticed that the issue is because of the date-time format. If some other decimal symbol is used instead of a period(.), this error can be seen.
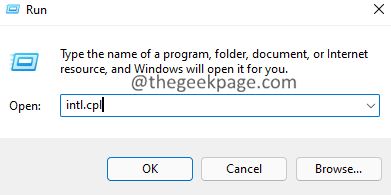
1. Open the Run dialog with Windows+R.
2. Enter the command intl.cpl and press Enter.
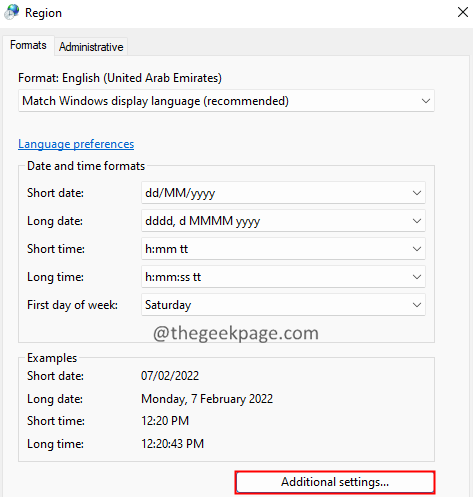
3. From the opening window, click on the Additional settings button.
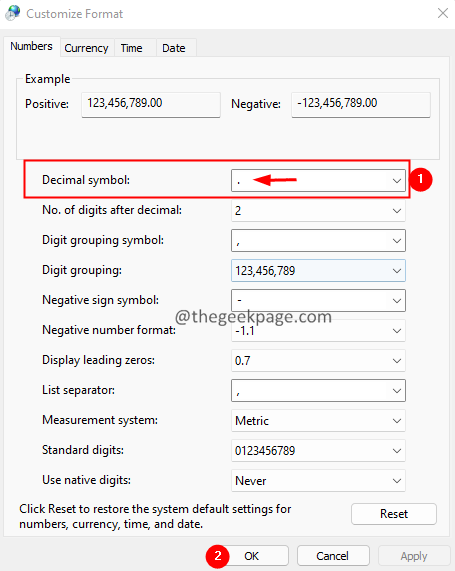
4. Make sure the Decimal symbol is “.“. If it is not, then change it “.” as shown below.
5. Finally, click on the Ok button.
Fix 2: Run Chkdsk Scan on the Drive
1. Open the Run Dialog using Windows+R.
2. Type cmd and hold the keys Ctrl+Shift+Enter at the same time. This should open Command Prompt window with Admin privilege.
3. In the User Access Control window that shows up, click on the Yes button.
4. In the command prompt window that opens, enter the below command:
chkdsk <External_Disk_Letter>:/f/x/r
For example, if your external disk shows up as E, then the above command should be :
chkdsk E:/f/x/r
Fix 3: Run an SFC scan
1. Open the Run Terminal using the keys Windows+R.
2. Type cmd and hold the keys Ctrl+Shift+Enter to open the Command Prompt in Admin mode.

3. In the User Access Control Prompt that opens, click on Yes.
4. Type the below command and press Enter.
sfc/scannow/offbootdir=<External_Drive_Letter>: /offwindir=<Drive_Letter_Windows>:\windows
where,
External_Drive_Letter – Drive letter that represents external disk.
Drive_Letter_Windows – Drive letter where Windows is installed.
For example, If your External Drive is has the drive letter D and windows is installed in C dir, then tweak the above command as shown below:
sfc/scannow/offbootdir=D: /offwindir=C:\windows
5. You should see a menu of options as shown below.
6. In the terminal, type the below command and press Enter.
sfc /scannow
7. Wait patiently till the scan completes.
8. Once done, restart the system.
Fix 4: Run a DISM scan
1. Open the Run dialog using the keys Windows+R.
2. Type cmd and hold the keys Ctrl+Shift+Enter to open the Command Prompt in Admin mode.

3. In the User Access Control Prompt that opens, click on Yes.
4. In the command prompt window that opens, enter the below command and press Enter.
DISM.exe /Online /Cleanup-image /scanhealth
5. Note that this is going to take some minutes to finish. Pkease wait patiently.
6. Once the scan is completed, restart the system.
Fix 5: Run a Virus Scan on the system
1. Open the Run Dialog holding the keys Windows+R together at the same time.
2. Enter the command ms-settings:windowsdefender and press OK.

3. In the settings window, choose Virus & Threat Protection as shown below.
4. In the window that opens, click on Scan Options.
5. Choose Full scan and press the Scan now button.
Fix 6: Reformat external HDD
If none of the above methods worked for you, this might mean there is some issue with the external USB drive. In such cases, you can format the disk. Note that formatting the external HDD deletes all the contents from the Drive.
1. Open Windows Explorer using the keys Windows+E.
2. On the left-hand side, click on This PC.
3. Now, right-click on the external device you have connected.
4. Choose Format from the context menu.
5. In the Format window that opens, click on the Start button.
Fix 7: Update the Disk Drivers
1. Open the Run Dialog by holding the keys Windows+r
2. Enter devmgmt.msc, and hit OK

3. In the Device Manager window, double-click on the disk drives.
4. Right-click on the external disk that is causing the problem and choose Update driver.
5. In the appearing window, click on Search automatically for drivers.
6. You will be notified of any updated version of the driver is found. Follow the on-screen instructions to update the disk driver.
7. Restart the system to see the changes.
We hope this article has been informative. Kindly comment and let us know the fix that helped you solve the issue.
Thanks for Reading.


