Some NVIDIA users are complaining about an issue as an issue they are seeing ‘Not plugged in’ in the Sound panel for the dedicated NVIDIA outputs. If you are also facing a similar problem on your computer, just follow these easy fixes to solve this issue. This problem may happen either due to a corrupted graphics driver or disable sound ports.
Fix 1 – Unisntall the graphics driver
STEP 1 – Uninstall the graphics driver
Uninstall the graphics driver from your computer.
1. Press Windows key+X from your keyboard.
2. Then you need to click on the “Device Manager“.

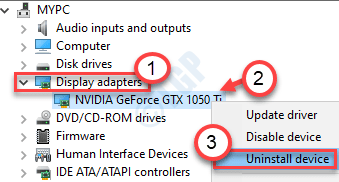
3. Then expand the section called “Display adapters“.
4. After that, right-click on the NVIDIA graphics driver. Then, click on the “Uninstall device“*.

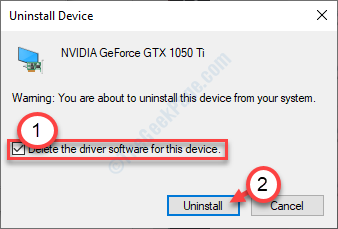
5. In this panel, check the box beside the option “Delete the driver software for this device“.
6. If you encounter an additional prompt for confirmation, click on “Uninstall“.

Once the driver is uninstalled from your system, close the Device Manager.
STEP 2 – Download and install the latest driver
1. Go to the NVIDIA site to download the driver.
2. Just put your display driver specifications in the correct boxes. Like – “Product type“, “Product series“, “Product“, “Operating System“, “Windows Driver Type“, “Download Type” according to your graphics card specifications.
3. After putting in the details, simply click on “Search“.

5. Click on “Download” to download the driver.
6. Once the driver is downloaded, go to the download location, After that, double-click on it to start the installation process of the driver.

7. While installing the driver, check the “Perform a clean installation” option.
8. Then you need to click on “Next“.

Complete the installation process and restart your computer thereafter.
Fix 2 – Roll back the driver
If you have received a recent update for your graphics driver, this problem may be caused by that.
1. Press the Windows key+X.
2. After that, click on the “Device Manager“.

3. When the Device Manager opens up, expand the “Display adapters“.
4. After that, double click on the NVIDIA graphics driver.

5. Here, click on the “Driver” tab.
6. When the Properties window, click on the “Rollback driver“.

Rolling back the graphics driver should fix the issue you are facing currently.
Fix 3 – Set the device from NVIDIA Control Panel
You can set up the NVIDIA Audio output from the NVIDIA Control Panel.
1. Right-click on the desktop and click on “NVIDIA Control Panel“.

2. When the NVIDIA Control Panel opens up, on the left-hand side, click on the “Display audio“.
3. Then, click on “Set up digital audio“.

4. Now, on the right-hand side, look for the “HDMI slot“.
5. Then, choose the device you are connected to your system.
6. Finally, click on “Apply“.

7. Right-click on the Windows icon and click on “Run“.
8. Write “mmsys.cpl” in the box and click on “OK“.

9. Once the Sound window opens up, go to the “Playback” tab.
10. After that, right-click on the “NVIDIA Output” device and click on “Set as default device“.

This should set the device as the default audio driver on your computer.
NOTE–
If you can’t see the NVIDIA audio driver in the Sound panel, follow these steps-
After opening the Sound panel, right-click and check the options “Show Disabled Devices” and the “Show Disconnected Devices“.

Check now if the error is still there.