Many users are facing an error that says The Feature You Are Trying to Use in on a Network Resource That is Unavailable while installing or uninstalling any application on the windows computer. These types of errors are most annoying because we can’t figure what is wrong with the system. It tells us to try again or change the location of the installation package file but in most cases, it makes no difference.
This issue could be due to issue with Windows installer service is not working as it should or the application package which you are trying to install is corrupted. We have formulated some methods that would help you to figure it out. These are the solution you should try to resolve the error.
Method 1 – Program install and uninstall troubleshooter
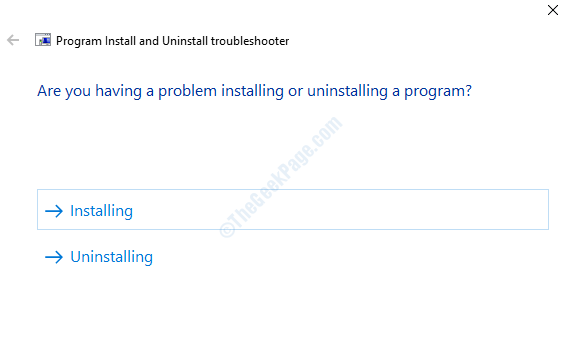
After numerous error reports by users in installing and uninstalling Windows programs, guys at Windows has made a special troubleshooter program to find and resolve to install/uninstall errors in the system. It makes our works easy to resolve this error, you just need to install the program, it will automatically find and resolve the error for you. Follow steps below to run the troubleshooter:
STEP 1: Click here to download Windows install and uninstall troubleshooter.
STEP 2: Double-click on the downloaded file to run it. Follow the on-screen instructions and move ahead by selecting appropriate options.
STEP 3: Select where you are facing the problem( i.e. Installing or uninstalling).

Wait for the troubleshooter to run, close the windows after it finishes patching.
Method 2 – Using Registry editor
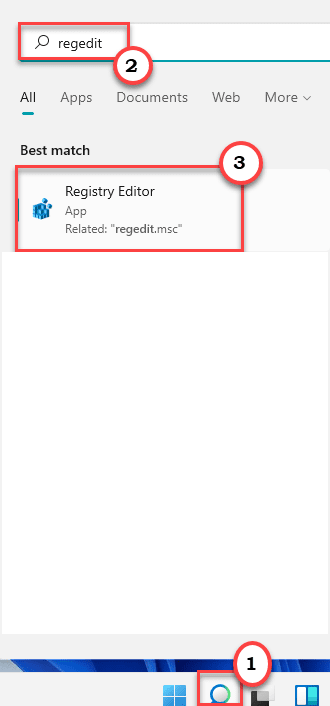
1 – Search REGEDIT in Windows search.

2 – Now, click on registry editor from the search result.
3 – Now, Before proceeding with the registry editor, take a backup.
Now, go to the following location in Registry editor.
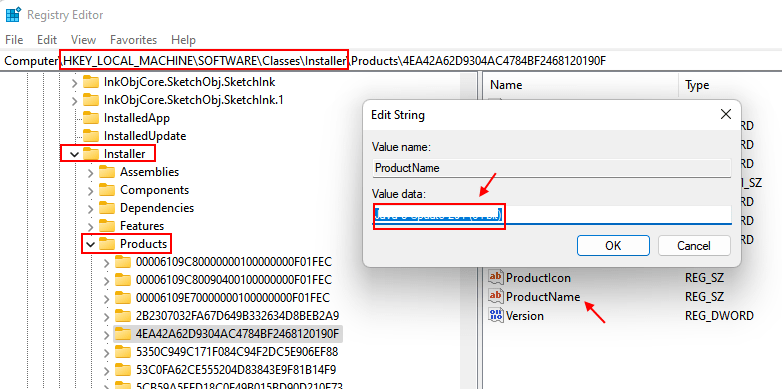
HKEY_LOCAL_MACHINE\SOFTWARE\Classes\Installer\Products
4 -Now, Keep Clicking on Every registry SUB keys under products to find out the program with which you are having this problem.
To know exactly the subkey of the problematic program , just Double Click on the subkeys one by one and just double click on the ProductName on the right side and see its value data. It will be having program name in it.
Just keep on clicking under every sub key and find the problematic program sub key folder.

5 – Just right click and delete that Sub-Key folder once you find it.

6 -Now, close registry editor and restart PC.
Method 3 – Check whether Windows installer service is running
Windows Installer service is a crucial service to install or uninstall anything on Windows. It should be running all time ideally but sometimes it stops due to some glitches. To check your Windows Installer service is running or not follow these steps:
STEP 1: Press Windows + R to open the Run box, type services.msc and hit enter to open the Windows Services window.

STEP 2: In the services window, scroll down and locate Windows Installer service. Right-click on the service to open the contextual menu and select properties.

STEP 3: In the General tab, under startup type select automatic from the dropdown menu. If service status says stopped, hit the start button, and if it says running do nothing.

STEP 4: Click Ok to save your settings and close the service manager window.
Reboot your computer and then try to install/uninstall the program you were trying installing/uninstalling to check error has resolved or not.
Method 4 – Download different version/copy of the installation package or download at a different path
As the error text says that issue might be because of the location of the installer package or also it might be because you might have downloaded a corrupt file or different version that is not supported by your computer.
So, to double-check the issue, download the installation package at a different location. Also, if there are multiple packages check your system properties to find a version that suits your windows system. For example, for most of the programs, there are 32 bit and 64-bit installation packages and also different versions for different processors. So, before downloading the installation package check your system properties and then download according to your computer specifications.
Method 5 – Delete Registry key
Sometimes installation/uninstallation errors happen due to the wrong registry value in the registry database. You can delete that key and then install the program if you are facing issues to install any application. To delete the registry key, follow steps below:
STEP 1: Open Run dialogue box by pressing Windows + R, type regedit, and hit Enter. It will open the Registry Editor window.

STEP 2: Press Yes on the User account control prompt.
STEP 3: On the left pane, open the path written below.
Computer > HKEY_LOCAL_MACHINE > SOFTWARE > Classes > Installer

STEP 4: In the installer folder, you will find a number of folders, each represent a program installed on your system. If you click on the folder some values will be shown right side, one of those values would be the Product name which is an application on your Windows system as shown in the image above, it will help you to find your program.

STEP 5: Locate the folder of the program you want to install/uninstall by checking all folders one by one. Once you found out the correct folder, right-click on it and select Delete. Click OK to confirm the action and close registry editor.

Restart the computer after finishing the process and check that you can able to install/uninstall the application. If not,.try the next method.
Method 6 – Repair the problematic application
After doing everything If you are still getting the same error we advise you to repair the problematic application from the control panel menu. However, this option is not available to all apps, you can try if you are out of all options. Follow these steps to repair your application.
STEP 1: Press Windows + R to open the Run box, type control to open Control Panel window.

STEP 2: Select the Program and Features menu. In the window, you will see all the programs you have installed on your computer. Select your program by left-clicking on it. After selecting the program you will see 2-3 options on top.
STEP 3: Click on the repair from the top menu.

STEP 4: Follow on-screen prompts and close the window once the process completes.
You will able to install or uninstall the program you wanted now. If you are facing any issues regarding following the steps you can always ask us in the comments.