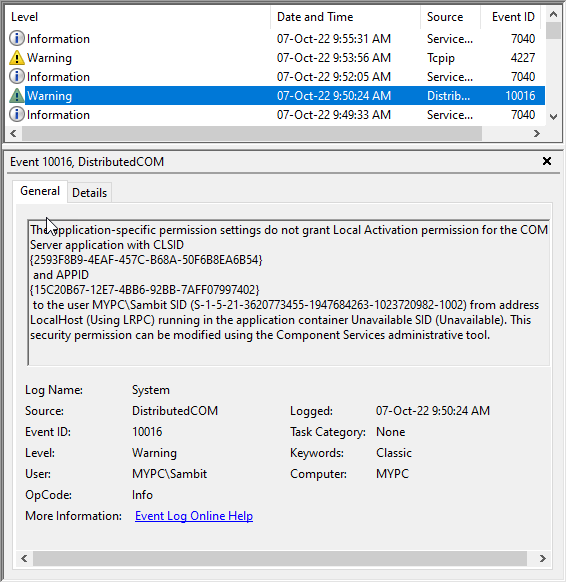
The COM server-related error message “The Application-Specific Permission Settings do not Grant Local Activation Permission for the COM Server Application” shows up when a certain process fails to get access to the DCOM components due to the insufficiency of proper permissions. As for the reason behind the issue defines, you can only fix this problem by granting proper permission to the DCOM components.
Solution – Grant proper permission to the APPID
There is a definite solution to this issue where you have just to grant proper permission to the particular APPID. This is a prolonged process. So,
But, before you do so, you have to identify the APPID from the Event Viewer page.
Step 1 – Note the APPID
You can note the APPID in the Event Viewer error module.
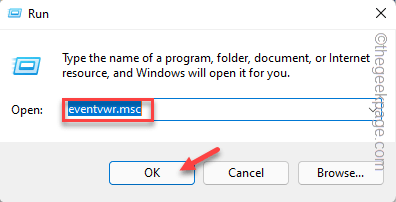
1. Open the Event Viewer. To do that, press the Win key+R keys together.
2. Then, paste this term there and click “OK” to open the Event Viewer screen.
eventvwr.msc
3. After you have opened the Event Viewer page, go to the error location and select the error.
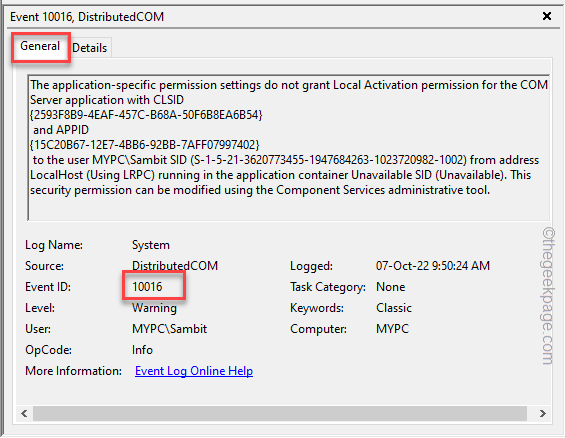
4. Now, in the “General” section, you will notice the error message, along with the Error Code, Level, User ID, etc.
5. Here, note down the “APPID” you notice on the same pane you notice.
Example – In our case, the APPID is “{15C20B67-12E7-4BB6-92BB-7AFF07997402}“.
Once you have noted the APPID, you may close the Event Viewer page on your computer.
Step 2 – Use the Registry Editor
You can use the Registry Editor to provide necessary permissions so that it can access the DCOM components without any issues.
1. Write “regedit” after pressing the Windows key from your keyboard.
2. Then, tap on “Registry Editor” to open it up.
3. When you have opened the Registry Editor page, proceed along this path –
Computer/HKEY_ClASSES_ROOT/AppID
Note – Paste the APPID that you have noted before after the “APPID” in the address.
Example – In our device, the copied APPID is “{15C20B67-12E7-4BB6-92BB-7AFF07997402}“. So, the complete address is –
Computer\HKEY_CLASSES_ROOT\AppID\{15C20B67-12E7-4BB6-92BB-7AFF07997402}
4. Once you have reached the specified location, look on the right-hand pane and note down the value data of “(Default)“.
This is the actual name of the app that is causing this problem.
[ Example – In our case, the Default value is “PerAppRuntimeBroker“.]
5. Now, right-tap the APPID and tap “Permissions…” to access the permissions page.
6. Coming to the main Permissions page, click on “Advanced” on the bottom part to access it.
7. Next, click “Change” to alter the owner on your own.
8. Now, write down “Administrators” in the box and tap “OK“.
9. On the next step, check the “Replace owner on subcontainers and objects” box.
10. Then, tap “Apply” to apply this modification. But, do not click “OK“.
11. After that, double-tap the “Administrators” entry in the ‘Permission entries:’ pane to edit its access.
12. Coming to the Permission Entry page, check the “Full Control” check box.
13. Then, click “OK” to save the changes.
14. Finally, click on “Apply” and “OK” to apply and save the changes.
After this just close the Registry Editor page and restart your system.
Step 3 – Tweak the COM Server application permissions
Now, you can change the permissions for the COM Server application.
1. At first, press the Windows key+R keys together to invoke the Run box.
2. After you have opened the Run box, paste this there and hit Enter.
dcomcnfg
3. When you reach the Component Services page, navigate through the left pane –
Component Services > Computers > My Computer > DCOM Config
4. Then, click on “View” from the menu bar and click “Detail” from the drop-down list.
5. Now, through the right-hand pane, look for the app that you noticed before (refer to step 4 of STEP 1).
6. Now, right-click on the app and tap “Properties“.
7. Next, visit the “Security” tab.
8. After that, in the ‘Launch and Activation Permissions’ section, click “Edit…” to edit the settings.
8. You may notice this message “One or more of the permission entries attached to Registry Value has an unrecognized type and can not be displayed.“. Just tap “OK“.
If you receive any other prompt about entries, tap “Remove” to remove it.
9. After this, click “Add…” to add a new permission entry.
10. Then, place your mouse in the blank box below “Enter the object names to select” and type this –
LOCAL SERVICE
11. After that, click “OK“.
12. Now, make sure the selected the “LOCAL SERVICE” from the user name group box.
13. Then, check the “Allow” beside the “Local Activation” box.
14. Finally, click “OK” to save this modification.
After enacting all these steps, exit the Component Services screen. Then, restart your computer.
You won’t see the “Application Specific Permission Settings do not Grant Local Activation permission for COM Server Application” error message again.


