If you are seeing an error message related to the “CCXProcess.exe-System Error” message on your computer, it is associated with the Adobe Creative Cloud Experience program. This problem can get in your way and disturb the creative workflow in any of the apps offered in the Adobe Creative Cloud suite. We have discussed the steps to rectify the error in a step-by-step guide.
Fix 1 – Change the Adobe value
There is a registry trick that you must try on your system.
NOTE – Craft a backup of your current system registry on your computer. This is due to a precautionary measure just in case. You can take the help of this guide.
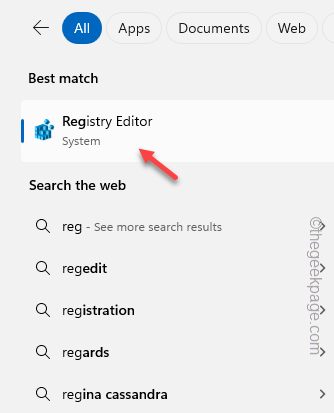
Step 1 – Type “regedit” in there.
Step 2 – You will find the “Registry Editor” has appeared in the search results tab. Tap to open it.
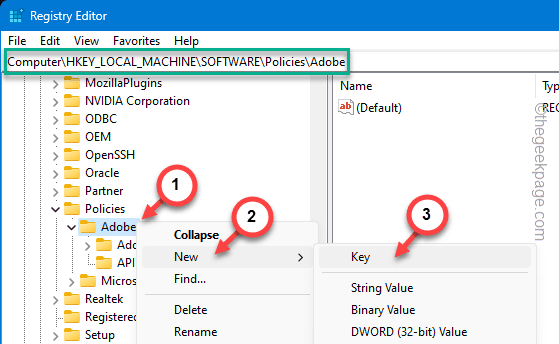
Step 3 – Go to this address in the Registry Editor screen –
HKEY_LOCAL_MACHINE\SOFTWARE\Policies\Adobe
Step 4 – Later, right-click the “Adobe” sub-key and click “New>” from the context tab.
Step 5 – Choose “Key” to create a new key.
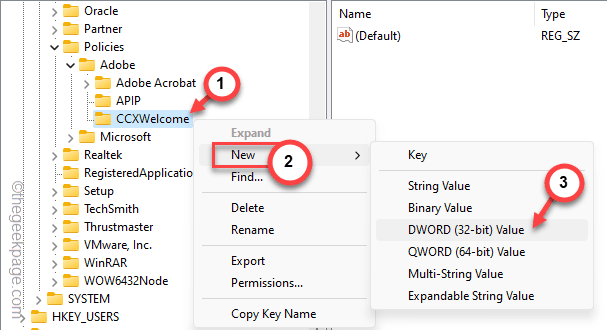
Step 6 – Choose to name this “CCXWelcome” key.
Step 7 – Later, right-click in the empty area and click “New>” and choose “DWORD (32-bit) Value” to create this value.
Step 8 – You must name this “Disabled“. Later, double-click this value to open that up.
Step 9 – Switch this value to “0“. Click “OK” to adjust the value.
You must quit the Registry Editor page. Later, just restart your computer and when the device works, check the status of the issue.
Fix 2 – Disable the Creative Cloud auto-startup
The Creative Cloud suite apps is set to start automatically at the system startup.
Step 1 – Launch the Adobe Creative Cloud suite on your system.
Step 2 – Go to the Settings button to open the Creative Cloud settings.
Step 3 – Quickly, get to the “File” and tap “Preferences” item in the menu.
Step 4 – Further, go to the General. Next, you have to uncheck the “Launch Creative Cloud at login” box in there.
Step 5 – Save these changes in there and restart your system.
Check whether the CCXProcess is disabled at the system startup or not.
Fix 3 – End the CCXProcess from Task Manager
If still getting the same message involving the CCXProcess on your computer, you can terminate the CCXProcess directly from the Task Manager.
Step 1 – Ignore the error message on your screen, for now.
Step 2 – Next, right-click the Windows button and open the “Task Manager” from the elevated pane.
Step 3 – Within a few seconds, the Task Manager should open up.
Step 4 – Next, tap the dot button to expand the menu and go to the “Startup” section.
Step 5 – Find the “Adobe Creative Cloud” app in there. Just right-tap that and click “Disable” to disable that.
After disabling the startup of the Adobe Creative Cloud from your computer, you won’t get the “CCXProcess.exe-System Error” again.
Fix 4 – Repair the Creative Cloud Package
Any missing corruption in the Creative Cloud package can lead to this issue. A missing critical dll file is a symptom of this error.
Step 1 – Quickly hit the Start+R buttons together.
Step 2 – Next, write “appwiz.cpl” and hit the “OK” button.
Step 3 – Later, when you can view all the apps there, right-click the “Creative Cloud” app.
Step 4 – Next, right-click that app and click “Repair/Uninstall” button.
Step 5 – When this message appears –
Are you sure you want to uninstall Adobe Creative Cloud App?
Step 6 – Choose to run the “Repair” operation to repair the Creative Cloud app.
Let it run the repairing operation on the Adobe Creative cloud app. If it detects the absence of a missing component, it will be replaced automatically.
Restart the device once and check.
NOTE– If repairing the Adobe Creative Cloud doesn’t fix the issue, you should uninstall the Adobe Creative Cloud and reinstall the same on your device.


