While adding a Google account to an Android device, many users have reported that they get stuck at the Checking info screen. It goes on and on and gets in a loop. Since it is very important to add a Google account to your Android device to get even the basics tasks done, this issue can turn quite frustrating. Well, when we are here to help, you need not worry about this issue anymore.
In this article, we have explained in detail through various working solutions how you can easily fix the issue of getting stuck at the Checking info screen while adding a Google account to your Android device. Hope you find the article useful.
Note: We have used the device Samsung Galaxy Note 10 Lite, with Android version 12, to explain the steps in this article. Based on your phone’s model and Android version, the images might slightly vary. Please reach out to us through the comments section if you have any concerns regarding the same. We are always happy to help.
Solution 1: Turn On Airplane Mode and then Turn it Off
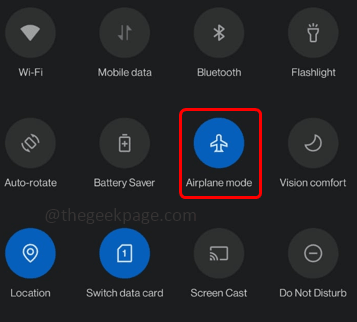
The very first solution to try would be to turn on the airplane mode in your device and then turn it back off. To turn on the airplane mode, pull down the notification panel from the top and then click on the Airplane mode icon. Once it is turned on, wait for a minute and then click on the icon again to turn it back off.
Solution 2: Connect to a Different Wi-Fi Network or Try Connecting to the Internet Using Cellular Data
One of the main reasons why you could be getting stuck at the Checking info screen could be because of an unstable Internet connection. If you’re connected to the Internet via a Wi-Fi network, try switching to a different Wi-Fi network. Also, you can try connecting to the Internet via cellular data. Check if your issue is resolved or not after trying out these simple solutions.
Solution 3: Clear Google Play Services App Data and Cache
Step 1: Click on the Settings app icon to launch it.
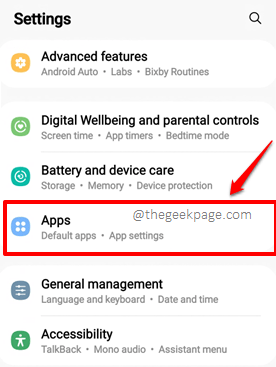
Step 2: Click on the tile for Apps.
Step 3: Scroll through the list of apps and click on the application named Google Play Services.
Step 4: On the App info screen, click on the Storage option.
Step 5: On the Storage screen, at the bottom, click on the button Clear cache.
Step 6: As next, click on the Manage storage button to clear the app data.
Step 7: Now on the Google Play Services Storage screen, click on the button named CLEAR ALL DATA. That’s it. Check if your issue is resolved or not once the data is cleared off.
Solution 4: Clear Google Play Store App Data and Cache
Step 1: Just like before, launch the Settings application first.
Step 2: On the Settings screen, click on the Apps option.
Step 3: Scroll down and find the application named Google Play Store. Click on it to view its application-related information.
Step 4: On the App info screen, click on the option named Storage.
Step 5: On the Storage screen, at the bottom, click on the Clear data button first and then click on the Clear cache button.
Try checking if your issue is resolved or not.
Solution 5: Backup and Reset your Android Device
If none of the above-listed methods work for you, as the last option, you can try resetting your Android device. Though this method is sure to resolve your issue by 99%, your phone will be wiped clean. That is, your phone will reach the factory reset state once this method is performed. So before going ahead with this method, please make sure you have taken a backup of all the files and folders you need, from your phone.
Step 1: Launch the Settings application.
Step 2: On the Settings screen, scroll down and click on the General management option.
Step 3: On the General management screen, click on the Reset option.
Step 4: Now on the Reset screen, click on the option named Factory data reset. If asked for confirmation, confirm the operation.
Once the phone boots back to life after performing the reset, your issue should be long gone.
Please tell us in the comments section which method fixed the issue for you.
Stay tuned for more amazing technical tricks, tips, solutions, how-tos, and hacks.


