Your Device Isn’t Compatible with This Version error is a somewhat common error that users face with their Android devices while trying to install applications from Google Play Store. The error can be quite frustrating as it forbids you from installing the application you need. Though the error might sound troublesome, there are quite a number of solutions that you can try to fix it in a matter of seconds.
Read on, to learn how you can easily fix the Your Device Isn’t Compatible with This Version error. So, let’s jump in, shall we?
Note: Please note that the steps and the screenshots might slightly vary based on the model and version of your Android device. Please try to find out the correct paths on your device, and if you are at a loss, please do reach out to us through the comments section.
Solution 1: Install the Application Using its APK File
If none of the above methods solve your compatibility issue, it could be actually because your phone cannot run the application that you are trying to install. However, there is one last solution that we can try to get you the application you need!
In this solution, we are going to detail how you can download the Android Application Package(APK) file, of the application you need, from the Internet and install it on your device with the help of some simple steps.
Note: There are 3 main steps involved in this solution. The first step is to allow your device to download and install applications from outside sources, the second step is to find your Android OS version and the third step is to find the suitable APK file version of the application that you are planning to install on your device.
Section 4.1: Allow Applications to be Installed from External Sources
Step 1: By default, Android devices are supposed to download and install applications only from Google Play Store. All other sources are blocked. So let’s unblock downloading and installing applications from those external sources first.
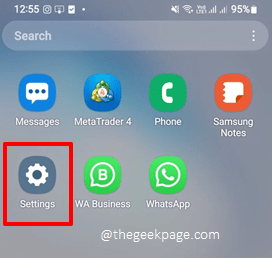
Firstly, launch the Settings application by clicking on its icon.
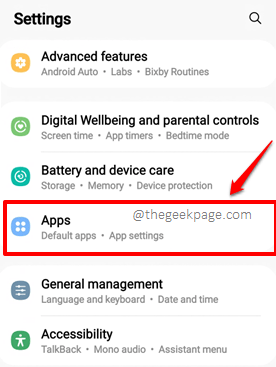
Step 2: On the Settings screen, find and click on the Apps tile.
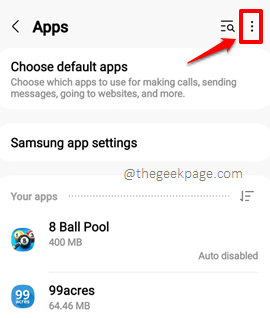
Step 3: At the top right corner of the Apps screen, click on the 3 vertical dots icon.
Step 4: From the little menu that pops out, click on the Special access option.
Step 5: On the screen that follows, click on the Install unknown apps option.
Step 6: Now you will be able to see the list of sources from where you can download and install the applications using their APKs. You need to enable the toggle button corresponding to the source you are planning to install the application from. I’m using the Chrome browser to download the application and once the APK is downloaded, my file manager will install the application if I click on the downloaded APK. So I have turned the toggle button to ON state for both the sources Chrome and My Files.
Note: You will see a warning saying Installing apps from this source may put your phone and data at risk at the top of the screen. It is ok to override these settings. But if you are worried, then you can skip this solution. If you download the APK from a source that is not secure, then your phone and data could actually be at risk.
Section 4.2: Find your Android Version
In this section, we will find the Android version that your device is running on. Using this version, we will find out the APK file that will run fine on your device.
Step 1: Launch the Settings application, scroll down and click on the About phone option.
Step 2: On the About phone screen, find and click on the Software information option.
Step 3: Now on the Software information screen, under the section Android version, you will be able to find the version of the Android operating system that your device is running on. Note down this Android version number. In the example below, it is 12.
Section 4.3: Download and Install the APK File from an External Source
You have now allowed your device to download and install applications from external sources and you know your Android version. So there’s nothing more that we need. Let’s go ahead and get that APK file of yours!
Step 1: Open any web browser. Chrome is taken as an example in this step.
Now search for the application for which you are getting the Your Device Isn’t Compatible with This Version error. You need to follow the format below.
Format: <Application_Name> <Android_Version> APK

Example: Candy Crush 12.0 APK
Click on the link returned by any trustable APK downloadable website.
Step 2: Find the APK file to be downloaded and click on the Download button.
Step 3: Once the file is downloaded, you will get a notification like the one shown below. Click on it.
Step 4: Once asked for confirmation to install the application, hit the Install button.
Step 5: That’s it. The app should now be installed on your device successfully.
Solution 2: Clear Google Play Store App Data and App Cache
Step 1: Launch the Settings application and click on the Apps tile from the Settings options.
Step 2: Scroll down, locate and click on the Google Play Store tile from the Apps screen.
Step 3: On the Google Play Store App info screen, click on the Storage option.
Step 4: Now on the Storage screen, click on the Clear data button first and then click on the Clear cache button.
Launch Google Play Store once the app data and app cache are cleared off and check if you can download the application which was giving you the compatibility error.
Solution 3: Uninstall Google Play Store App Updates
Sometimes the issue could occur because of corrupted Google Play Store updates. So let’s uninstall them and check if the root cause is that or not.
Step 1: Pull down the notifications panel and launch the Settings application by clicking on the gear icon at the top right corner of the screen.
Once the Settings application is launched, click on the Apps tile.
Step 2: On the Apps screen, locate and click on the application named Google Play Store.
Step 3: At the top right corner of the App info screen, click on the 3 vertical dots icon.
Step 4: As next, click on the Uninstall updates option as shown below.
Step 5: When asked for uninstall updates confirmation, hit the OK button to proceed.
That’s it. Google Play Store will be reset to its factory version now. Wait for a second and check if your issue is resolved or not by trying to download the application that was giving you the compatibility error.
Step 6: Now let’s get your Google Play Store back to the latest version available. Launch Google Play Store by clicking on its icon from the applications drawer.
Step 7: On the top right corner of the screen, click on your Profile icon.
Step 8: As next, click on the Settings option.
Step 9: Expand the About section under the Settings options, by clicking on the down arrow icon associated with it.
Step 10: Now under the Play Store Version section, click on the Update Play Store link to update your Play Store to the latest version available.
Solution 4: Update Android Software
Most issues related to your Android device can be solved by simply updating your Android version to the latest release available. In this solution, let’s see how this can be done.
Step 1: Launch the Settings application and click on the Software update option at the bottom.
Step 2: On the Software Update screen, click on the Download and install option.
Step 3: On the screen that follows, if you have any pending updates, you will be able to see that the Download button is active and clickable. Click on it.
Once the updates are downloaded, you will be prompted to restart your device to install the downloaded updates. This process will take some time.
When the phone boots back to life after installing the updates, check if your issue is resolved or not.
Please tell us in the comments section whether you could successfully fix the Your Device Isn’t Compatible with This Version issue by following the solutions listed in our article. Please tell us which method did the trick for you.
Stay tuned and happy geeking!


