If you love to download games from Steam, you may often come across the “Steam content servers unreachable” error while downloading games. This error prevents you to download games. The error, however, can show up due to many reasons because of the different system settings of the users. Fortunately, we have a few solutions available that can fix the “Steam content servers unreachable” error on your Windows 10 PC.
Method 1: Through Chrome Settings
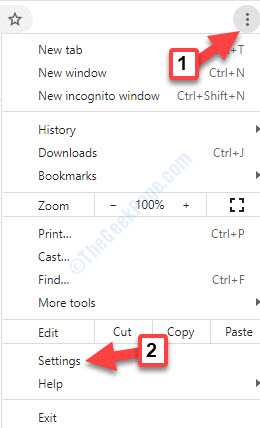
Step 1: Open Google Chrome and click on the three vertical dots (Customize and control Google Chrome) on the top right off the browser.
Select Settings from the context menu.

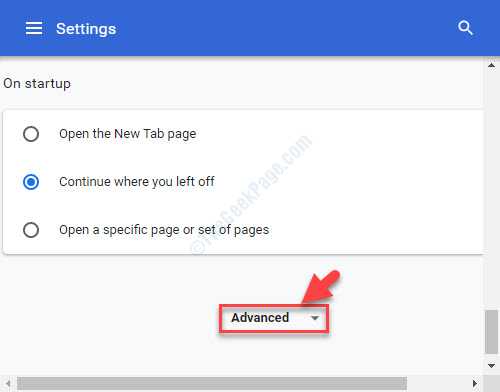
Step 2: Next, go to Advanced and click to expand.

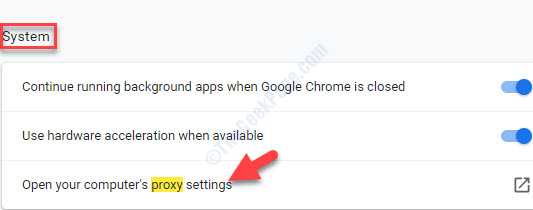
Step 3: Now, under System and click on Open your computer’s proxy settings.

Step 4: It opens the Proxy settings window. On the right side of the window, under Automatic proxy setup, go to Automatically detect settings and turn it off.

Now, try downloading the game in your Steam app and it should work fine.
But, if it still shows the error, you can try changing the same settings through Internet Properties.
Method 2: Through Internet Properties
Step 1: Right-click on Start and select Run to open the Run command.
Step 2: Type inetcpl.cpl in the Run command search box and hit Enter.

Step 3: In the Internet Properties window, go to the Connections tab.
Click on LAN settings.

Step 4: In the LAN settings dialogue box, under Automatic configuration, uncheck the box next to Automatically detect settings.
Press OK to save the changes.

Now, go back to the Steam app and you should be able to download your favorite game.
However, if the problem persists, you may try disabling the chrome extensions.
Method 3: By Changing the Game Download Region
Step 1: Open the Steam app and navigate to the upper left. Click on Steam and select Settings from the menu.

Step 2: In the Settings window, go to Downloads on the left side and then on the right side of the pane, set the Download Region field to any other country than your current one.
Press OK to save the changes.

This should help you get rid of the error and you can continue downloading the Steam game.
However, if you still can download the game, you can try removing the clientregistry.blob.
Method 5: By Removing the Clientregistry.blob
Step 1: Right-click on Start and select File Explorer from the menu.

Step 2: Copy and paste the below path (check both the paths to find which one contains the Steam folder) into the address bar:
C:\Program Files\Steam

OR

C:\Program Files (x86)\Steam
Then, locate the clientregistry.blob file.

Step 3: Rename the file as clientregistryold.blob or simply hit Delete to remove the file.

You can now launch the Steam app and let the file download. If this also does not help, you may try running the Steamreporter.exe as shown below.
Method 6: By Running Steamreporter.exe
Step 1: Right-click on Start and select File Explorer from the menu.

Step 2: Copy and paste the below path (check both the paths to find which one contains the Steam folder) into the address bar:
C:\Program Files\Steam

OR

C:\Program Files (x86)\Steam
Step 3: Locate Steamreporter.exe and double-click on it to run it.

Now, restart your Steam app and you should now continue with the download.
However, if you are still unable to download, you can try clearing up the Steam download queue.
Method 7: By Clearing Up the Steam Download Queue
Step 1: Launch Steam app, go to Library, and click on Downloads.

Step 2: In the Downloads window, click on the cross icons one by one to clear the queue, except the one that you want to download first.

Step 3: Once you have cleared the games (except the one one that you want to download first), select the game that you want to completely remove, right-click and select Uninstall.

Step 4: In the Uninstall prompt that opens, click on the Uninstall button to confirm.

Step 5: Press the Delete button in the next prompt to confirm removal of the game.
This should help resolve the issue and you can now continue downloading the games that you want. If this also does not help, you may try running the flush config.
Method 8: By Running Flush Config Command
Step 1: Right-click on Start and select Run from the menu to open the Run command.

Step 2: In the Run command search box, type steam://flushconfig and press OK.

Step 3: It will open the Steam – Clear Download Cache pop up. Press OK to confirm your actions.

You can now restart Steam and the download will continue.
However, if you are still not able to open Steam or download the games, you can try launching Steam in Safe mode.
Method 9: By Launching Steam in Safe Mode with Networking
Step 1: To boot your computer into safe mode and to select Enable Safe Mode with Networking, you can follow the Method 2 in this article.

Step 2: Now, open the Steam app and try updating it or uninstalling it the games again. This should help resolve any issues with the Steam app.
But, if you are still having problems with the Steam app, you can try turning off the Safe-web from network router.
Method 10: By Turning Off the Safe-Web from Network Router
If you are using a network router for internet, there are chances that it may have a feature called the safe-web within it. It’s known to filter all the incoming data that it considers as unsafe. However, we have created some instructions giving you an overall idea on how to turn off the safe-web in routers:
Step 1: Open the WiFi or the network router settings section and go to Parental Control.
Step 2: You can also visit the Virus or the Filtering section and the Web-safe option should be there.
Step 3: To open the router settings, enter the related IP address provided for it. For instance, for many users it is usually 192.168.1.1.
You can also contact your modem provider to check for your IP, you can check the same at the back of the device, or on the packaging box.
This should help fix the Steam app issue, but if the problem persists, you can try downloading the latest steam client.
Method 11: By Downloading a New Steam Client
Step 1: Right-click on Start and select File Explorer from the menu.

Step 2: Copy and paste the below path (check both the paths to find which one contains the Steam folder) into the address bar:
C:\Program Files (x86)\Steam
This is usually the default location of your steam folder.
But, if you have installed Steam in any other directory, you can go to that directory and open the Steam folder.
Step 3: Next, locate the below three folders:
Steam.exe (Application)
SteamApps (Folder)
Userdata (Folder)
Step 4: Now, delete all the other applications, files, and folders except the above three.
Step 5: Then, click on the link below to visit the Steam website and download the newest Steam client. Make sure you install Steam with the help of the installer in the same directory that you had earlier:
https://store.steampowered.com/about/
This should fix the Steam download issues, but if you are still facing issue with the Steam app, you can try checking if changing the default browser helps.
Method 12: By Changing the Default Browser
Step 1: Go to the Start menu, click on it and select Settings from the menu.

Step 2: In the Settings window, click on Apps.

Step 3: In the next window, click on Default apps on the left side of the pane.

Step 4: On the right side of the window, go to the Web browser section and select the browser that you want to save as the default browser.

This should fix the issue, but if it still does not get resolved, you can try uninstalling the Steam Content Server Limiter.
Method 13: By Uninstalling the Steam Content Server Limiter
Step 1: Go to the Windows search bar and type Control Panel in the search field.

Step 2: Left-click on the result to open the Control Panel window.

Step 3: In the Control Panel window, set the View by field to Large icons and then select Programs and Features.

Step 4: Under Uninstall or change a program, right-click on the Steam Content Server Limiter and select Uninstall.
Once the program is uninstalled, you can try opening the Steam app and download games. It should work fine now. But, if you are still facing the same problem, you can try changing the DNS.
Method 14: By Changing the DNS Servers
Step 1: Right-click on Start menu and select Run to open the Run command.

Step 2: In the Run command search field, write ncpa.cpl and hit Enter.

Step 3: In the Network Connections window that opens, right-click on your network router and select Properties.

Step 4: In the WiFi Properties dialogue box, under the Networking tab, double-click to open the Internet Protocol Version 4(TCP/IPV4) option.

Step 5: Next, under the General tab, click the radio button next to Use following DNS Addresses option.
Now, write 8.8.8.8 in the Preferred DNS server field and 8.8.4.4 in the Alternative DNS server field.

Step 6: Press OK to save the changes and exit. Now, try using the Steam app and it should work fine.
Alternatively, you can also try using 1.1.1.1 and 1.0.0.1 as Preferred and Alternative DNS server addresses respectively.
If this also doesn’t work, you can try disabling Chrome extensions, especially a specific add-on named Ghostery. While you must disable this specific extension, you should also turn off any other program like a VPN that’s connected to your network. Alternatively, you can try deactivating any 3rd party antivirus installed on your PC and also the Windows Defender or Firewall to see if it helps fix the issue.