Are you seeing the ‘Steam content servers are unreachable‘ error message on your computer? If you are seeing this error message on your computer, don’t worry. This problem may occur due to a variety of reasons, starting from the wrong download region to the usage of corrupt proxy servers. Simply go through these easy fixes on your system and the problem will be solved in no time at all.
Workarounds–
1. Restart your system and check if this helps your issue.
2. Try disabling the antivirus on your system. Further, launch the Steam client on your system.
Fix 1 – Adjust the Steam download section
Clearing the Download cache should fix the issue on your computer.
1. At first, you have to open Steam on your computer.
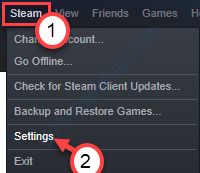
2. After that simply click on “Steam” in the menu-bar.
3. Then click on ” Settings“.

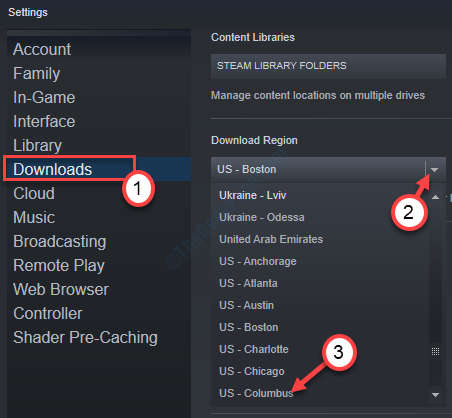
3. After that, on the left-hand side, click on “Downloads“.
4. Then, click on the ‘Download Region‘ section, click on the drop-down icon, and then choose a server at a nearby local server*.

5. Now, you have to click on the “CLEAR DOWNLOAD CACHE” on the left-hand side.
6. In case if there is a warning prompt, click on “OK“.

*NOTE-
Changing the download region should eliminate the server load issue. Sometimes, your nearby server may be overloaded on special events (like in Steam’s summer sale). So, you can choose another server from that list of servers if this dilemma stretches further.
Fix 2 – Disable the proxy settings
You can disable the corrupt proxy settings on your system to fix the issue.
1. Press Windows key+R to open the Run window.
2. In the Run window, type “inetcpl.cpl” and then hit Enter.

The Internet Properties window will open.
3. In the Properties window, click on the “Connections” tab.
4. Now, click on “LAN Settings“.

5. In the Local Area Network (LAN) Settings window, check the option “Automatically detect settings“.
6. Then, click on “OK” to save the settings.

7. Finally, click on “Apply” and then click on “OK“. This will save the change.

This automatic setting should fix the issue.
Fix 3 – Flush default configuration of Steam
Flushing the default configuration the Steam will fix the corrupt config settings in Steam.
1. Press the Windows key along with the “R” key.
2. After that, paste this code in the Run window. Then, click on “OK“.
steam://flushconfig

After that, restart Steam on your system. Check if this works out for you or not.
Fix 4 – Clear Steam download queue
Clearing the Steam download queue should fix the issue on your system.
1. Open the Steam client on your machine.
2. After that, click on the “Library” and click on “Downloads“.

3. You will see your games are updating.
4. Click on the “Cross” sign (❌) to stop the downloads.

5. Then, right-click on the game you don’t want to install at first and click on “Manage“.
6. Then, click on “Uninstall“.

You may see a prompt for confirmation to delete the game files. Click on “Delete” to delete it from your computer.
Relaunch Steam and check if this helps.
Fix 5 – Allow Steam through your firewall
Allow the Steam executables through your firewall.
1. Click on the Search box beside the Windows icon and type “Allow an app“.
2. Now, click on “Allow an app through Windows Firewall“.

3. Now you have to click on “Change settings” to get permission to modify the settings.

4. Simply scroll down through the list of apps. Keep an eye for the Steam executable files (like – Steam, Steam Web Helper, etc.)
5. Check the option “Private” and “Public” both to enable network access in both networks for all the Steam services.

7. Once you have finished modifying the settings, click on “OK“.
![]()
This should allow the Steam executables through the firewall on your computer.
Fix 6 – Uninstall and Re-install Steam client
Uninstalling and re-installing the latest build of the Steam client should solve the problem.
1. Paste this line in the Search box and hit Enter.
Programs & Features

2. Here you will see a list of applications installed on your computer.
3. After that, right-click on the “Steam” application and then click on “Uninstall“.

4. After that, click on “Uninstall“.

5. Once Steam is uninstalled from your system, click on “Close” to close the setup window.

6. After that, go to the Steam website.
7. Then, click on “Install Steam“.
The Steam setup file will download.
8. After the Steam setup has finished downloading, double click on the “SteamSetup.exe” on your computer.

Follow the on-screen instructions to install the Steam application.
9. Click on “Finish” to finish the installation.

You won’t experience this issue in the latest build.
Fix 7 – Modify the Steam config file
Some simple changes in the configuration file and the problem will be solved.
1. Right-click on the Windows icon. Click on the “Run“.
2. Paste this location and hit Enter.
C:\Program Files (x86)\Steam\config

3. Once you are in the Config folder, double click on the “config.vdf” file to edit it.

4. Here, look for this section.
"InstallConfigStore" {
"Software" {
"Valve" {
"Steam"
"cip"

5. Then, add an extra line under the “cip” section and paste this line there.
CS"
"valve511.steamcontent.com;valve501.steamcontent.com;valve517.steamcontent.com;valve557.steamcontent.com;valve513.steamcontent.com;valve535.steamcontent.com;valve546.steamcontent.com;valve538.steamcontent.com;valve536.steamcontent.com;valve530.steamcontent.com;valve559.steamcontent.com;valve545.steamcontent.com;valve518.steamcontent.com;valve548.steamcontent.com;valve555.steamcontent.com;valve556.steamcontent.com;valve506.steamcontent.com;valve544.steamcontent.com;valve525.steamcontent.com;valve567.steamcontent.com;valve521.steamcontent.com;valve510.steamcontent.com;valve542.steamcontent.com;valve519.steamcontent.com;valve526.steamcontent.com;valve504.steamcontent.com;valve500.steamcontent.com;valve554.steamcontent.com;valve562.steamcontent.com;valve524.steamcontent.com;valve502.steamcontent.com;valve505.steamcontent.com;valve547.steamcontent.com;valve560.steamcontent.com;valve503.steamcontent.com;valve507.steamcontent.com;valve553.steamcontent.com;valve520.steamcontent.com;valve550.steamcontent.com;valve531.steamcontent.com;valve558.steamcontent.com;valve552.steamcontent.com;valve563.steamcontent.com;valve540.steamcontent.com;valve541.steamcontent.com;valve537.steamcontent.com;valve528.steamcontent.com;valve523.steamcontent.com;valve512.steamcontent.com;valve532.steamcontent.com;valve561.steamcontent.com;valve549.steamcontent.com;valve522.steamcontent.com;valve514.steamcontent.com;valve551.steamcontent.com;valve564.steamcontent.com;valve543.steamcontent.com;valve565.steamcontent.com;valve529.steamcontent.com;valve539.steamcontent.com;valve566.steamcontent.com;valve165.steamcontent.com;valve959.steamcontent.com;valve164.steamcontent.com;valve1611.steamcontent.com;valve1601.steamcontent.com;valve1617.steamcontent.com;valve1603.steamcontent.com;valve1602.steamcontent.com;valve1610.steamcontent.com;valve1615.steamcontent.com;valve909.steamcontent.com;valve900.steamcontent.com;valve905.steamcontent.com;valve954.steamcontent.com;valve955.steamcontent.com;valve1612.steamcontent.com;valve1607.steamcontent.com;valve1608.steamcontent.com;valve1618.steamcontent.com;valve1619.steamcontent.com;valve1606.steamcontent.com;valve1605.steamcontent.com;valve1609.steamcontent.com;valve907.steamcontent.com;valve901.steamcontent.com;valve902.steamcontent.com;valve1604.steamcontent.com;valve908.steamcontent.com;valve950.steamcontent.com;valve957.steamcontent.com;valve903.steamcontent.com;valve1614.steamcontent.com;valve904.steamcontent.com;valve952.steamcontent.com;valve1616.steamcontent.com;valve1613.steamcontent.com;valve958.steamcontent.com;valve956.steamcontent.com;valve906.steamcontent.com"

6. Press Ctrl+S to save the changes in the file.
Relaunch the Steam client on your computer.
Fix 8 – Remove Steam Content Server Limiter
You can uninstall the Steam Content Server Limiter from your system.
1. Press the Windows key+R.
2. Write this Run command and hit Enter.
appwiz.cpl

3. Scroll down and right-click on the “Steam Content Server Limiter“.
4. Click on “Uninstall“.

Once you have uninstalled it, the problem will be solved.
Fix 9 – Delete the ClientRegistry.blob file
The clientregistry.blob file holds the registry value for the Steam client.
1. Right-click on the Windows icon and click on the “Run“.
2. Then, paste this location in the Run window and click on “OK“.
C:\Program Files (x86)\Steam

The Steam folder* will open up.
3. Once it opens up, look out for the “ClientRegistry.blob” file.
4. After that, right-click on it and click on “Delete“.

Launch Steam again and check the status of your problem.
In case if this doesn’t work out, go back to the Steam folder again and follow these steps.
5. Find out the “steamerrorreporter.exe“.
6. After that, double click on the “steamerrorreporter.exe” to run it.

Now, relaunch the Steam again.
*NOTE– This is the default location of the Steam folder. If you have installed Steam on any other drive, navigate to the folder manually. Then, follow the rest of the instructions.
Fix 10 – Modify the DNS settings
You can modify the DNS settings to solve the problem.
1. Press the Windows key+R.
2. Then, write “ncpa.cpl“. Click on “OK“.

3. Then, you need to right-click on the adapter and click on the “Properties“.

4. To adjust the IPv4 settings, you should double click on “Internet Protocol Version 4 (TCP/IPv4)“.

5. Next, click on the radio button beside “Use the following DNS server addresses:”
6. After that, put these following DNS servers settings-
Preferred DNS server: 8.8.8.8
Alternate DNS server: 8.8.4.4
7. Click on “OK” to save it.

Restart the system. Reboot your router, also.
Fix 11 – Disable Safe-web
Some select router offers a safe-web protocol that protects your router from potential threats and malware.
You have to disable the Safe-web on your router settings.
1. Open the router configuration page from your browser. (Generally, it is a default IP address, like 192.168.1.1). Log in to the router page with your credentials.
2. You can locate the Safe-web in any of the sections mentioned below-
a. Parental Controls section.
b. Virus section or the Filtering section
When you have located the Safe-web settings, just turn it off.
Try to connect to the Steam Content Servers again.
Fix 12 – Add Steam to the antivirus exception
You can add the Steam application to the list of your antivirus exception.
NOTE– We have explained the steps in Windows Defender. If you have any dedicated antivirus installed, may some steps differ but the process is similar.
1. At first, press Windows key+S and type ‘Windows Security‘.
2. Then, click on the “Windows Security“.

3. After that, click on the ‘home icon’ and then click on the “Virus & threat protection“.

4. Scroll down in the Windows Security window to locate Virus & threat protection settings.
5. Then, click on the “Manage settings“.

6. Click on the “Add or remove exclusions“.

7. Scroll down till you identify the ‘Exclusions‘ option. Click on the “Add an exclusion“.
8. From the drop-down select the “File” type.

9. Now, navigate to the location where the application is installed on your computer.
10. Then, choose the Steam.exe file, and click on “Open“.
Generally, the location is – C:\Program Files (x86)\Steam

11. You will notice that Steam has appeared in the list of excluded applications.

Close the Windows Security window.
Restart your system to let this change take effect. Check if this solves the issue on your computer.
Fix 13 – Change the default browser settings
In a peculiar way, some users have solved the issue just by settings Internet Explorer as their main browser.
1. Press the Windows key+I.
2. Then, click on the “Apps“.

3. After that, click on the “Default apps“.
4. Then, scroll down to locate the ‘Web browser’ section. Click on it.
5. After that, choose the “Internet Explorer” from the list.

Internet Explorer will be set as the default browser for your machine.
Try the Steam again. This should have fixed the issue regarding the ‘Steam Content Server unreachable’ on your workstation.
Your problem should be solved.