Many gamers have reported seeing the Game game stuttering and lagging issues while using the Steam application. On checking the details, it looks like the issue is predominantly caused by the Steam VR WebHelper.
SteamVR WebHelper is an internal browser that the Steam application uses to set up the display needed for the Steam Store game library. This uses up to 70% of the CPU causing the Stuttering and lagging issues in Steam.
In this article, we’ve curated a list of fixes that will help you overcome the high CPU usage of Steam Client WebHelper.
Fix 1: Disable Animated Avatar
Step 1: Open the Steam Application.
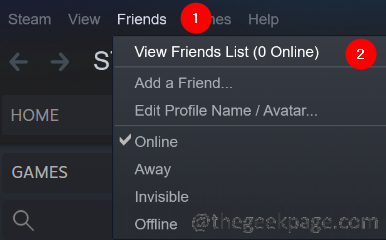
Step 2: Click on the Friends tab from the top-menu options.
Step 3: Click on the View Friends list.
Step 4: Click on the Settings icon.
Step 5: The Friends list settings window opens. Next to the Enable Animated Avatars & Animated Avatar Frames in your Friends List and Chat, toggle the button to turn OFF the settings.
Fix 2: Disable Steam Overlay
Step 1: Open the Steam application by double-clicking on it.
Step 2: Click on the Steam menu option located in the left-hand side corner.
Step 3: Click on Settings.
Step 4: In the Settings window, click on In-Game from the left-hand side.
Step 5: From the right-hand side, untick the option Enable the Steam Overlay while in-game.
Step 6: In the settings window, click on the Interface tab from the left-hand side.
Step 7: Untick these three options:
- Enable smooth scrolling in web services(requires restart)
- Enable GPU accelerated rendering in web views(requires restart)
- Enable hardware video decoding, if supported(requires restart)
Step 8: Click on the Ok button.
Step 9: You will see a prompt asking to restart the system. Click on the Restart Steam button.
Fix 3: Run Steam in small mode.
If none of the above methods don’t work, you can try running steam in small mode disabling the Steam WebHelper. Gamers have reported seeing a 10-15% increase in fps when they disabled Steam WebHelper.
Step 1: Exit the Steam Application if it’s open.
Step 2: Right-click on the Steam Application
Step 3: Choose Open file location.
Step 4: Right-click on steam.exe and choose the Copy file path option.
Step 5: Hold the keys Windows+R and open the Run Dialog.
Step 6: In the Run dialog that opens, paste the address that you copied from Step 4 and append the line -no-browser +open steam://open/minigameslist
The final command should be as shown below.
"C:\Program Files (x86)\Steam\steam.exe" -no-browser +open steam://open/minigameslist
Fix 4: Uninstall the latest windows update
If you notice that the error is after updating the Windows, you can roll back to the previous state by uninstalling the last 2-3 updates.To do so, follow the below steps:
Step 1: Open the Run Terminal with the keys Windows+R.
Step 2: Enter the command appwiz.cpl and hit Enter.
Step 3: In the window that shows up, click on View installed updates.
Step 4: Check the date on which the application was installed.
Step 5: Uninstall an update by right-clicking on it and choosing Uninstall.
Step 6: Now uninstall the latest updates one by one and figure what which update caused the issue.
That’s all.
Thanks for reading.


