While working on your computer you may see something like “Srtasks.Exe“. The Srtasks.Exe indicates high disk usage in your Windows 10 PC. This is an executable of an authentic Microsoft process called as “Microsoft System Protection Background Tasks” which is quite often used by Windows 10’s Task Scheduler for creating restore points automatically.
If you are on Windows 10, you can find the “Srtasks.Exe” executable in the C:\Windows\System32 path. Whenever you see this, it means there’s high CPU usage. You may also see this flagged as a virus by a 3rd party antivirus software. There are chances that you see something like that in the disguise of “Srtasks.Exe”, but with a missing “s“. It should appear as “Srtask.Exe” instead. This helps you detect if it’s a malware.
Fortunately, there are a quite ways to fix the Srtasks.Exe high disk issue in Windows 10. Let’s see how.
Method 1: Through Services
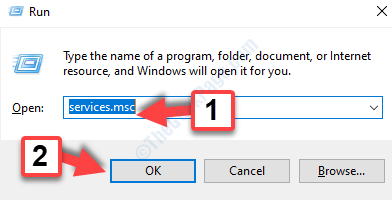
Step 1: Press Win + R keys on your keyboard to open the Run command. In the search field, type services.msc and hit OK to open the Services window.

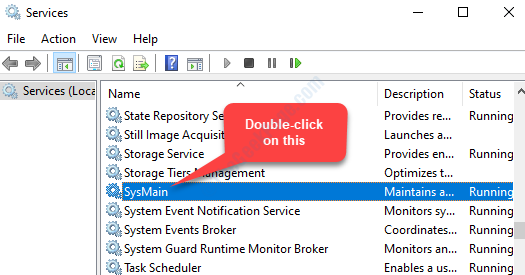
Step 2: In the Services window, go to the right side of the window. Now, under the Name column, scroll down and find SysMain.
Select SysMain and double-click to open the SysMain Properties window.

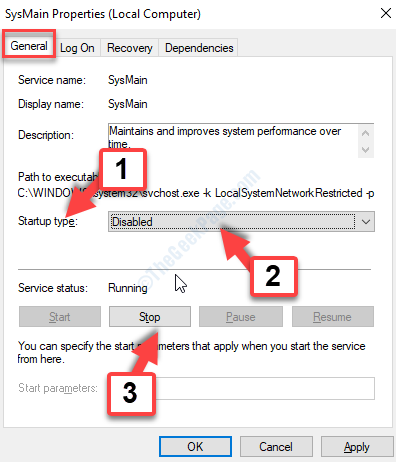
Step 3: In the SysMain Properties window, under the General tab, navigate to the Startup type field. Here. click on the drop down and select Disabled. Then press the Stop button below to disable the service.
Hit on Apply and then OK to save the changes and exit.

Now, just restart your PC and see if it helps fix the Srtasks.Exe high disk issue in your PC. If it doesn’t, then try the 2nd method.
Method 2: By Running the System File Checker Tool
Step 1: Navigate to the Start button on your desktop and in the search box, type Command Prompt. Right-click on the result (Command Prompt) and click on the Run as administrator option in the right-click menu.
This will open the Command Prompt window in admin mode.

Step 2: In the Command Prompt (Admin mode) window, run the below command:
sfc /scannow

This process takes time to complete, so wait patiently. The System File Checker will detect any corrupt files and repair them accordingly.
Step 3: – Now, run the code given below
DISM.exe /Online /Cleanup-image /Restorehealth
Step 4: – Now, execute the code given below
chkdsk C: /R
Once it’s complete, reboot your PC and the Srtasks.Exe high disk issue in your Windows 10 PC should be gone.
Method 3: Disable System Protection
1. Search Create a restore point in Search box. Click on it
2. Now, Click on configure.
3. Now, Disable system protection.

4. Click on Apply and close the window.