When you create a System Restore or use third-party software to create a snapshot of your system drive or partition so that you can use it later to recover, this exact snapshot is called a Shadow Copy. These shadow copies use a lot of the system space if not taken care of. Many users have reported seeing an error when they use the vssadmin command in the command prompt to delete the shadow copies of a particular drive to reclaim the space on their system. The exact error message displayed to the user is as below:
Error: Snapshots were found, but they were outside of your allowed context. Try removing them with the backup application which created them.
The vssadmin command lets you manage shadow copies that are created by System Restore and not those created by any third-party apps or Windows built-in backup. Whenever you run this command line tool and it comes across shadow copies that are not created by System Restore, it skips them and shows the above error message. If you are confronting this error and you want to recover space, you need to delete the old shadow copies or change the settings so that the Windows Backup shadow copies are deleted automatically. Go ahead and read this article to find some fixes that can help your overcome this error on your Windows PC.
Fix 1 – Manually Delete Windows Backup Shadow Copies
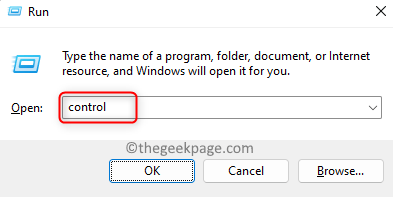
Step 1. Open the Run box using the Windows and R key combination on your keyboard.
Step 2. Type control and hit Enter to open the Control Panel.
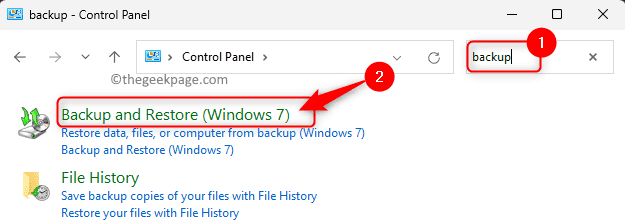
Step 3. In the search box at the upper left corner of the Control Panel, type backup and hit Enter to see the search results.
Step 4. Select Backup and Restore (Windows 7) in the displayed search results.
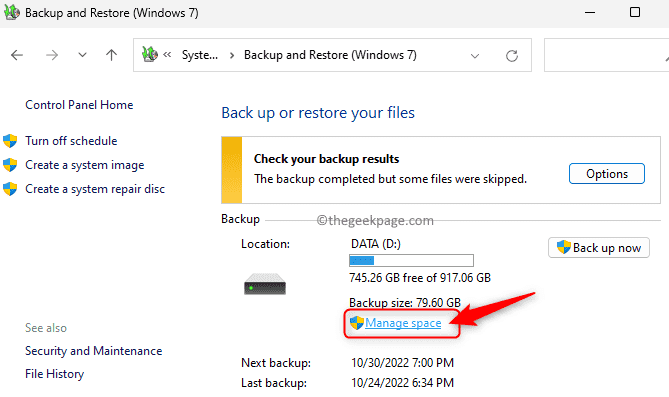
Step 5. Here, click on the Manage space link in the Backup section.
Step 6. In the Manage Windows Backup Disk Space window, click on the View backups… button in the Data file backup section.
Step 7. You will see a list of Windows Backup shadow copies on this screen.
Select the backup that needs to be deleted and click on the Delete button.
Step 8. In the confirmation dialog that pops open, click on Delete to confirm the deletion of the data file backup.
You will now have the Windows Backup shadow copies deleted without encountering the error.
Fix 2 – Manage Windows Backup Disk Space
Step 1. Repeat Steps 1 – 5 as indicated in Fix 1 above to open the Manage Backup Disk Space window.
Step 2. In this window, click on the Change settings… button in the System image section.
Step 3. Here, you can either select “Let Windows manage the space used for backup history” or “Keep only the latest system image and minimize the space used by backup”.
Step 4. When you choose the second option of keeping only the latest version of the system image and minimizing space, you will be given an estimate of the space that will be freed up.
Step 5. Once this setting is done, your Windows Backup shadow copies will be automatically deleted based on the settings chosen.
Fix 3 – Use the Resize Shadow Storage Command
Step 1. Press Windows + R to open the Run dialog.
Step 2. Type cmd and press the Ctrl + Shift + Enter key at the same time to run the Command Prompt as an administrator.
When prompted by User Account Control for permissions, click on Yes.
Step 3. Type the command below and execute it by pressing the Enter key.
vssadmin resize shadowstorage /for=X: /on=X: /maxsize=401MB
Note: X in the command refers to the volume or drive letter. Change as per your requirement.
Step 4. After the above command executes, you will receive a success message.
Now, you can increase the limit to the recommended unbounded setting by using the below command.
vssadmin resize shadowstorage /for=X: /on=X: /maxsize=unbounded
Step 5. After the resizing, you will see the below message
Successfully resized the shadow copy storage association
Step 6. Execute the command below.
vssadmin delete shadows /for=d: /all /quiet
Step 7. Type the below command to check there are no more shadow copies.
vssadmin list shadows
Now, all the shadow copies must have been deleted.
Fix 4 – Run the Diskshadow Command
If you are facing this error on your Windows server then use the diskshadow command as mentioned in the steps below.
Step 1. Press the Windows key on your keyboard and type command prompt in the search bar.
Step 2. Once Command Prompt is highlighted in the search result, click on Run as administrator in the right pane.
Click on Yes when prompted for permissions by UAC.
Step 3. Execute the command below by typing it and hitting the Enter key.
diskshadow
Step 4. You will see the DISKSHADOW prompt.
Here, execute the below command to list the shadow copies with their IDs.
list shadows all
Step 5. Execute either one of the below commands.
To delete a particular shadow copy use the below command:
delete shadows set {shadow copy id which you want to delete)
To delete all the shadow copies execute the following command:
delete shadows all
Step 6. Reboot your system after the commands are executed.
That’s it!
Thanks for reading.
Using the fixes in this article, you must have been able to delete the Windows Backup shadow copies on your system without encountering the error message “Snapshots Were Found, But They Were Outside of Your Allowed Context”. Did you find the article useful enough in resolving this issue while trying to delete the shadow copies on your Windows PC? Please comment and let us know your thoughts and the fix that worked for you.


