Steam is a gaming platform that is most preferred by a large number of gamers due to the availability of different game titles and the flexibility that it provides. Gamers can use their account on any computer to access the games that they have purchased in their account. As the game sizes have been increasing over time, the time that is taken to download them also have increased. But, lately, many Steam users have reported that the game download speeds on their PC have slowed down and it is taking much longer than before.
Are you experiencing a long waiting time while downloading games on Steam even when you have a good internet connection and fast download speeds for your internet service? Then, go ahead and dig into this article to find methods that can help you solve this problem and have faster game download speeds on Steam. Before moving ahead with the fixes try the workarounds mentioned below.
Workarounds
1. Check if you have a working network connection.
2. Restart both your PC and router/modem to check if it resolves the download speed issue.
Fix 1 – Change Steam Download Server Region and Bandwidth Limit
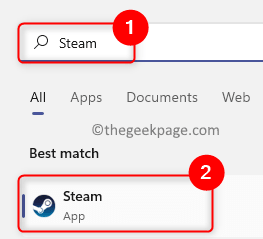
1. Tap on the Windows key on your keyboard and type Steam in the Windows search box.
2. Select the first option Steam in the result list.
3. In the Steam app window that opens, click on the Steam menu at the upper left corner of the window.
Now a menu opens up, here select Settings.
4. In the Steam Settings window, click on the Downloads tab in the left pane.
5. Now, move over to the right pane.
Click on clear Download cache

After that , use the dropdown menu below the Download Region section and choose a different server region
6. Go to the Download Restrictions section.
Make sure to uncheck the box next to “Limit bandwidth to:” so that there are no restrictions to the bandwidth while downloading games.
Also, uncheck the box next to the option Throttle downloads while streaming.
7. Click on OK to confirm and save the changes.
8. You will see a window asking to restart Steam for the changes in settings to come into effect.
Here, click on Restart Steam.
9. Relaunch Steam. Go back to your Downloads in Steam and check if the download speed has improved.
Fix 2 – Clear Steam’s Download Cache
1. Launch the Steam application.
2. Click on the Steam menu at the top-left corner of the application’s window.
Here, select the Settings option.
4. Go to the Downloads tab in the Steam Settings window.
On the right side, click on the Clear Download Cache button.
5. In the window that pops up, click on OK to confirm the process of clearing the download cache
This process will log out from your account on Steam.
6. Log in to your Steam account again with the correct credentials. Then, check if the download speed has increased.
Fix 3 – Disable Ipv6
1 – Search View Network connections in search box and click on the search result

2 – Now, Right click on your network adapter and click properties

3 – Disable IPv6 and click OK
4 – Restart Steam and try downloading again

Fix 4 – Set Realtime Priority for Steam Downloads
Before moving ahead with the steps in this fix, check that Steam is running on your PC.
1. Open the Task Manager using the Ctrl + Shift + Esc key combination on your keyboard.
2. In the Processes tab, scroll and locate a process with the name Steam (32 bit) in the list.
Right-click on this process and select Go to details in the context menu.
3. This moves over to the Details tab in the Task Manager.
Here, right-click on the steam.exe process and select the Set priority option.
In the set of options for priority, choose Realtime.
4. In the same way as mentioned in Step 3, change the priority of steamservice.exe to Realtime.
5. Check if your download speed is faster than before. This process will prioritize the Steam process over the other processes running on your PC.
Fix 5 – Update your Network Drivers
1. Click on the Windows (blue colored) button.
Type Device Manager in the search box.
2. In the search result that appears, select Device Manager.
3. Expand the Network adapters section by clicking on the small arrow next to it.
Here, right-click on your network adapter and choose Update driver.
4. You will see the Update drivers window for your network adapter.
Here, click on Search automatically for drivers in the two options shown.
5. Wait for some time until Windows searches for any new drivers and installs them.
6. Reboot your system once the drivers are updated.
7. Launch Steam and check if there are any improvements in the download speed.
Thanks for reading.
The Steam game download speed must now be faster than it was before. We hope the fixes in this article have helped you resolve the slow download speed issue in Steam on your Windows PC. Did you find this article useful? Please let us know your thoughts and opinions in the comments section below.
