Skype is a VOIP-based application that can be used for sending instant messages and making video and voice calls for free to other Skype accounts. It is available for use on any device like phones, tablets, Windows PCs and Macs. Many users have reported a problem while trying to send messages to their friends or colleagues on Skype. They have noticed that the message is not being sent to their Skype contacts no matter how many times they tried resending it.
One of the possible reasons for messages not being sent on Skype is that either the contact has blocked you or the person whom you are trying to send the message has removed you from their friend’s list. Also, the message sending may have failed due to a bug or bad network connectivity.
If you are in a similar situation wherein your messages are not sent on Skype, then continue reading this article. Here, we have listed solutions that have been used by others in resolving the issue of messages not being sent on Skype. Try the fixes mentioned in the order here until your problem gets resolved.
Fix 1 – Reset Skype
1. Right-click on the Windows Start button on your taskbar to open the context menu.
In the menu that opens, click on Apps and Features to go to the Apps & features page in the Settings app.
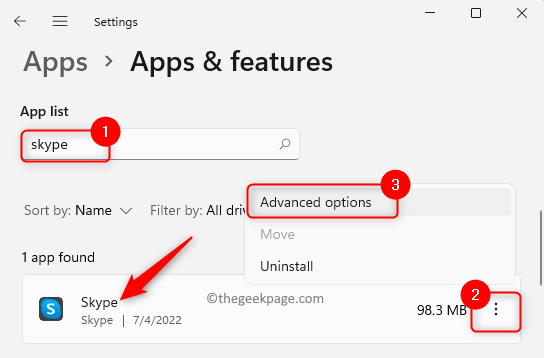
2. Here, scroll down and locate the App list section.
Type skype in the search box below the App list text to look for Skype in the list of installed applications on your computer.
In the displayed search result, click on the three-dot menu associated with Skype and choose Advanced options in the menu.
3. On the Advanced options page for Skype, scroll and locate the Reset section.
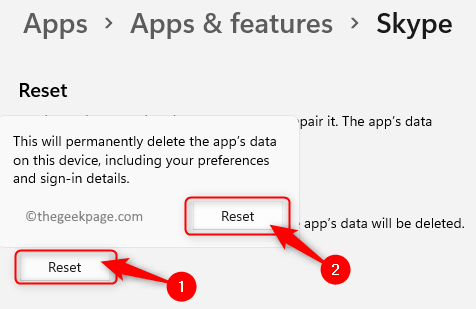
Click on the Reset button under the Reset section.
On the confirmation prompt, click on Reset again to confirm the process.
Once the reset process finishes, you will see a tick next to the Reset button.
4. Exit the Settings window.
Open Skype and log in to your account. Check if you are able to send a message to your Skype contact.
Fix 2 – Check if you are Using the Latest Version of Skype
1. Open the Skype application.
Click on the three horizontal dots visible to the right of your name.
In the menu that opens, select the option Settings.
2. In the Skype Settings window, go to the Help & Feedback tab in the left panel.
On the right side, you will see a message that reads “You’re on the latest version of Skype”, which means you don’t need to perform any update for the application.
3. If you don’t see this message, it means you will need to download and install the latest version of Skype.
On Windows 11/10, you can go to the Microsoft Store and check if there is any update in this case.
4. Hit the Windows key and type store in the search box.
Click on Microsoft Store in the search results.
Once Store opens, click on the Library tab in the left panel.
On the right side, you can find if there are any updates for the Skype application.
If there is any update available, then click on the Update button associated with Skype.
Wait for the update to download and install. Then, check if the problem is resolved.
Fix 3 – Disable Proxy Servers
If you are using a proxy server, many applications and websites will not work in the way they are supposed to as they are assumed to be imposing a security threat to the system. Follow the steps mentioned below to disable proxy servers on your Windows PC.
1. Press Windows + R keys simultaneously to open the Run box.
Type ms-settings:network to open the Network & Internet page on the Windows Settings app.
2. On the Network & internet window that opens, click on the box with the text Proxy.
3. Here, turn off the toggle associated with the Automatically detect settings option under the Automatic proxy setup section.
Also, check whether the Manual proxy setup option is turned off.
4. If the manual proxy is not turned off, then click on the Edit button next to Use a proxy server in the Manual proxy setup section.
On the Edit proxy server prompt that opens, make sure that the toggle under Use a proxy server is turned Off.
Then, click on Save.
5. Now, open Skype and try sending a message to any contact to check if the messages are being sent or not.
Fix 4 – Check Skype Server Status
Skype is owned by Microsoft and the servers are operational and stable most of the time. But, at times the servers may be down for maintenance or to resolve some issues. Use the steps below to check the server status for Skype.
1. Open your Skype application.
2. To go to the Skype Settings, click on three horizontal dots next to your Skype name and choose Settings in the menu.
3. In the Settings window, click on the Help & Feedback tab.
4. On the right side, click on Skype Status in the Help section. It will take you to the Official Skype support page showing the server status.
5. If you see the text Normal service next to Skype Status on this page, then it means that the servers are running without any issue but there is a problem with the Skype app on your computer.
If there is any other message, you need to wait until the issue with the Skype server is fixed and they return to normal service.
Fix 5 – Use the Older Version of Skype
If the fixes mentioned till now have not helped you resolve this issue, then you can try installing an older version of the application on your computer.
1. Click on this link to go to open the Official Skype Download Page.
2. Now, click on the arrow on the blue button in the Skype for Desktop section.
In the dropdown list that opens, click on Get Skype for Windows.
3. Select a location on your PC to save this Skype app installer file.
Once the download completes, double-click on the installer and start the installation process.
Follow the instructions on the screen to complete this process.
4. After the older version of Skype is installed, open it and log in to your Skype account.
Check if you are able to send messages without facing any issues.
Fix 6 – Delete and Reinstall Skype
1. Exit the Skype application before uninstalling it from your PC.
To do so, open Task Manager using the Ctrl + Shift + Esc key combination on your keyboard.
Locate the Skype app in the list of processes running on your PC.
Right-click on Skype and choose the option End task to kill all the running Skype processes.
2. Open the Run dialog using the Windows and R key combination.
Type ms-settings:appsfeatures and hit Enter.
3. On the Apps & features page, you need to locate the Skype app in the list of installed apps.
Look for the section App list and type skype in the search box below it.
Click on the three-dot menu associated with Skype and select Uninstall.
On the confirmation pop-up, click on Uninstall again.
Follow the on-screen instructions and finish the uninstallation process of the application.
4. Click on this link to go to the Official Download page for Skype.
On this page, click on the blue box with the text Get Skype for Windows 10 & 11.
You will see a prompt asking to open Microsoft Store to install this application.
Click on the Open Microsoft Store button.
Microsoft Store opens with the Skype app page.
Click on the Get button to start the installation. Once Skype is installed log in and check if the problem is fixed.
5. If you are using an older version of Windows, then on the Official download page click on the downward facing arrow on the blue button and choose to Get Skype for Windows to start the download process.
Then, perform the installation using the downloaded executable file.
That’s it!
Thanks for reading.
We hope that the solutions mentioned in this article have helped you fix this problem of Messages Not Sending on Skype. Please comment below and let us know the fix that worked for you.


