The Mail app usually works pretty well once you have set it up on the Windows PC/laptop. Some of the Mail users may think otherwise, as this default email client in Windows isn’t dowloading any mails on their machines. This peculiar problem can become the main source of your headace as you can’t access any email or view the attachments in offline mode. These methods should take care of that.
Fix 1 – Change the email sync settings
There is a email sync settings that should take care of the downloading issue in the Mail client.
Step 1 – Search and open up the Mail app on your device.
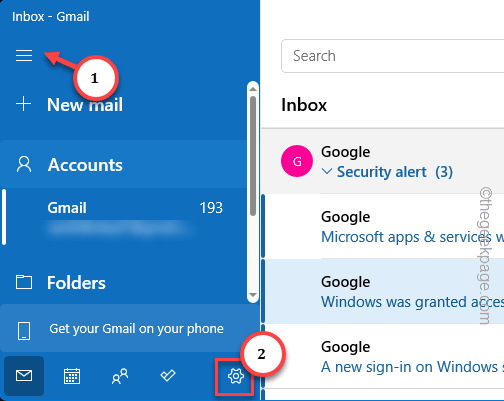
Step 2 – Next, tap the three bar menu to expand that.
Step 3 – Tap the “⚙️” button at the bottom.
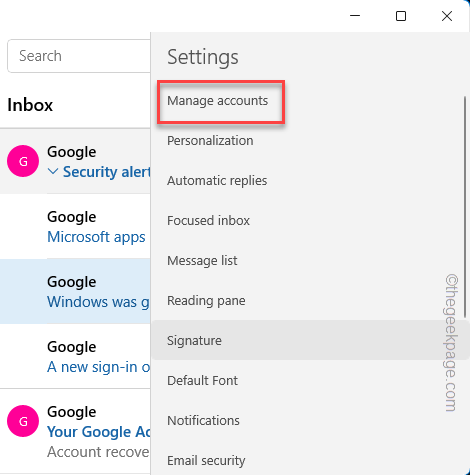
Step 4 – After you have opened the Mail settings, tap the “Manage accounts” option to open that up.
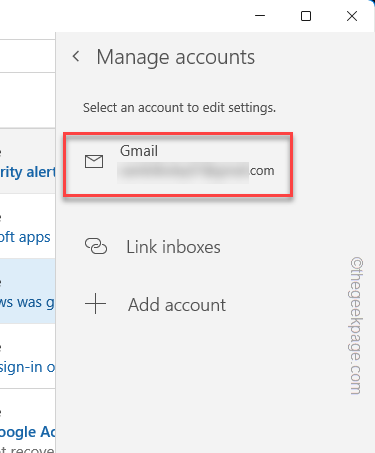
Step 5 – On the side bar, you will see the list of email accounts. Tap to open the problematic one from there.
Step 6 – Now, you willl see the settings of this particular email account. Tap “Change mailbox sync settings” to access that.
Step 7 – After this, set the ‘Download new content’ to “as items arrive” from the drop-down menu.
Step 8 – Next, switch the ‘Download email from’ to “the last 3 months” (you can choose other time period from the same drop-down).
Step 9 – Finally, turn all the options in the Sync menu and tap “Save“.
Email
Calendar
Contacts
Spare a few seconds or a full minute for the Mail app to set everything up. Now, all the email messages for the last 3 months will be downloaded on your device.
Fix 2 – Whitelist the Mail app in firewall
Check whether it is the Windows Firewall that is hindering the Mail app access to the internet.
Step 1 – To whitelist the Mail app in firewall, tap the Win+R both keys at once.
Step 2 – Next, paste this in the empty box and click “OK”.
firewall.cpl
Now, if you look closely, you will find the option to allow/disallow an app through the firewall on the left pane.
Step 3 – So, click “Allow an app or feature through Windows Defender Firewall“.
Step 4 – You won’t be able to do anything unless you click “Change settings“.
Step 5 – Now, keep you eyes on the list as you scroll down. Identify the “Mail and Calendar” app.
Step 6 – Ensure that both the type of firewall ‘Private‘ and ‘Public‘ box is checked.
Step 7 – Finally, you can save these changes using a tap on “OK” button.
Quit this Allower applications page in Control Panel.
Though a system restart isn’t mandatory, you may do that and test the Mail app one more time.
All the mail messages will be available offline after a few moments.
Fix 3 – Reset the Mail app
Even if whitelisting the Mail app doesn’t work, you should reset the entire Mail app.
[NOTE – Beware, as resetting the Mail app will clean up all the exisitng email drafts, stored in the local device storage. Apart from this, any other filters or rules will be removed from the app as well.]
Step 1 – You can start by opening up the Settings window. The shortcut is Win+I keys.
Step 2 – Go to the “Apps” bar.
Step 3 – Next, click “Installed apps“.
Step 4 – Search for “mail” using the search box present there.
Step 5 – Just tap the Mail and Calendar app and click “Advanced options“.
As you explore the advaned options of the Mail app, reach the Recovery section.
Step 6 – Tap “Reset” once and twice on the dialog box to ensure the resetting process.
Once you have reset the Mail app, go ahead and launch it from the system.
As the default home page brings up in Mail and Calendar, setup your account properly to fetch all the emails in there.
Fix 4 – Use the new Outlook app switch
The Mail and Calendar app is going to be replaced with the Outlook app on Windows 11/10. So, try out the new Outlook and check it out.
Step 1 – To do this, you must have launched the Mail app.
Step 2 – Tap the bar button to get out of the default email message view.
Step 3 – As soon it does, you should be able to view the “Try new Outlook“.
Within seconds the default layout of the Mal app will be gone and get replaced by a more refined version of Outlook messaging app.
But, you may have to log in using your email accounts in the new app or browser page. Once you have set it up, you are good to go.
You won’t face the email messages not downloaded bug in the new app.


