Let us say you have a printer connected to your system and want to make this printer available for all the users using your network. You can do so by sharing your printer to the network. Earlier , this was done using Homegroup feature of Windows 10. Now , that this functionality is not supported anymore, let us discuss different ways of achieving it. In this article , let us see how to share a printer with your network.
Pre-requisites:
1. The printer must be Turned ON , Setup and actively running
This means that the printer should be powered ON and connected to your PC(either through cable or Wirelessly). Drivers must be installed and be in working state.
2. The Computer to which the printer is connected , must be ON and connected to the internet.
3. File and Printer Sharing must be turned ON
Following are the steps to turn on File and Printer Sharing :
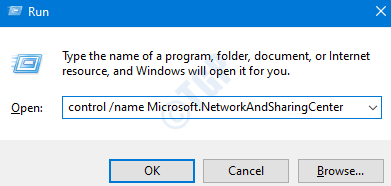
Step 1: Hold Windows+r to open Run window
Step 2: In the run window, type control /name Microsoft.NetworkAndSharingCenter and hit Enter

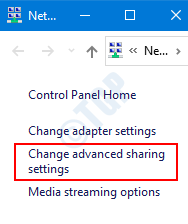
Step 3: From the Network and Sharing Center window , Select Change advanced sharing settings from the left-hand side as shown in the snapshot below.

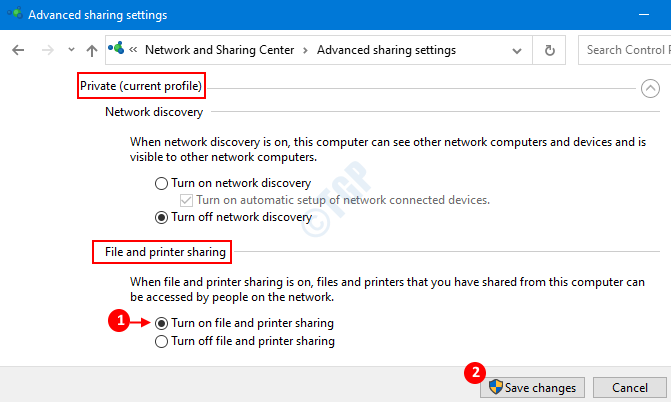
Step 4 : In the appearing window,
- Choose the type of Network(Private or Public) where you want to share your printer.
- Under File and printers sharing section, Tick the Turn on file and printer sharing option.
- Press on Save changes
NOTE:
In the below snapshot , File and Printer Sharing enabled on Private Network. To share the printer to a Public network , choose Guest or Public network section instead of Private.

Now, that all the pre-requisites are taken care of. Let’s proceed further and share the printer.
Method 1: From Settings
Step 1: Hold the keys Windows+r at the same time from your keyboard to open the Run window.
Step 2: Type ms-settings:printers and click on OK

Step 3: In the Settings –>Printer & scanners window at the right-hand side, you can see the list of printers installed in the system.

Step 4: Click on the Printer you want to share and select Manage

Step 5: In the Printers window, Choose Printer properties

Step 6: To share a Printer with the network , following settings to be done in Printer Properties Window:
- Select the Sharing tab
- Tick on Share this printer
- Tick on Render print jobs on client computers
- Click on OK

NOTE: By default, the driver for a Windows version of your system will be installed (example, x64). If you want to add drivers for other versions(x86, AMD, etc.) , you can do it by clicking on Additional Drivers under the Drivers section,

In the Additional Drivers window that opens select the version of windows(example, x86) and click OK

In the Install Print drivers window , Type or browse to the location of the driver file and press OK

That’s All . Now the Printer will be made available to all the devices using the network.
Step 7: In order to Stop sharing a printer with the network , following steps are do be followed.
- Under the Security tab , untick the option Share this printer
- Click on OK

Method 2 : From Control Panel
Step 1: Hold the keys Windows+r to open the Run window.
Step 2: Type control /name Microsoft.DevicesAndPrinters and press OK

Step 3: In the appearing window, under the Printers section, you can see all the Printers listed. If you are not able to see the printers, expand the Printers section by pressing the arrow just before Printers heading.

Step 4: Now right-click on the printer you want to share and choose Printer Properties as shown in the below image.

Step 5: Printer Properties window opens as shown below

Step 6: In order to Share a printer with the network , follow Step 6 from Method 1
Step 7: In order to Stop Sharing a Printer with the network , follow Step 7 from Method 1
Method 3: From Printers Folder
Step 1: Open the Run window with the shortcut Windows+r
Step 2: In the window, write explorer shell:PrintersFolder and press OK

Step 3: The Printers Folder opens and we can see all the Printers listed as shown below

Step 4: In the window, right-click on the Printer you want to share and choose Printer Properties

Step 5: The Printer Properties window opens as shown below,

To Share a printer with the network , follow Step 6 from Method 1
To Stop Sharing a Printer with the network , follow Step 7 from Method 1
Method 4: From Power Shell
Step 1: Hold the keys Windows+r at the same time to open the Run window.
Step 2: Type powershell and hold the keys Ctrl+Shift+Enter to open the Elevated Powershell window

Sharing the Printer
In the PowerShell window that opens, run the following to Share the Printer command and hit Enter:
Set-Printer -Name "<Name of the Printer>" -Shared $True
Lets say we want to share the Brother printer from our system.
1. We should know the exact name of the Printer. We can get that using the command
Get-Printer | Format-List Name
Refer to the snapshot below

2. Now that we know the name , in this case Brother HL-1110 series. We can run the below command & press Enter to Share it with the network
Set-Printer -Name "Brother HL-1110 series" -Shared $True

That’s All and the Printer would be shared to the Network.
NOTE:
1. To verify the changes, issue the command :
Get-Printer | Format-List Name, Shared
The Shared status will be “True”
2. If you want to share the printer with a specific name you can do so with ShareName parameter.
Set-Printer -Name "<Name of the Printer>" -ShareName "<Name of the printer to be shown>" -Shared $True
Lets say , we want the name of Brother printer(i.e “Brother HL-1110 series”) to show up as “Color Printer”(All the devices can see the name as “Color Printer”) we can do so by issuing the following command
Set-Printer -Name "Brother HL-1110 series" -ShareName "Color Printer" -Shared $True
Stop Sharing the Printer
To Unshare the Printer run the below command and hit Enter:
Set-Printer -Name "<Name of the Printer>" -Shared $False
For example , if you want to stop sharing the Brother HL-1110 series printer. Enter the following command:
Set-Printer -Name "Brother HL-1110 series" -Shared $False
To verify the same issue the command
Get-Printer | Format-List Name, Shared
The Shared status will be “False”
Method 5 : From Command Prompt
Step 1: Press the keys Windows+r together to open the Run window.
Step 2: Type cmd and press Ctrl+Shift+Enter together. This opens Elevated Command Prompt(Command Prompt with Admin rights)

To Share the Printer
Issue the following command to share the printer
cscript "%WINdir%\System32\Printing_Admin_Scripts\en-US\prncnfg.vbs” -t -p "<Name of the Printer>" -h "<Name of the Printer to be shown>" +shared
Lets say we want to share the Fax printer from our system.
1. We should know the exact name of the Printer. We can get that using the command
wmic printer get name
Refer to below snapshot

2. Now that we know the name , in this case Fax. We can run the below command & press Enter to Share it with the network
cscript "%WINdir%\System32\Printing_Admin_Scripts\en-US\prncnfg.vbs” -t -p Fax -h Fax_Shared +shared
The inverted commas can be omitted if the Printer name does not contain spaces.
Refer to the snapshot below

NOTE :
For the above command to work:
- The shared name parameter is mandatory ( i.e -h <Name of the Printer to be shown>)
- When the Printer Name and Shared Name contains spaces in their names , example Brother HL-1110 series , make sure it is written within inverted commas “” like “Brother HL-1110 series”
- Sometimes, even when the Printer Name, Shared Name containing spaces is written within inverted commas, system throws an error stating “Description The parameter is incorrect”. In such cases consider renaming the printer with a name without spaces with following command and try again.
cscript "%WINdir%\System32\Printing_Admin_Scripts\en-US\prncnfg.vbs" -z <New_Name_without_Spaces> -x -p “<Current Name of Printer>”
For Example , in our case , we could name the Brother HL-1110 series something like Brother_HL-1110_series
cscript "%WINdir%\System32\Printing_Admin_Scripts\en-US\prncnfg.vbs" -z Brother_HL-1110_series -x -p “Brother HL-1110 series”
To Stop Sharing the Printer
Now issue the following command to Stop Sharing the Printer
cscript "%WINdir%\System32\Printing_Admin_Scripts\en-US\prncnfg.vbs” -t -p "<Name of the Printer>" -shared
Lets us say , we have to stop sharing the printer Fax , we can run the following command:
cscript "%WINdir%\System32\Printing_Admin_Scripts\en-US\prncnfg.vbs” -t -p Fax -shared
The inverted commas can be omitted if the printer name does not contain spaces.

That’s All. Hope this has been informative. Thankyou for Reading.