If you are a huge fan of video games or animations, then seeing the error, Graphics card not detected, is highly going to disappoint you for sure. A Graphics card in your laptop renders an image on to your monitor for a better display quality. To a get a richer gaming experience, an increased performance in 3D applications and software and for a better video and HD experience, we usually tend to invest on a great Graphics card. Under some circumstances, your system may not be able to recognize the graphics card.
There are a variety of reasons that might lead to this error. A faulty graphics card, faulty drivers, GPU slot issues or incorrect BIOS settings can be one of the many reasons. Inadequate power supply can also be a cause. You system might not detect the graphics card either on inserting a new one or it might have stopped detecting the existing one out of the blue.
Read through this article to know how you can fix this issue.
FIX 1 : Check For Hidden Devices
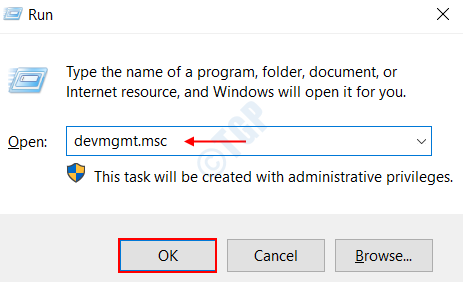
Step 1 : Open up Device Manager on Windows 10. To do so, open up Run dialog by pressing on Windows and R keys together.
Step 2 : Type devmgmt.msc in the textbox as shown below. This will open up the Device Manager window.

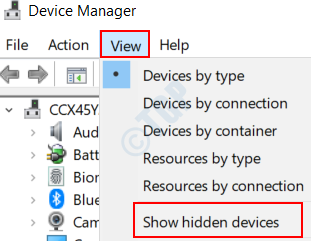
Step 3 : Click on the View Tab in the window that opened up. Now choose the option Show Hidden devices from the list.

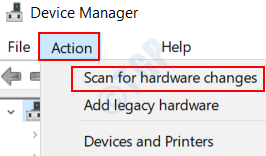
Step 4 : Now navigate to the Action tab and click on it. Choose the option Scan for Hardware changes from the list that opens up.

Step 5 : Check if your graphics card driver under Display Adapters. If it shows up, then you are good to go.

If you dont see the graphics card under Display Adapters, get on to the next fix.
FIX 2 : Check the Graphics Card Slot
The Graphics Card slot that resides inside your motherboard can be a cause of concern in many cases. They may have become faulty all of a sudden due to current and voltage issue. In order to check out for the GPU slot in your system, follow the below given steps.
Step 1 : Turn off your PC.
Step 2 : Open up the back cover of your PC or laptop.
Step 3 : Take a look on to the motherboard and Graphics card slots, like the PCI Express x16 slots.. Turn on the PC and check if the fan associated with the graphics card is running.
Step 4 : If the fan is running, then there isn’t an issue with the slot. Else, try inserting the graphics card in any other slot available, like the AGP slot. Check if the fan runs on turning on the PC.
Step 5 : There are chances that multiple slots might be faulty. Try each of them.
Step 6 : In case if none of the graphics card work on the slot, you may have to consider replacing the motherboard.
FIX 3 : Uninstall Windows Updates
Installing new windows updates may have introduced this bug and may have messed up with your drivers and other inbuilt settings. If you had updated your Windows less than a week ago, then there is an option to uninstall it. To do so, follow the below given steps .
Step 1 : Search for the Settings menu from the Windows Search bar and click on it.

Step 2 : Click on the option Update and Security.

Step 3 : In the Settings page that opens up, click on the option Recovery on the left pane.

Step 4 : You will find a feature named Go back to an Earlier Build. Click on the option Get Started and follow the instructions provided.

Note that this option may be greyed out if you hadn’t done a recent windows update. Get on to the next fix if this doesn’t solve your issue.
FIX 4 : Set up Default Graphics Card
If you have the NVIDIA graphics card installed in your system, then you can follow the below given steps to set the Graphics card in your system to use the default one.
Step 1 : Right click on your desktop and choose the option NVIDIA Control Panel.

Step 2 : In the window that opens up, Click on the tab 3D settings.

Step 3 : On the left pane, you will find the option Manage 3D settings under 3D settings. Click on it.

Step 4 : Click on the tab Program settings on the right pane.
Step 5 : Now choose the program for which will be wanting to use the graphics card for. You can do so by choosing the program from the drop down list under Select a Program to Customize section.

In my case, I have selected Adobe Acrobat as my program to be customized.
Step 6 : Under the section Select the Preferred Graphics Processor for this program, click on the drop down list and choose the option Use global setting ( High Performance NVIDIA Processor ).

Click on the Apply button on bottom and then exit the window.
This will choose the option NVIDIA Processor as the default graphics card for your selected program.
If this works for the program you selected, then follow the same steps for different applications in your system
FIX 5 : Restore the Default BIOS Settings
Restoring the BIOS settings for the graphics card to default can help restore all the GPU settings in your system to their original state. This can help in many cases. To do so, follow the below given steps.
Step 1 : Search for the option Settings from Windows Start Menu and click on it.

Step 2 : Choose the option Update and Security on the page that lands up.

Step 3 : Now, in the left pane, you are required to choose the option Recovery.

Step 4 : On the right pane, you will find the option Restart Now under Advanced Startup.

This will restart the system in a different mode rather than the normal one.
Step 5 : Once the system restarts, you will get a new screen different from the normal login screen. Now, choose the option Troubleshoot from a list under Choose an option menu.

Step 6 : Click on the option Advanced Options under Troubleshoot.

Step 7 : You are now required to choose the option UEFI Firmware settings from the options.

It will prompt you to restart the system. Go ahead with it.
Step 8 : You will find an option Restore Defaults under the tab Save and Exit. These options will differ from manufacturer to manufacturer.
Step 9 : Once you restore the defaults, all the application and program settings will be restored to its original set up. Exit the window and restart your system.
Check if any of the above given methods work out for you. Please feel free to comment in case of any queries.