Whenever you connect multiple USB devices to your system using USB hubs, Windows can suspend some idle USB devices to conserve power. Whenever Windows does exert this action, you will notice the USB device is either very slow or completely unresponsive. But, there are solutions to this issue and you can easily fix this problem.
Basic Workarounds –
1. The first workaround you should try is to restart your computer. If this is a just one-time glitch causing this problem, a simple system restart should fix it.
2. Try plugging in another USB device and test whether Windows is also suspending this. If that’s not the case, then this is a device-specific issue. Follow the Fix
Fix 1 – Disable the Selective Suspend using regedit
Using a registry tweak, you can easily disable the Selective Suspend feature universally on your Windows machine.
1. At first, press the Win key and the R keys together.
2. Then, type this and hit Enter.
regedit
NOTE – You should take a registry backup before you proceed any further. This is to avoid any possible complications created because of this registry edit you are going to perform. It is very easy and you can easily do it this way –
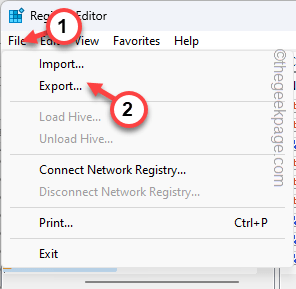
a. After opening the Registry Editor, tap “File” and then, click the “Export” option to create a registry backup.
b. After that, just name this backup and store it somewhere on your system drive.
3. Next, visit this head file following the same pane –
HKEY_LOCAL_MACHINE\SYSTEM\CurrentControlSet\Services\
4. Now, take a look at the sub-keys of Services and find the “USB” sub-header*.
5. If you can find it, select it and look for the “DisableSelectiveSuspend” value on the right-hand pane.
6. Double-click this value so that you can edit it.
7. Then, set the value to “1“.
8. After that, hit Enter from your keyboard to change the value.
NOTE –
What if you can’t see the USB key at all? Then, follow these steps to create all of these.
1. Just, right-click on the “Services” key and tap “New>“, and then on “Key” to create a new key.
2. Name this key “USB“.
3. After that, go to the right-hand pane, right-click on the space, and tap “New>” and “DWORD (32-bit) Value” to create a new value.
4. Then, name the value “DisableSelectiveSuspend“.
5. After that, just double-tap this so that you can edit it.
6. Input the value “1” and click “OK“.
Close the Registry Editor and restart your device.
Once your device restarts, plug in the USB device to the UBS hub and test.
Fix 2 – Toggle the Power Management
Windows has the power to make some USB devices sleep to conserve more power. You can disable these settings.
1. At first, pressing the Win key+X keys together should bring up the context menu.
2. Then, tap “Device Manager” to open it up.
3. Now, just expand the “Universal Serial Bus controllers” device.
4. Then, right-click the “USB Root Hub” and tap “Properties” to access it.
5. Next, head on to the “Power Management” tab.
6. After this, uncheck the “Allow the computer to turn off this device to save power“.
7. Finally, tap “OK” to save this change.
Close Device Manager and test if this feature works.
If this doesn’t work, you can disable the selective suspending feature for your power profile.
Fix 3 – Disable the Selective Suspending feature
You can disable the Selective Suspend feature of the power profile universally for all devices.
1. There is a quick shortcut to reach the Power profile. So, just press the Windows key+R keys together.
2. Then, type this and hit Enter.
powercfg.cpl
3. Now, check which power profile you are using. Then, tap “Change plan settings” to access that.
4. On the next page, tap “Change advanced power settings” to view the advanced power setting.
5. On the Power Options page, locate the “USB settings” feature and click to expand it.
6. Now, tap the “USB selective suspend setting” to expand it.
7. Next, set the Setting to “Disabled” mode.
8. After that, tap “Apply” and “OK” to save the change.
Close the Control Panel page after this. Test if this works.
Fix 4 – Disable and enable USB Root Hub
Try disabling and re-enabling the problematic USB Root Hub to fix the problem.
1. If you search “device” using the search box, you will see the “Device Manager” in the search results.
2. When you reach the Device Manager screen, look for the “Universal Serial Bus controllers“.
3. Here, look out for the affected USB Root Hub device.
4. Then, right-tap the device and tap “Disable device“.
5. You will notice a warning message has appeared. So, tap “Yes” to disable this device.
Returning to the main Device Manager page, close it, and reboot your computer. Rebooting the device reinstalls all the devices at the system startup.
Your problem will be solved for sure.


